

“Writing Romance and Relationships for Visual Narratives”, a two-part webinar with Drew Spence on getting ‘the feel’ right for convincing DAZ-rendered relationship stories in comics, storybooks, slideshows, animation storyboards etc. Booking now.
Category Archives: Tutorials
Vue Solutions
A free Vue Solutions community webinar, 28th November 2021. Booking now.

Learn from top DAZ Store maker and vendor Esha
A new tutoring group, with top DAZ Store maker and vendor Esha, offering ‘in person’ a full up-to-date…
guide for texturing props and clothing, without the usual headaches and hurdles. … we’ve had repeated requests for Esha to teach this topic, so we are starting on Sunday the 28th of November 2021.
Small numbers in the group, for the personal coaching touch. Booking now.

If you can’t afford Substance Painter for this, I imagine that the translation of that part of the tutoring to the similar tool $20 ArmorPaint would not be too difficult.
Installing the Asus Xtion Pro in 2021
I bagged a nice “why-not” eBay bargain on an old Kinect-a-like motion-capture device. Yes, there are still a few real low-price auction bargains from real people to be had there, among the vast herds of re-listers and ‘gadgets from China’ sellers. The Asus Xtion Pro depth-sensing camera is arriving soon. Unlike the early Kinect it’s Windows-friendly and can do good face capture, and unlike a luxury iPhone it doesn’t require a small mortgage and a contract-shackle.

But until it arrives, after much search/research, here are some useful files for getting an old Asus Xtion Pro depth-sensing camera running on Windows. The links and notes may help others.
1. The official Asus drivers ISO are here (V1164_1202.zip), and also the firmware patch (FWUpdate_5_8_22.zip) to enable this camera to use OpenNI 2.0 or higher. (Your Web browser may need to turn off some blockers to see the javascript selection options).
2. Get the ISO unzipped and mounted. WinCDEmu is a good free driverless mounting utility, if your Windows baulks at driver-based ISO mounters. It’s important to note that once installed the firmware will require you also have the Primesense SDK Version 20.4.4.0 installed. The firmware-patched camera can only use OpenNI 2.x with this present. The installer from the ISO should get you this, as you’ll see by checking Uninstall…
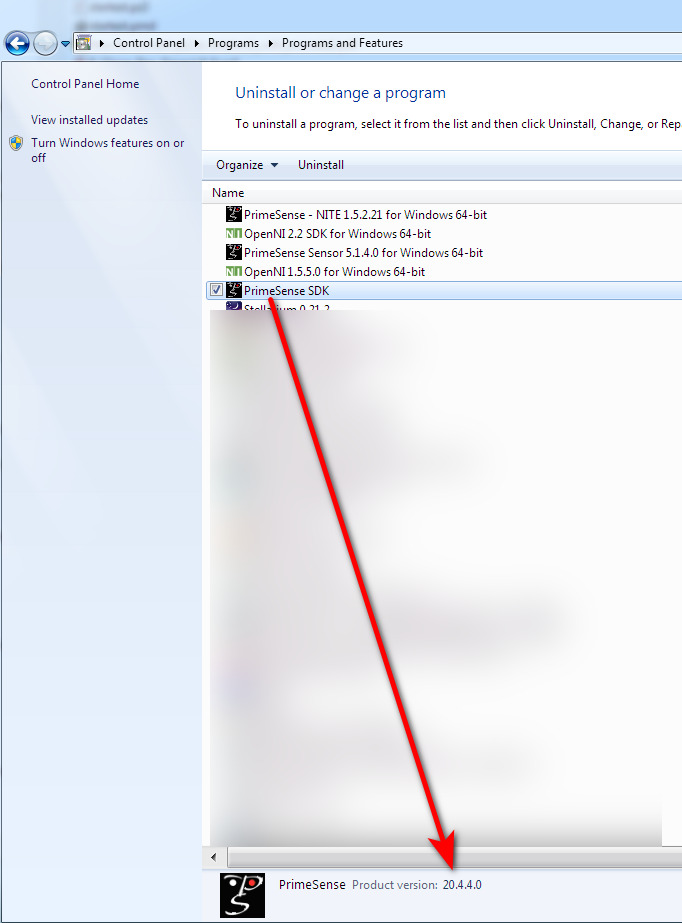
Here there seems to have been some slight confusion, that now needs clearing up. I’m pretty sure that this “Primesense SDK Version 20.4.4.0” is what the official drivers page slightly misleadingly calls the “SDK OPEN NI Package 20.4.2.20 or higher”, from the Asus Xtion Pro’s sensor maker Primesense. There does not actually appear to have been a “OPEN NI Package 20.4.2.20″… and I think OpenNI Windows x64 2.2.0.33 and Primesense SDK Version 20.4.4.0 were confused and conflated by the person writing the driver listing. Easily done.
3. After the ISO install, check in Windows Uninstall to see the above version number is correct. Then connect the camera to a USB 2.0 port. I’m not yet sure what order the following two steps are to be done in:
i) install the updated firmware. Your original model Asus Xtion Pro should now work with OpenNI 2.0 and most motion-capture / robotics / 3D scanning software that requires 2.x.
ii) install the OpenNi 2.x drivers, presumably from your new C:\Program Files\OpenNI2\Driver folder. Possibly Windows will auto-install a driver as soon as the camera is plugged in, in which case you may need to ‘Update driver’ later.
On removing and then plugging back in your camera, the Primesense drivers should then — judging by screenshots from an old Windows 7 install guide — become visible in Windows Device Manager. The device shows as a “Primesense Carmine 1.08” (branded at retail as Asus Xtion).
OpenNI Cookbook has three pages which may help with this part of the process.
4. But the ISO appears to only install OpenNI 1.5.5. Now then… why does the drivers page say it contains the 2.x version? For the moment I’m guessing that the answer is that the Primesense SDK Version 20.4.4.0 may actually contain OpenNI 2.2.0.x within it or perhaps even 2.4.4.x. That would sense for a SDK (software development kit).
But if not, then as I’ve done here, also install OpenNI 2.2 from OpenNI-Windows-x64-2.2.0.33.zip at Stucture.io. This is a worthy community archive and so far as I can tell this appears to be the ‘last good’ version, before evil megacorp Apple stepped in and snaffled all the patents for use with their luxury iPhone.
5. Ok, you may then have something that will enable the camera to work when plugged in. If you look under C:\Program Files you should see these new folders.

If you get conflicts between OpenNI1 and OpenNI2, I guess you just uninstall version 1.
Note that there is also a firmware patch to take the camera’s USB 2.0 to 3.0, though one firmware patch will be enough for me for now. There are also various 32-bit installer versions of the above, if your old software requires 32-bit.
Note also that the Asus Xtion Pro is not to be confused with the Asus Xtion Pro LIVE version, which came out a year later and added an RGB camera to what is otherwise 99.9% the same model. Some old software appears to require Asus Xtion Pro LIVE, and I’ll test if it can run from a ‘firmware-updated Asus Xtion Pro capable of OpenNI 2.x’.
I’ll keep readers informed about progress, and if all this works when the camera arrives and is plugged in.
The original Xtion Pro works with:
* Unity (via various plugins and projects, or DIY your own)
* iPi Recorder + iPi Mocap Studio (body only, round-trips .BVH from Poser and DAZ)
* Fastmocap Professional (export supposedly via .BVH targets for M4 and Poser 6 and 8, body only – but see this Oct 2014 review before buying).
* Visikord (motion-controlled music for VJs, art installations, haunted houses etc).
* UNREAL4MIRROR (Virtual fitting / dressing mirror plugin for Unreal Engine 4).
* “The Claw is an arcade machine with futuristic controls. We replaced the traditional joystick and push button” with the Asus Xtion Pro.
* iClone 5.1 + one of three MoCap Plugins then offered (the latter now deeply unavailable).
* Blender (human motions automatically laid along timeline, to control a water surface).
* Artec Studio (scan 3D objects to meshes).
* Should work with most other object-scanner software. No textures, as that would also require the slightly later Xtion Pro Live’s added RGB camera. But ArmorPaint would do the job on the mesh fairly easily.
* Nuitrack.
* Faceshift (Facial mo-cap. Defunct now, purchased and killed by Apple. Later versions required(?) Xtion Live. But at 2015 they stated “All available cameras which produce good tracking quality are publicly supported by us or will be shortly. In 2015 you could get “a perpetual licence for non-commercial use for $150”, and don’t you now wish you did?).
* Matlab (for science/data analysis).
* GV-3D People Counter (counts the number of people entering a space).
Can also save a capture to an .ONI (OpenNI) file that appears to be .BVH-like… in that it packs all the frames as prerecorded skeleton movement data. This can be loaded to Unity via OpenNIContext. In addition, the .ONI timestamps can be queried with code, it’s said.
Also used in various robotics, medical, science projects etc. It has even been used in farming, as a “3D cow scanner” to detect lameness.
Fitted to some drones by ambitious drone-ers.
Also natively “supports push, wave, and tap gestures” for control of Windows software, and at launch shipped with the Kylo Browser (gesture-based Web browsing). Make “simple rotation gestures to zoom-out and zoom-in”, which sounds like it could get interesting with large digital maps.
At launch in Spring 2012, the list of compatible games included…
* SEGA’s Virtua Tennis 4.
* EA’s Need for Speed: Hot Pursuit.
* Capcom’s Street Fighter 4.
* Rovio’s Angry Birds.
* Beatbooster was a slightly later flagship sci-fi racing/exercise game for the device. Judging by YouTube videos, not one for gamers who dislike motion-sickness. Seems to have vanished.
* Related to games, the TurboTuscany demo. World’s first VR headset with full-body tracking, which used the first Xtion.
Collapsing code in Visual Studio Code
The free desktop PC software Microsoft Visual Studio Code (‘VSC’) is a sort of super Notepad++. It’s what you now want in order to copy-paste coloured code into the Renderosity Python forum, since a recent back-end forum update. Notepad++ on its own can’t do that particular job.
Here’s a handy tip for editing a non-Python Poser file with VSC…
Crtl + K.
Then hands off keyboard.
Then Ctrl + 3.
This collapses the zillion lines of nested code, as you can see here. Much more comprehensible now…
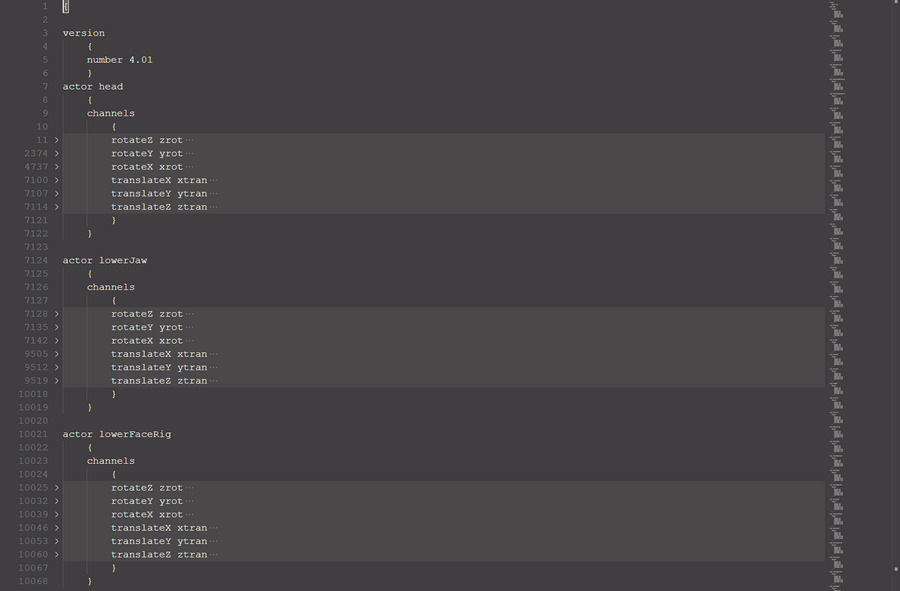
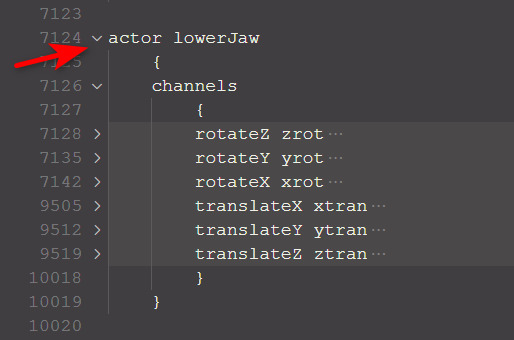
Then Mouseover the blank bit, to reveal the arrows that expand the hidden code block…
Not sure if this also works in Microsoft’s newly launched online version of Visual Studio Code, but it probably does.
Also, in the sidebar of this blog I’ve added links to a couple of free community-made editors for Poser file types (.CR2, .PZ2, etc).
Renderosity Forums URL changes
Renderosity has a new format for Forum URLs. Was…
https://www.renderosity.com/mod/forumpro/?forum_id=12589
or
https://www.renderosity.com//forums/?forum_id=10139
Now…
https://www.renderosity.com/forums/12589
The redirect is automatic, but a bit sticky and often fails. Thus manual fixing of bookmarked URLs is best.
Delete…
mod/forumpro/?
and replace
_id=
with
s/
Sadly the change appears to has bjorked the Python forum. Hopefully a proper code-display module will be plugged into the new forum software, soon.
Update: Copy-and-paste from a proper code editor (not Notepad++) now works. Suggested code editors are Microsoft Visual Studio Code, and PyCharm. Digital Art Live magazine has a two-page guide on how to install and set up the free Visual Studio Code.
Fix the DNS ‘not found’ problem
I’m currently experiencing severe website-lookup problems, effectively blocking my access to about 20% of sites. Especially smaller sites such as David Revoy, HiveWire Forum, GreasyFork, Blender Nation, eTools, Major Geeks, Stack Overflow, Nitter and many others, completely ‘not found’ seemingly due to patchy DNS on all DNS servers. Some are complaining about being unable to register Corel software.

Users of commercial services such as Slack have been very annoyed about being locked out…

It appears to affect Chrome-based browsers only, and is continuing for many sites. So… installing a Firefox based browser (I recommend Pale Moon) should at least get you to the missing sites. No amount of jiggering about with clearing DNS caches and adding new public-DNS addresses will cure the problem, I’ve spent the whole of Saturday morning trying to fix it for the Chrome-based Opera browser.
Update: It’s due to dodgy free root SSL certificates on the sites. Firefox has its own store of these at my end, so it was unaffected. Fixed by installing fresh root certificates. (The Slack outage mentioned above actually appears to have been down to its own stupid DNS jiggering-about, rather than SSL certificates).
Matcap for Poser 11
Matcap for Poser 11. You’re welcome.
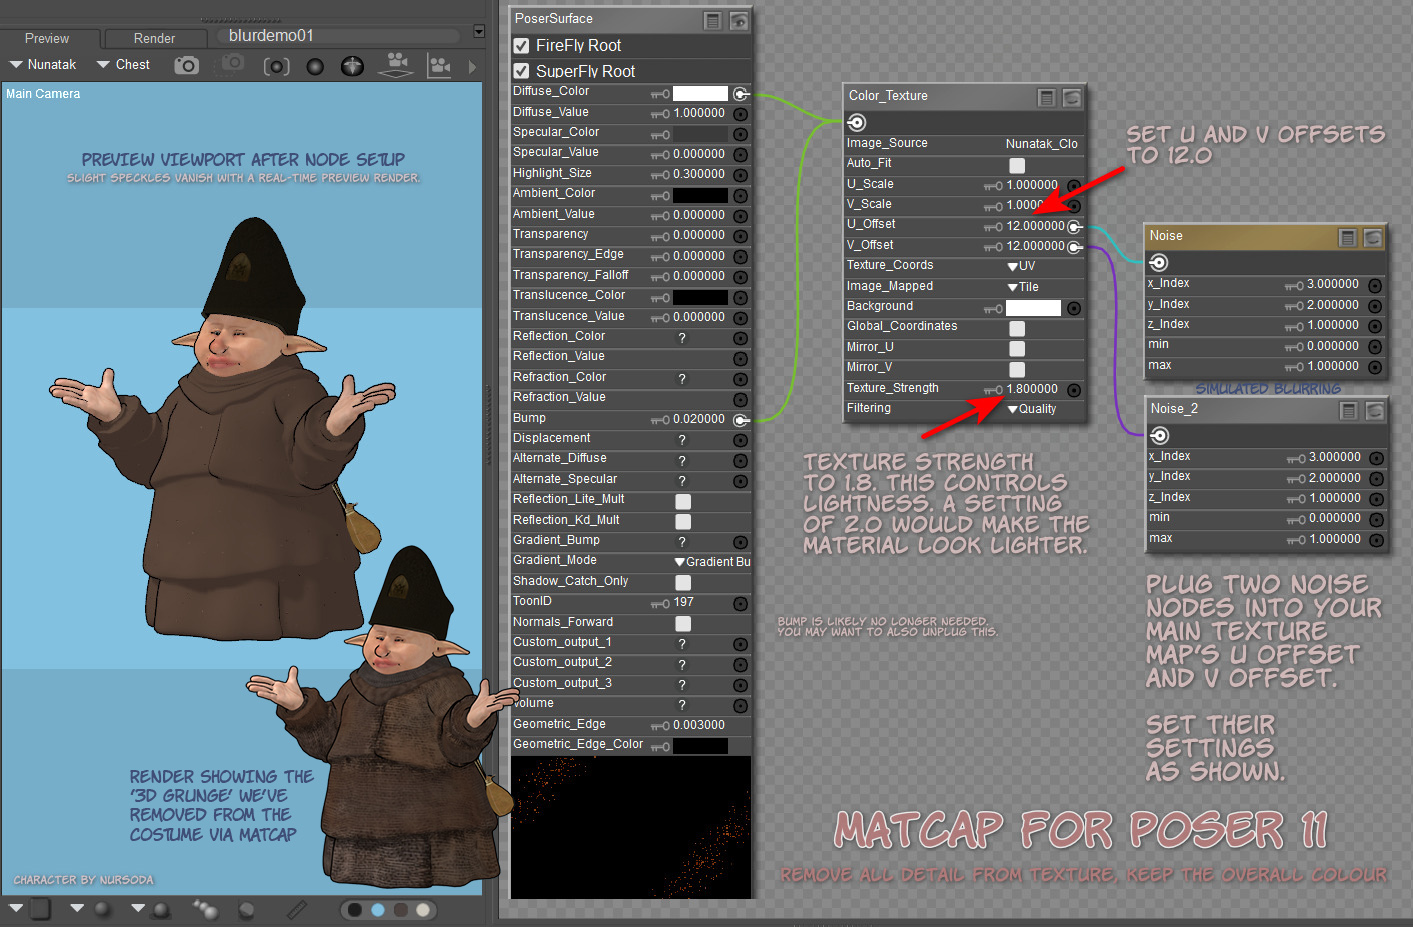
The material is de-grunged, but its overall intended colour is retained. A more suitably artistic texture (i.e. that doesn’t scream ‘3D speckly grunge’ to regular comics readers) can then be subtly added via plugging a hand-inked texture tile into the Alternate Diffuse. Ignore the hat, it’s raw and untouched as yet. And obviously there are some missing ink-lines, that would need hand-inking. And you’d want the inked lines on another layer in Photoshop, and then blend them in better. But you get the idea.

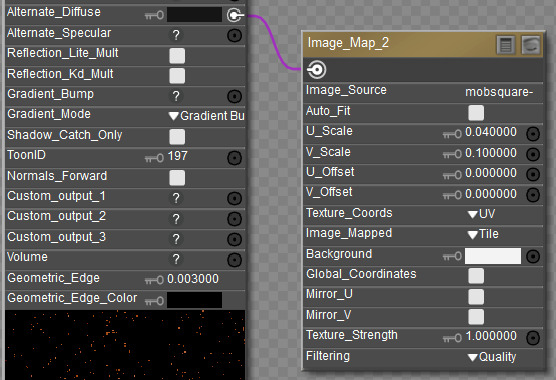
Not for use on eyes, of course, and skin may need a softer treatment. Thus we can’t just have a script blast the entire character.
Can’t think why I didn’t think of it earlier. A basic form of matcap by simply blurring out the existing textures, while keeping the intended colour. You can of course build on this base, and try to develop the more complex forms that the animation industry understands as ‘matcap’, which involve fixed shadows and suchlike.
|
1 2 3 4 5 6 7 8 9 10 11 12 13 14 15 16 17 18 19 20 21 22 23 24 25 26 27 28 29 30 31 32 33 34 35 36 37 38 39 40 41 42 43 44 45 46 47 48 49 50 51 52 53 54 55 56 57 58 59 60 61 62 63 64 65 66 67 68 69 70 71 |
### v.1.0 September 2021. # A quick degrunger script for Poser 11.x. Runs on the current texture # and removes grungy detail, while retaining their averaged base colour. # Not good for skin and eyes, but good for dark grungy and speckly # clothing etc textures. Intended for use with the Poser 11 Comic Book # Preview mode, to get colour flats to go underneath a seperate lineart # render from the same scene. ### import poser scene = poser.Scene() # Test if we have materials even present. mat = scene.CurrentMaterial() if mat: tree = mat.ShaderTree() root = tree.Node(0) # Test if we have a Diffuse_Colour node with something plugged into it. imgmap = root.InputByInternalName('Diffuse_Color').InNode() # Yes we do, so continue with the MATcap process. if imgmap: shaderTree = poser.Scene().CurrentMaterial().ShaderTree() root = shaderTree.Node(0) imgNode1 = root.InputByInternalName('Diffuse_Color').InNode() parameterU = imgNode1.InputByInternalName('U_Offset') uOffset = imgNode1.InputByInternalName('U_Offset') uOffset.SetFloat(12) texStrength = imgNode1.InputByInternalName('Texture_Strength') texStrength.SetFloat(1.3) # Create Noise node and set its paramaters and position noise1 = shaderTree.CreateNode(poser.kNodeTypeCodeNOISE) noise1.SetLocation(230,460) noise1.Input(0).SetFloat(3.0) noise1.Input(1).SetFloat(2.0) noise1.Input(2).SetFloat(1.0) noise1.Input(3).SetFloat(0.0) noise1.Input(4).SetFloat(1.1) # Plug the Noise node into the right slot. shaderTree.AttachTreeNodes(imgNode1,parameterU.Name(),noise1) root = shaderTree.Node(0) imgNode2 = root.InputByInternalName('Diffuse_Color').InNode() parameterV = imgNode2.InputByInternalName('V_Offset') vOffset = imgNode2.InputByInternalName('V_Offset') vOffset.SetFloat(12) texStrength = imgNode1.InputByInternalName('Texture_Strength') texStrength.SetFloat(1.3) # Create another Noise node and set its paramaters and position noise2 = shaderTree.CreateNode(poser.kNodeTypeCodeNOISE) noise2.SetLocation(230,600) noise2.Input(0).SetFloat(3.0) noise2.Input(1).SetFloat(2.0) noise2.Input(2).SetFloat(1.0) noise2.Input(3).SetFloat(0.0) noise2.Input(4).SetFloat(1.1) # Plug the Noise node into the right slot. shaderTree.AttachTreeNodes(imgNode2,parameterV.Name(),noise2) shaderTree.UpdatePreview() scene.DrawAll() else: print 'The current selection is not driven by an Image Map.\n\nThis means it cannot be MATcap-ed.\n\nTry making a selection in the Material Room.' else: print 'Please first select or set up a material in the Material Room.' |
A few G’MIC tips
Note that the free G’MIC will not launch in Photoshop if the layer being filtered has multiple areas of transparency, as you might get from a .PNG render of a 3D scene. In which case, right-click on the layer and ‘Convert to Smart Objects’ first. Then G’MIC will launch for that layer. Apparently the mighty Photoshop still cannot handle more than one area of transparency in a layer, without such a conversion being done. Other similar software has no such problem.
Also, when filtering real-time Poser Comic Book renders for detail, such filtering is usually aided by having good quality (rather than muddy / low-res) textures loaded. Here’s how you do that with a Preview render…
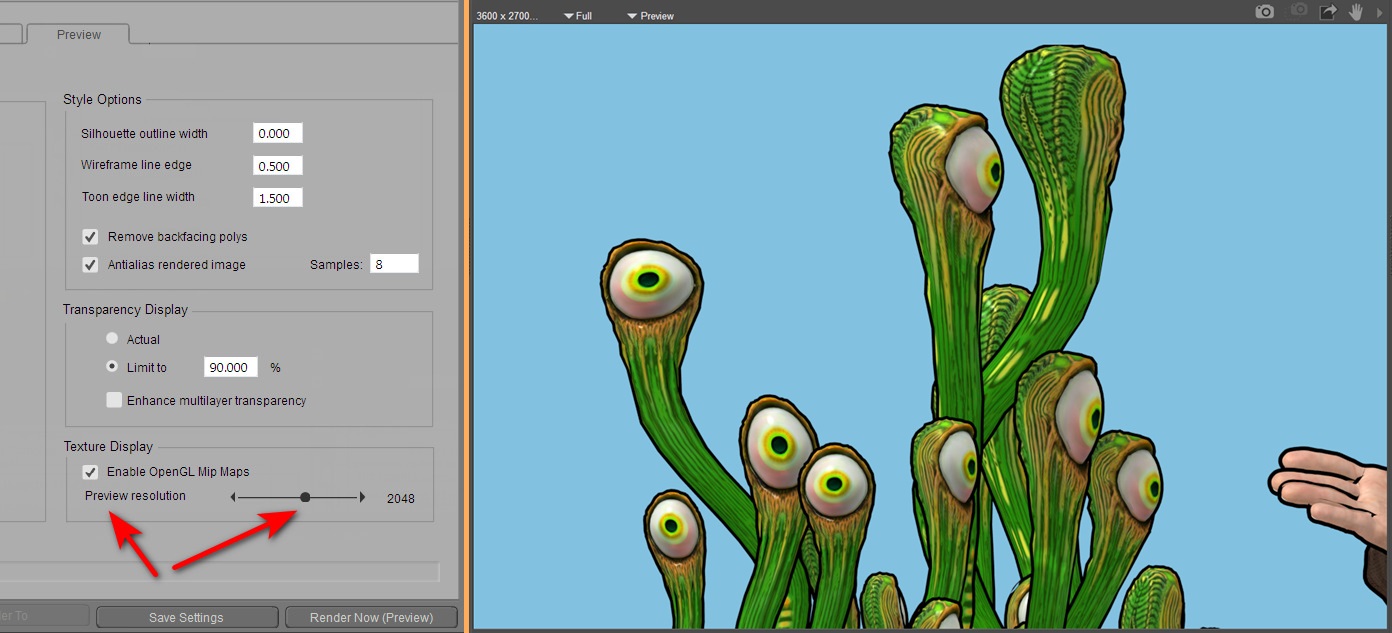
Obviously if you’re instead rendering for a Colour Flats layer in your Photoshop layer-stack, then the low-res textures don’t matter so much. Because you’re going to scour off all that unwanted grunge and noise with Topaz Clean 3.1 or G’MIC’s Comic Book filter. Ready to lay the Lineart layer on top.
“We’re going to need a bigger bucket, Doreen!”
In Poser 11, you may have long relied on your trusty old CPU-rendering Firefly custom render-presets. But they may not have kept up with what your PC can do.
For instance I have a 12-core PC, and so in Edit / Preferences I tell Poser 11 I have 24 threads available for its use (12 cores = 24 threads) when CPU rendering with Firefly.

To speed Firefly up enormously in such a case, I switch the Bucket Size on an old Firefly render preset up to 512. Most likely you have some old presets hanging around too and they are a decade or more old and are perhaps running at a Bucket Size of 32. Or you followed some advice that was that old. 32 was a good safe setting for the days when most people had only 1 or 2 threads available for rendering. Think of it as the size of each bucket of paint that Poser ‘throws’ onto the render canvas, in order to render your picture. Small processing power = small buckets each time.
If your PC can’t handle a big fast Bucket size of 512, I’m guessing you could perhaps try 256 for a 6-core / 12-thread PC with enough RAM. 256 also works well for a modern post-2010 graphics-card render. But beware of setting 512 for a graphics card, as it may well crash your driver on older cards.
“But I use SuperFly now”, you may say. Ah, but can SuperFly do the old-school Firefly lines, or the Firefly ambient occlusion? Here are two presets made very fast on a 12-core PC. Obviously you’re going to choose CPU not GPU on your render settings panel, for these.
Lines:


Ambient Occlusion (turn AO on for scene lights, first):


“Fast” as in… two or three seconds at 1800 pixels. For lines or AO. Obviously if it’s a character with hair and complex bits and inefficient lighting, then it’s going to be a lot slower. But still quicker than otherwise.
The probably applies to other software such as MojoWorld. Make the ancient default bucket-size bigger.
Update: Poser 12 is a bit different, with the move to Cycles 2. CPU users of “adaptive sampling” rendering with SuperFly will apparently paradoxically see better results from quite small bucket sizes.
Color codes for PoserPython coders
A useful Poser colour-code chart for Python coders, at LaTeX Color Definitions. You can see how the colour chart allows you to translate a colour to the three RGB values in a format needed for a PoserPython script. For instance, the chart’s Amethyst purple…

{amethyst}{rgb}{0.6, 0.4, 0.8}
This becomes in PoserPython, with spaces removed…
nodeInput = root.InputByInternalName(‘AlternateDiffuse’)
nodeInput.SetColor(0.60,0.40,0.80)
A mid grey, useful in toning down neon-like Preview colours arising due to a Scatter node plugged into the Alternate_Diffuse, would then be…
nodeInput = root.InputByInternalName(‘AlternateDiffuse’)
nodeInput.SetColor(0.70,0.70,0.70)
Note that some nodes need a _ and some don’t. I’ve no idea exactly why, but perhaps it’s the ‘internal/external name thing’ that Poser has. Thus you’ll see Alternate_Diffuse in the Material room, but it has to be AlternateDiffuse in the script. If one such name doesn’t work in a script, just add or remove the _ and try again.
Possibly there is some colour-wheel freeware somewhere that offers something similar to the chart, but the chart is a nice friendly solution. If saved out as a PDF it can be indexed by your PC’s local keyword search.
‘Save selected’ to a PDF, from your Web browser
How to capture an old abandonware software manual page to PDF, from the deeply buried Internet Archive ‘Wayback’ copy, without the header frame and other unwanted items on the page.
1. Make your selection(s) on the Web page, by the usual click / drag / select.
2. Crtl P on the keyboard, or Menu / Page / Print to open the browser’s printing preview.
3. Choose More Options / Selection Only. Print to PDF.

There are free Web browser add-ons that also let you make multiple selections on the same page, if there is some cruft that you want to skip.
I assume here that your target manual was at one time posted as a single long Web page, as was a common practice ‘back in the day’ for plugins and utilities. For multiple pages you would save them as individual PDFs and then join these into one. (Capturing complex nested manuals for big software, with sidebar panels and many pages, is another matter. But even they can be wrangled to a single PDF in various ways).
Why do this? Because then the clean and streamlined result can be uploaded as a PDF manual to the main Internet Archive, where it will become visible in search-engines.
G’Mic as a Topaz Clean replacement
Update, June 2022: this solution is now broken in the latest G’MIC, due to regrettable changes in the required filter. Should work on G’MIC 3.0.x or lower.
I’ve found a way to just about emulate the Topaz Clean 3 Photoshop plugin, using the free G’MIC filter set in its new Photoshop .8BF form. Since G’Mic also runs on Paint.NET and PhotoLine, it will also work there. I can’t vouch for Krita, as Krita bundles its own variant of G’Mic.
Why is this needed? Because Topaz Clean 3 is no longer sold. Clean was unique and useful for 3D comics people, old manga scanners, and those who wanted to perk up character screenshots from The Sims etc. My specific use case is filtering a ‘colour flats’ base render from Poser, which could be very nicely de-grunged with Clean 3.1 in Photoshop.
This is as close as I can get in 2021 to Clean 3. It uses G’MIC’s standard Artistic | Comic Book filter with the sliders tweaked as you see below. There is also a comparison with the original and the old Clean 3 result. The original render had already been taken some way by using a flat IBL light in Poser, but still had unwanted grunging and speckling.
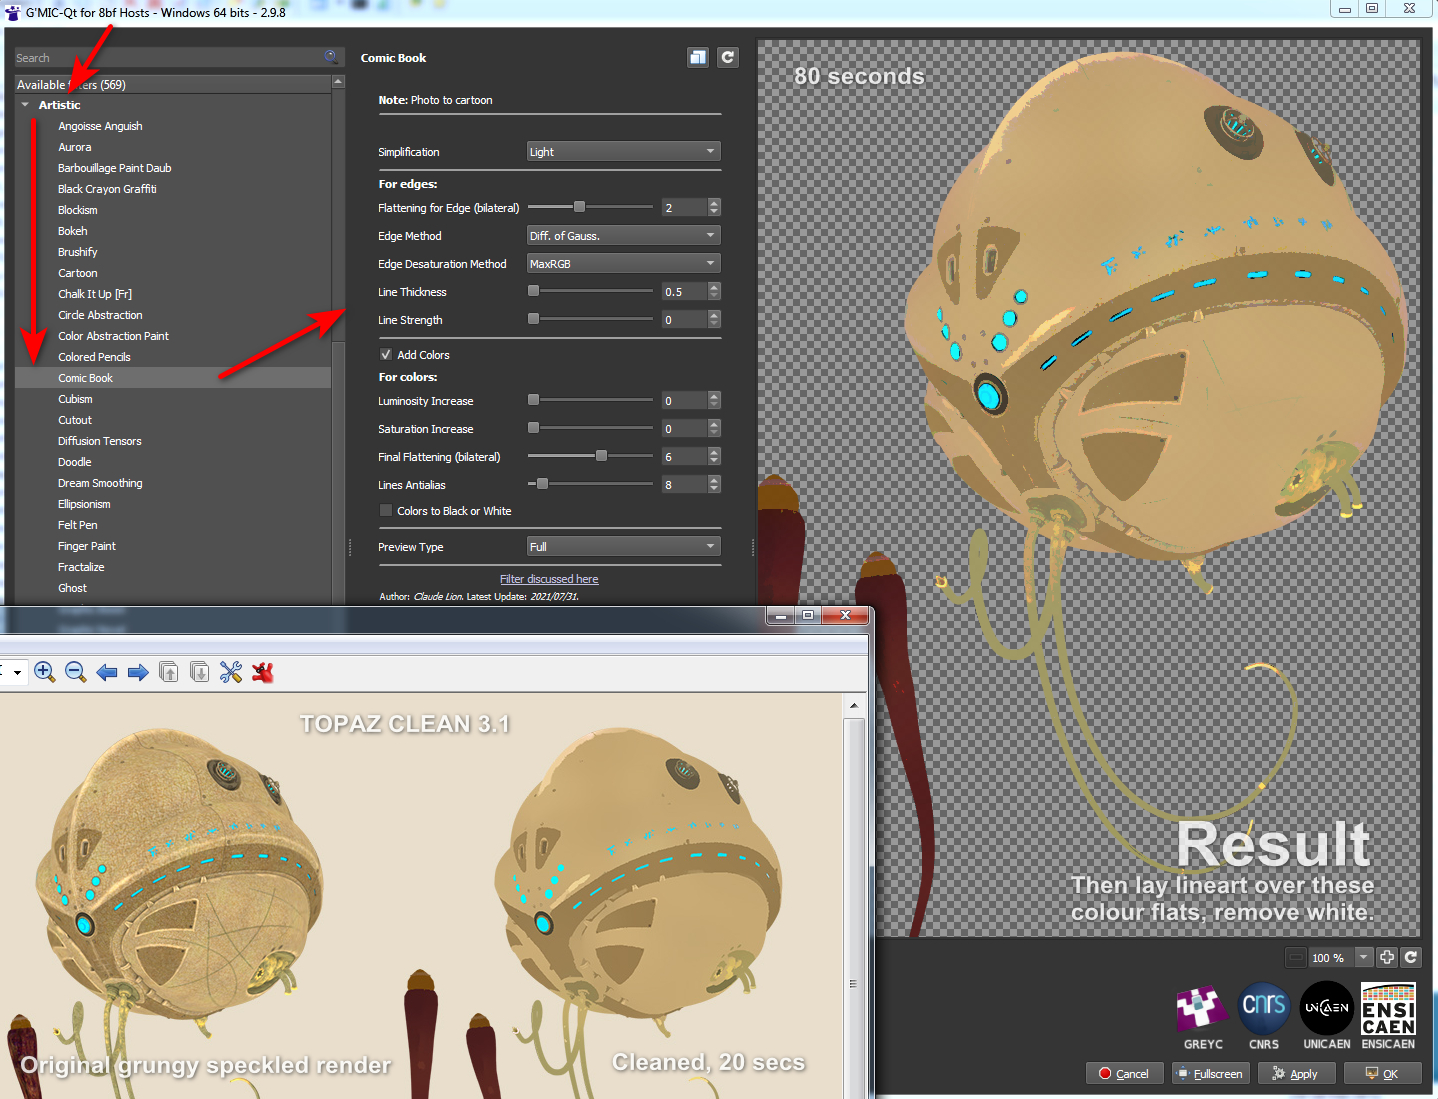
Pretty close, but there are drawbacks:
1. It takes a long time to run, 60 to 80 seconds on a workstation. Compared to a much more nippy 15 to 20 seconds for Topaz Clean 3.1.
2. You cannot take the Comic Book lines off altogether. Their lowest setting is locked at 0.5. This matters little, however, as you’re going to drop a real-time lineart render on top.
3. There are still some artefacts, that seem like posterization of the colours, here and there. Topaz Clean smoothly cleans them away, but G’MIC doesn’t.
But there you go… if you need free and no longer have Topaz Clean 3 for some reason or can’t (cough) find a copy, then this should help with the degrunging job for 3D comics when using layers (colour flats / details / lineart / shadows, all on their own filter-able and editable layers).
And it can do so in a more satisfactory way than the obvious and cringe-y ‘Posterized in Photoshop’ look, or by applying some swirly-blurry mess-filter that destroys edge details. The aim here being to somewhat emulate the crisp ‘paint-bucket’ flats that a professional comic-book colourist might start the colouring process with.
Get a bigger Sketch Designer in Poser 11
Here’s how to get a bigger Sketch Designer window in Poser 11, on a big widescreen desktop. The Sketch Designer default window and its internal preview window-size has not increased since the old days. You can of course, drag the corner…

…and thus enlarge the window. But you have to do that every time. And it doesn’t ‘stick’ between sessions. It’s not ideal.
Let’s fix that, with a perma-fix for those with PCs fast enough to run the larger real-time Sketch preview window.
1. Close Poser 11, if open.
2. In Windows Explorer open the path C:\Users\USER_NAME\AppData\Roaming\Poser Pro\11
3. Find there the file Poser UI PrefMap.xml and copy a backup somewhere safe. Open the original file with Notepad++ and you will see the section…

This is fairly self-explanatory. Set the x and y screen co-ordinates where the Sketch Designer window first pops into existence. Then set how wide and high it draws out onto the screen.
4. Now take a look at how wide your current Sketch Designer window actually is. Here I have 958 x 720…
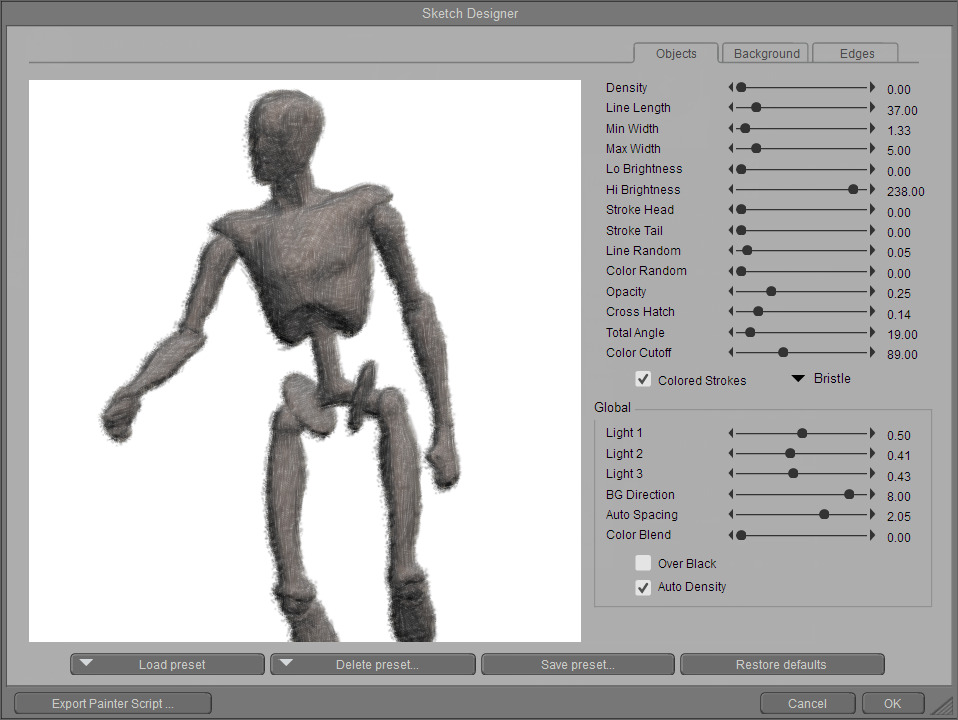
… but that’s not the XML’s default 799 x 600 settings. Ah, but I have a general UI scaling set in Poser Preferences to 1.2. Therefore you will want take this scaling into account, as most users with large desktop monitors will have scaling on. The easiest way to work it out is to grab your calculator and x 1.2 or whatever the scaling you have set. With a 1.2 UI scaling, 1000px becomes 1200px, for instance.
5. But that’s not all. Now we have a larger window opening, the initial window-loading location co-ordinates also need to be changed to re-centre it. In practice, Poser can do this for you. Open Poser with your new settings and position the larger window where you want it on the screen. Close and re-open Poser 11. You will then see that Poser UI PrefMap.xml has changed and Poser has done the added calculations for you…
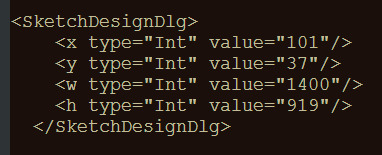
With 1.2 scaling, the above gives you nearly full screen on a 1920 x 1200px monitor. But not too much, and nicely centred. But you can have it whatever larger size you want. I guess you could even have it smaller, and appearing in a corner of the monitor. Those with an ‘extended’ desktop in Windows, and two monitors, might even be able to get it to appear on the second monitor. But that’s just my guess.

The re-sizing you set in the XML is persistent across sessions. Or it is if…
i) you never try to manually resize by dragging on the corner. In which case the magic mega-size sketch window goes “pooot!”, and the factory defaults on the Sketch Designer will be automatically re-instated by Poser.
ii) if you re-run a Sketch preset via Top Menu | Render or Crtl + R, without going back into Sketch Designer first. Not sure why you would want to run the same Sketch preset twice on the same scene, though.
iii) if Poser crashes, then the same thing will happen. It reverts to the old size.
Sadly a Python script cannot re-write the Poser UI PrefMap.xml with the big settings while Poser is running. Once the software has reverted to its hidden internal defaults for Sketch Designer, due to one of the above conditions, no scripted rewrite of the relevant XML block can persuade it to go back to the big window for that session.
So there you go. No more peering into a relatively small Sketch Designer preview window, or having to manually drag and re-size it every time. Just be careful not to revert it. If you do you need to close Poser and fix up the XML again. I now have a Windows .BAT which calls a script that patches the XML automatically.
The other trick to know is to make a quick Preview render and then go straight into Sketch Designer. You then get a Sketch Designer Preview mini-window which ‘looks into’ the render size you just rendered to, which is what you need for designing custom Sketch presets. Because the Sketch effect is render-size dependent. What looks great at 800px wide will look quite different at 1800px, and may have a cut-off edge on the render. Thus you need to design presets at the size you want to render to, and then note the target render size in your saved custom preset (e.g. 1800px_fast__painterly001_run_on_smooth_shaded_with low_lights). As you can see here, it’s also useful to note the speed on your PC, veryfast, fast, 1min, slow, and so on.
How to run Python scripts in Blender
Until today I’ve been a clueless newb when it comes to finding and loading/running the Python scripts that shipped with Blender 2.79. I knew Blender could run Python, but had no idea where to find that in the folders or the UI. Here’s what I learned with Blender 2.76, an older (2016) version needed to access many older free assets in .blend files. All this assumes that you don’t have a weird custom UI embedded in the .blend file you downloaded, which unfortunately is perfectly possible to set up in Blender’s utterly vile UI. In which case you may never find the following items.
Anyway, in Windows a set of free helper (‘template’) scripts are installed to…
C:\Program Files\Blender Foundation\Blender\2.76\scripts\templates_py\
Then in a sensibly set up normal Blender UI, you can find these at…
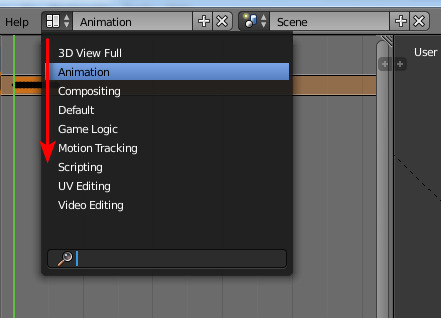
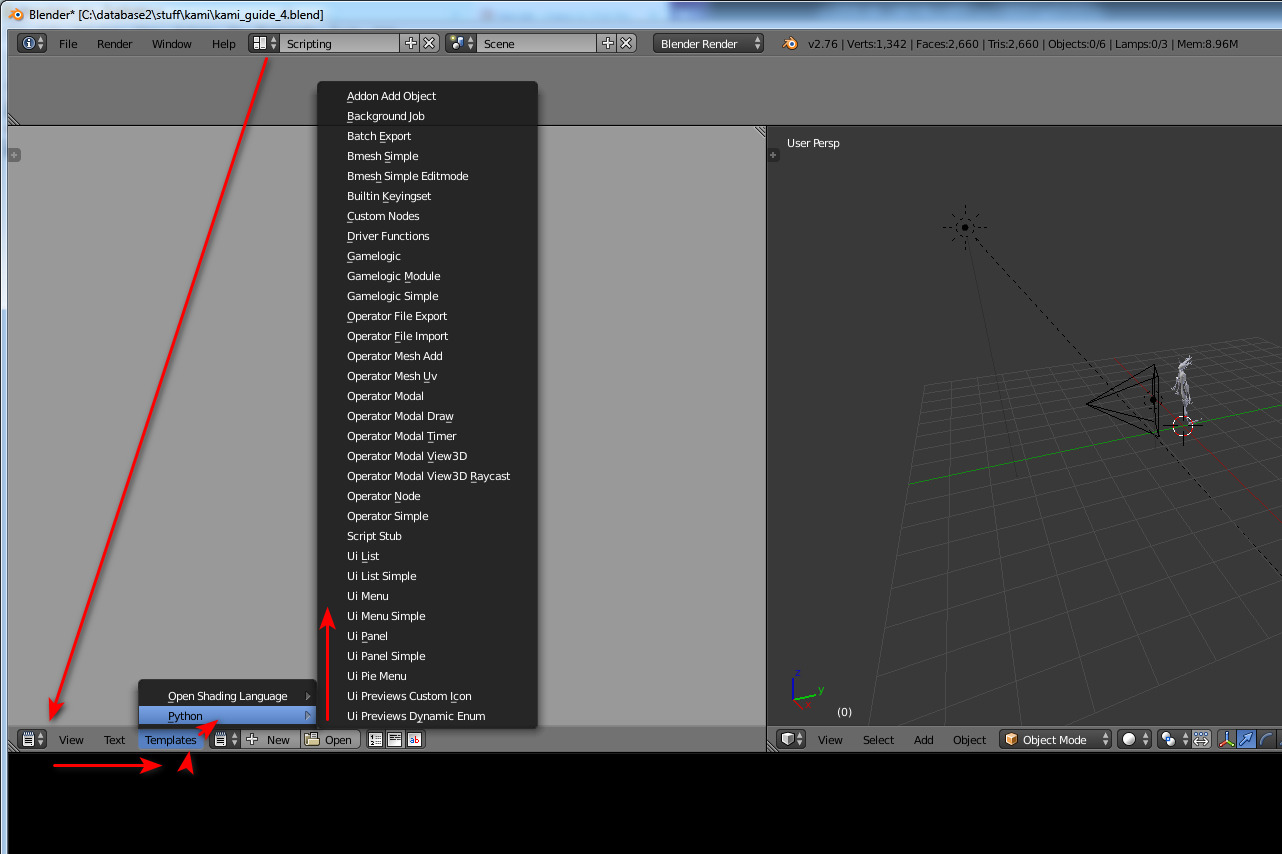
The Animation UI also has access to the same “Templates” menu-item, but it seems the other UI panels do not.
You can also paste your own .PY Python scripts in the above folder, and they will also show up in the UI via the same method. If you only have a few (you’re likely just being forced to use Blender to export from some free .blend files for DAZ or Poser use) then you probably want to prefix their name to get them to the top of the list (e.g. AAA-my_script.py).
Note that you don’t need to re-start Blender after pasting a new script in there (as you do with Poser), in order to see it on the list.
The above then appears to be the somewhat trickier-to-find equivalent of Poser’s Python scripts folder…
C:\Program Files\Smith Micro\Poser 11\Runtime\Python\poserScripts\ScriptsMenu
And of Poser’s rather more obvious Scripts drop-down…

The other and more ‘console-like’ temporary way to test an in-progress script in Blender is to go into Scripting or Animation, as seen above. But then…
1. Click on Text menu label.
2. “Create a Text Block” (Crtl + N).
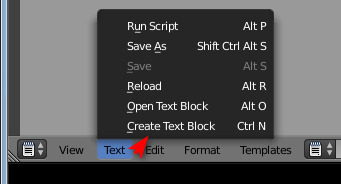
3. You see an empty panel. Here you paste in the script from a plain text editor such as Notepad++.
4. Slide the infernal UI out the way, as it’s likely hiding the ‘Run Script’ button over on the right.
5. Run script (Alt + P). You can also do this by going back into the Text menu, where it is the top command.