Now on the DAZ Store, How to Master Material Zones in DAZ: Tutorial Guide.


Now on the DAZ Store, How to Master Material Zones in DAZ: Tutorial Guide.
After a little wrangling and bashing I was able to get the DAZ 3D Bridge for Photoshop, posted about yesterday, fully running. Including its “Update” and “AutoUpdate” features.
Required:
1. As per my tutorial yesterday, the latest DAZ Studio 4.20.0.17 64-bit, and its latest DS4_3DBridge_1.13.0.17_Win64.exe Bridge. This Bridge then installed to both DAZ 4.20 and to my 64-bit Photoshop 2018. The latter is here superfluous though, as we also need to get another and 32-bit Bridge plugin into Photoshop CS6 to get the Bridge fully functional.
and
2. Photoshop CS6 32-bit, with its 32-bit plugin installed from an old DS4_3DBridge_1.6.2.70_Win32.exe installer I found on an old backup DVD. Note that install of this requires a DAZ Studio 4 32-bit version to be present (I used an old 4.12.x 32-bit), or else the vital Bridge install will be refused. 32-bit parity between the two is important. You may also want your old DAZ 4.12 Pro serial to activate the 32-bit DAZ, though that is probably not needed. No serial was needed for the Photoshop side of the old 32-bit Bridge. No damage was done to my DAZ Studio 4.20.0.17 64-bit by the install of an old 32-bit version over in C:\Program Files (x86)
It’s possible you don’t even need that old 32-bit Bridge installer, as a there’s also a current 32-bit one still available in your DAZ Product Library. The current is DS4_3DBridge_1.13.0.17_Win32.exe

Usage:
Then I just load Photoshop CS6 32-bit, load its 32-bit version of the DAZ Bridge, it will then auto-launch my latest DAZ Studio 4.20.x 64-bit. Then, the 32-bit CS6 plugin can happily talk to the latest Bridge script/camera in the 64-bit latest DAZ Studio. Update and Autoupdate work perfectly. Importing an iRay render into Photoshop also works fine. Use the 3D Bridge camera. I assume it’s all direct script-to-script talk at that point, and thus no .EXE bit-parity is required.
So… the problem appears to have been that everyone had moved on to 64-bit Photoshop, partly breaking the Bridge’s “Update” and “Autoupdate” features. But the current plugin still works fine if you give it a 32-bit Photoshop CS6 with an old 32-bit Bridge plugin located in Photoshop’s plug-ins directory.
I should say that all this happens for me in Windows 7 64-bit, and that later versions of Windows may not be so co-operative.
Also found: the original Bridge PDF User Guide from 2008. Never updated, it seems.
Here’s how to get the free DAZ Bridge running with Photoshop, and streamline a chunk of the workflow with my additional automated script.
1. Download the Bridge.
BRIDGE: Most people will want the 64-bit installer current at DS4_3DBridge_1.13.0.17_Win64.exe and this is working with the latest DAZ Studio 4.20.x. DAZ Studio lacks Poser’s ability to render to a multi-layered Photoshop .PSD, so this is the only official way to get renders over to a layered Photoshop file.
PHOTOSHOP: In this 64-bit case you need a 64-bit Photoshop that also supports 3D. Adobe recently pulled all 3D support from Photoshop, for rather murky reasons. Technically that should not matter, as all we’re doing here is bringing in a 2D render via a Bridge. But you may still want to revert to an older 3D version of Photoshop. The following tutorial assumes Photoshop 2018 on Windows.
2. Install the DAZ bridge. In the installer, you specify the plugins directory for the version of Photoshop you want to target. In this case…
C:\Program Files\Adobe\Adobe Photoshop CC 2018\Plug-ins
3. Once installed, go look in your regular Photoshop’s ..\Plug-ins directory and you should see a new ..\DAZ 3D folder there, and inside that a psdzbridge.8li file. Success.
4. Now load Photoshop. Open the backdrop image (aka ‘background’, aka ‘backplate’) you want as the base layer for your picture, above which your 3D DAZ renders will appear as adjustable layers. Ideally this backdrop is not at some huge size, but rather more like 1800-2400px wide. Then you run the Bridge script thus…

6. The Bridge’s mini UI panel will then appear in Photoshop. DAZ Studio will also be auto-launched at the same time, if it wasn’t already running. Give it time to load. In DAZ you will see you now have a special camera which is being used to get and pass the renders, and you will automatically be looking through that camera.
7. In DAZ, the Backdrop now needs to match the same one you have open in Photoshop. I wrote a script that automatically takes care of all the fiddly steps involved in this: it first invites the user to select and load the same backdrop they’ve already loaded in Photoshop. Ignore other manual switches, as the script will take care of them. This is how you load a backdrop image…

Then, once you’ve done that, the script continues. It auto-sets the Viewport ratio to the new backdrop, then also matches the current render size to it in pixels, and finally it turns off visibility of the backdrop in renders. The script also sets the iRay Max Time (i.e. maximum render time) to 30 seconds.
* Script (save as Photoshop_Bridge_helper_script_for DAZ_Studio.txt and then rename to .dsa).
(I have a tutorial here on how to pin a script to your DAZ UI’s ‘Scripts’ menu).
8. Both DAZ and Photoshop should now have the same auto-magically matched backdrops. Set up your prop or figure in DAZ, via the special Bridge camera, so as to match the backdrop in terms of position and lighting.
For 64-bit users to get a cutout render on transparency, you need to first click “Preview Image”. This doesn’t Preview in 64-bit (see below for details) but does set up “Render to New Layer” to render onto transparency. 32-bit users with CS6 need no such workaround.

In Photoshop and via the Bridge’s mini UI, you then “Render to New Layer”. The resulting render will perfectly match the backdrop in Photoshop, and will also be a cutout on transparency.
And the DAZ render time is now reasonable, taking 30 seconds to get into Photoshop. The seconds can be adjusted at the foot of my script. Adjust the time to as long as you can bear…
// Max Time in seconds
oProperty.setValue(30)
oProperty.getValue()
Yes, sadly 64-bit users have to do a proper full render in DAZ before it’s brought into Photoshop. Because the Bridge’s “Preview” button no longer works in 64-bit. What “Preview” was supposed to do was… “create an image or layer in Photoshop using the current DAZ Studio viewport image.” But for most this no longer works. Bridge now only works fully if you can use this method which involves having CS6 32-bit on a 64-bit system.
Thus for most people the best way to get an iRay render into Photoshop with any speed is to manually cap the render time to just 30 seconds, which my script does for you. At my default of 30 seconds the iRay render’s result is grainy, yes… but that doesn’t matter for me. The aim in Photoshop is “painterly via a filter”. The grain thus gets smushed away by the filter, and the painterly effect is perhaps even helped along a bit by the grain….

Alternatively you could try setting your DAZ engine to use a superfast custom iRay preset you have working with a ninja $1,000 graphics-card, or manually set the near real-time render-engine of OpenGL, after my script has run.
The advantages of rendering to layers over a matched background are various. Layers can be filtered differently or faded out for a ‘depth fog’ effect. Cutout edges can be stroked. Layers can be moved or deleted without having to go back into a big 3D scene. Very large complex pictures can be built, potentially with many elements, without burning out your PC trying to render some DAZ mega-scene all in one go.
That’s it. Enjoy, as the DAZ Photoshop Bridge could have cost you $200 back-in-the-day!
Digital Compositing with DAZ Studio and Photoshop, an eight-week one-to-one group mentoring course led by Vladimir Chopine. It’s a re-run of the longer course he did a while ago, but this one is shorter. Booking now, starts on 4th June 2022.

Redfield Sketch Master, aka Sketchmaster, now in 2018 (v19.01, January 2019). Who knew?

* Still affordable at $40.
* Windows only. I expect it would not be flummoxed by anything back to Windows XP, but that’s just my guess.
* Now multi-core and with a far bigger preview window (and thus slower than before for previews, about on a par with G’MIC). But much faster at 1000px to actually render a preset to your final image, due to the multi-core support. Not so much faster at 3600px, though… maybe 40% faster. But worth having.
* Ships with wholly new presets. Also appears to have a different or more advanced or canvas-scaled engine, but keeps a very similar UI.
* Installs and runs alongside your old 3.3x version. Does not inherit the old custom presets.
* The new version’s engine is no good for humanising 3D line-art, and for that you need the old 3.3x.
* Requires standard 8-bit images (“Last Draw” save-renders from DAZ are 16-bit, and thus require downsampling before filtering).
* Backup and restore of your saved custom presets is done by the same method. They’re stored in the registry, so you save out a Windows .reg file, thus…

If you’re upgrading your PC to a new one, or a new OS, this is how you transfer your Sketch Master presets.
Coming in early/mid June 2022, a two-part webinar on working with material zones in DAZ Studio.
My EZ Skin 3 post, with mini-tutorial and advice, has been updated. Including links. It’s also now available in a version for Poser 12.
There are plenty of bits of software that will take this sort of lineart and filter it. This unfiltered example of source lineart is from Poser 11, with the real-time comic book option set to b&w and simple lighting.

Such lineart can be filtered by, for instance, the free G’MIC which has a big range of filtering options. The new G’MIC 3.1 will be out for Photoshop in a few days, and will add another comic-oriented filter. Then there’s Digital Auto-Painter (DAP), though only its graphic-novel preset is of real use for lineart — and with a bit of twiddling that can be emulated with the free G’MIC. A nice one I rate is Redfield’s Sketchmaster, especially if you want a kind of soft pastels look. Some people even work wonders with the native Photoshop filters, chaining them together in an Action. AKVIS Charcoal I tried some years ago, and though kind of nice it was slow. It may have improved since.
Topaz Clean 3 is also useful for cleaning off the bump-map and muddy-texture grunge, prior to any filtering. That can also be emulated with the free G’MIC. Though the sadly-discontinued Topaz Clean 3 is more than twice as fast, on what is a very slow process.
Now I’ve found another new way of filtering. I discovered that the maker of DAP had launched a new Style Animator 1.0 at $40. It vectorizes lineart, and can then apply a preset style. Kind of like SketchUp’s line styles, which many readers will be familiar with. I tried it, it’s nice, it works, but… is somewhat limited in its range.
Yet the idea of Style Animator 1.0 led me to discover software that’s been hiding in plain sight for the last 20 years. So much so that I don’t think it’s ever had a review. At least, I can’t find one. It’s Synthetik Studio Artist, which is from developer John Dalton and recently had a major update to 5.5.5. If the $40 Style Animator is a cute little furry Bush Baby, then the $200 Synthetik Studio Artist is a massive chest-beating 500lb Mountain Gorilla. And just as fearsome to approach, as it’s not easy software to learn despite the 560-page manual and a wealth of video tutorials. ‘Autopainter’ it may be… but it sure takes some getting used to. Yet recent intensive testing shows it has at least half a dozen great possibilities ‘out of the box’, when fed Poser lineart. When I say great I mean ‘looks relatively hand-made, without being cheesy’. The next edition of VisNews will have the details.
There’s a generous non-expiring free trial for it, and I’ve made two free preset actions for it which are on Dropbox.
1. Open File | New Source and Canvas (Ctrl + N), and select some Poser lineart.
2. Type number 100 in the h Mult box on the import parameters, to get the Canvas the same size as the Source image you’re loading onto it. Sadly this step can’t be automated.
3. Run one of my preset actions. If you loaded a .PNG with an alpha mask, then run the main action. If you loaded a render from Poser’s Sketch (no alpha possible), then run the Sketch one.
4. Either should result in the output of a cleanly masked .PNG file , when you use “Save Canvas as…” to save a .PNG file.

The Poser inks after my preset

A Poser Sketch render after my preset
There are of course just starting points. The idea is you bring the output into Photoshop. Output should be the same size as the source, and so easy to composite. Here G’MIC has added a finishing touch, seen most clearly on the toes. Not one line of this was inked by hand…

Figure is ‘BioBot’ by AntFarm.
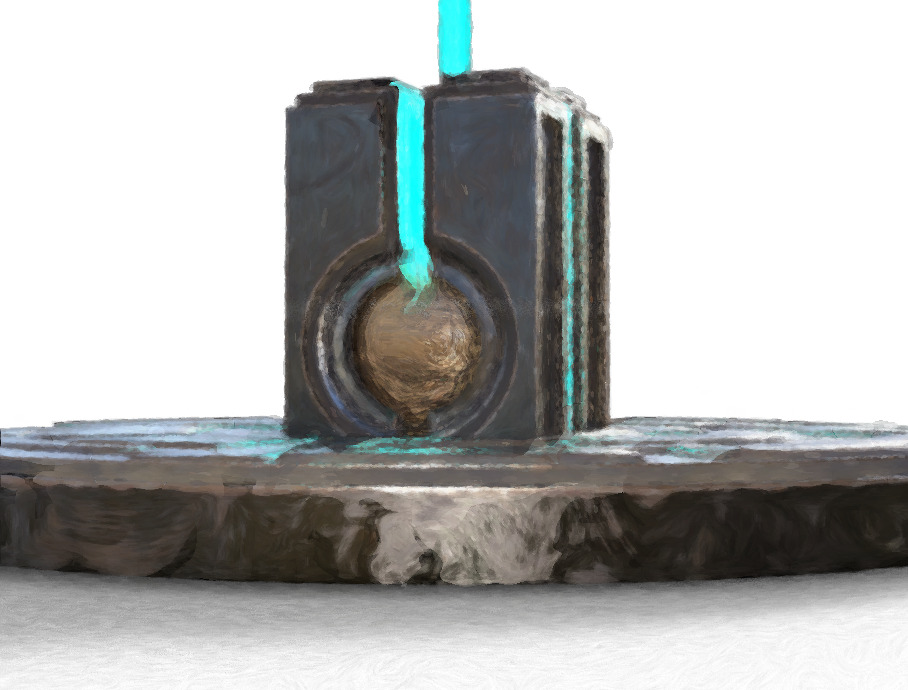
I’ve finally found and hacked a working way to have a script apply a single shader across multiple surfaces in DAZ. Many hours of searching and testing finally surfaced Mcasual’s free mcjSelectTheseMats. This will do the job in DAZ 4.12.x, with a few custom adjustments. I’m amazed no-one has made such a script for this basic task, until now. Here is my working tweak to extend the ‘mcjSelectTheseMats’ script.
SelectTheseMats_ApplyShader.txt (download, rename to be a .DSA script)
This selects the named base figure in the scene, then makes sure he is really selected, then selects and highlights all the non-eye surfaces of the ‘Genesis 2 Male’. Adjust as desired for your likely target figure (e.g ‘Genesis 8 Female’. There is also a naming convention which handles having two or more Genesis figures of the same base type in a scene).
The resulting script auto-selects all the required surfaces. This part works even if something else entirely is selected in the scene, when the script is run, e.g. a light. It also doesn’t matter if the target figure is named ‘Fluffy Bunny’ etc in your runtime, the DAZ scene only sees and knows him as a ‘Genesis 2 Male’.
Then at the end of the script, I added two lines to apply the chosen shader to the selected surfaces. Obviously you will need to adjust the path to your desired shader and file and then save the script.
With this script in hand you can then theoretically build it into a larger multi-pass ‘render, load and repeat’ script. By having the script make an automatic render after each new shader is applied. It would be ‘shader-based’ multi-pass, rather than ‘render-engine based’ multi-pass.
Obviously the script as it stands is not the ‘apply to all surfaces in a scene, except those identified as eyes’ I initially wanted, but it works and goes a long way toward it.
Also, this was the short non-working version that I wrestled with for a long time. Theoretically it should work, but it doesn’t select the surfaces, only applies the shader to any already-selected surfaces…
var figure = Scene.findNodeByLabel( “Genesis 2 Male” );
figure.select( true );
var sPathToFile = “C://my_folder/my_shader.duf”;
App.getContentMgr().openFile( sPathToFile, true );
It may save someone else the trouble in the future.
Vital advice from Warlord at Renderosity, “Making Video Tutorials – Staying on Point”. I suspect I know the recent two-hour slog-a-thon which may have triggered his article, as I saw that one too.
“Practice”, yes, as he stresses. And I’d add that also from practice comes your timing. Don’t spend ages on introductions and ‘Computer Graphics classroom’ theory about isometroptical flange-widgets and how vertex pixel-wiggling happens (that no-one will remember or ever use). Only to run out of time to present the actual useful knowledge for the software in question (i.e. ‘find X here, set Y here, then press this, not that’) that people are waiting for. In such situations you then have to cram it all into four garbled minutes while skipping lots of the juicy stuff. Practice and timing helps you bypass such problems, because you know in advance if it will all fit in the time available.
Also vital advice from Warlord…
Show a clip at the beginning of the tutorial demonstrating the final result.
Good microphones and levels are also a ‘must have’.
I’d add that “can we keep questions to the end please” is also useful to prevent interruptions and sidetracking during a ‘live room’ presentation. A variant for webinars is “questions at the end of each segment, please” although such things can also be done in other ways.
“Writing Romance and Relationships for Visual Narratives”, a two-part webinar with Drew Spence on getting ‘the feel’ right for convincing DAZ-rendered relationship stories in comics, storybooks, slideshows, animation storyboards etc. Booking now.
A free Vue Solutions community webinar, 28th November 2021. Booking now.

A new tutoring group, with top DAZ Store maker and vendor Esha, offering ‘in person’ a full up-to-date…
guide for texturing props and clothing, without the usual headaches and hurdles. … we’ve had repeated requests for Esha to teach this topic, so we are starting on Sunday the 28th of November 2021.
Small numbers in the group, for the personal coaching touch. Booking now.

If you can’t afford Substance Painter for this, I imagine that the translation of that part of the tutoring to the similar tool $20 ArmorPaint would not be too difficult.
I bagged a nice “why-not” eBay bargain on an old Kinect-a-like motion-capture device. Yes, there are still a few real low-price auction bargains from real people to be had there, among the vast herds of re-listers and ‘gadgets from China’ sellers. The Asus Xtion Pro depth-sensing camera is arriving soon. Unlike the early Kinect it’s Windows-friendly and can do good face capture, and unlike a luxury iPhone it doesn’t require a small mortgage and a contract-shackle.

But until it arrives, after much search/research, here are some useful files for getting an old Asus Xtion Pro depth-sensing camera running on Windows. The links and notes may help others.
1. The official Asus drivers ISO are here (V1164_1202.zip), and also the firmware patch (FWUpdate_5_8_22.zip) to enable this camera to use OpenNI 2.0 or higher. (Your Web browser may need to turn off some blockers to see the javascript selection options).
2. Get the ISO unzipped and mounted. WinCDEmu is a good free driverless mounting utility, if your Windows baulks at driver-based ISO mounters. It’s important to note that once installed the firmware will require you also have the Primesense SDK Version 20.4.4.0 installed. The firmware-patched camera can only use OpenNI 2.x with this present. The installer from the ISO should get you this, as you’ll see by checking Uninstall…
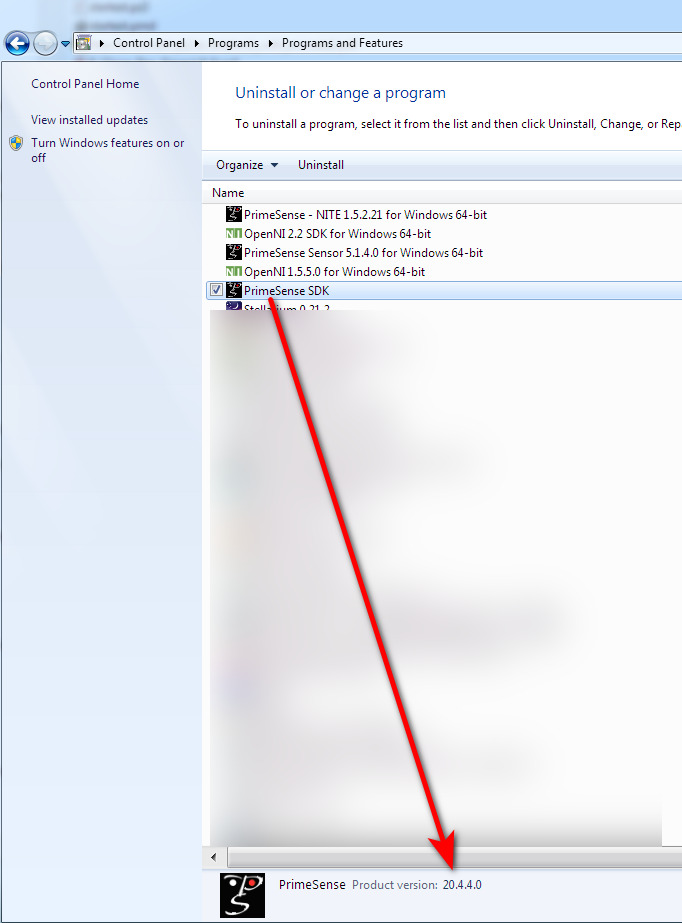
Here there seems to have been some slight confusion, that now needs clearing up. I’m pretty sure that this “Primesense SDK Version 20.4.4.0” is what the official drivers page slightly misleadingly calls the “SDK OPEN NI Package 20.4.2.20 or higher”, from the Asus Xtion Pro’s sensor maker Primesense. There does not actually appear to have been a “OPEN NI Package 20.4.2.20″… and I think OpenNI Windows x64 2.2.0.33 and Primesense SDK Version 20.4.4.0 were confused and conflated by the person writing the driver listing. Easily done.
3. After the ISO install, check in Windows Uninstall to see the above version number is correct. Then connect the camera to a USB 2.0 port. I’m not yet sure what order the following two steps are to be done in:
i) install the updated firmware. Your original model Asus Xtion Pro should now work with OpenNI 2.0 and most motion-capture / robotics / 3D scanning software that requires 2.x.
ii) install the OpenNi 2.x drivers, presumably from your new C:\Program Files\OpenNI2\Driver folder. Possibly Windows will auto-install a driver as soon as the camera is plugged in, in which case you may need to ‘Update driver’ later.
On removing and then plugging back in your camera, the Primesense drivers should then — judging by screenshots from an old Windows 7 install guide — become visible in Windows Device Manager. The device shows as a “Primesense Carmine 1.08” (branded at retail as Asus Xtion).
OpenNI Cookbook has three pages which may help with this part of the process.
4. But the ISO appears to only install OpenNI 1.5.5. Now then… why does the drivers page say it contains the 2.x version? For the moment I’m guessing that the answer is that the Primesense SDK Version 20.4.4.0 may actually contain OpenNI 2.2.0.x within it or perhaps even 2.4.4.x. That would sense for a SDK (software development kit).
But if not, then as I’ve done here, also install OpenNI 2.2 from OpenNI-Windows-x64-2.2.0.33.zip at Stucture.io. This is a worthy community archive and so far as I can tell this appears to be the ‘last good’ version, before evil megacorp Apple stepped in and snaffled all the patents for use with their luxury iPhone.
5. Ok, you may then have something that will enable the camera to work when plugged in. If you look under C:\Program Files you should see these new folders.

If you get conflicts between OpenNI1 and OpenNI2, I guess you just uninstall version 1.
Note that there is also a firmware patch to take the camera’s USB 2.0 to 3.0, though one firmware patch will be enough for me for now. There are also various 32-bit installer versions of the above, if your old software requires 32-bit.
Note also that the Asus Xtion Pro is not to be confused with the Asus Xtion Pro LIVE version, which came out a year later and added an RGB camera to what is otherwise 99.9% the same model. Some old software appears to require Asus Xtion Pro LIVE, and I’ll test if it can run from a ‘firmware-updated Asus Xtion Pro capable of OpenNI 2.x’.
I’ll keep readers informed about progress, and if all this works when the camera arrives and is plugged in.
The original Xtion Pro works with:
* Unity (via various plugins and projects, or DIY your own)
* iPi Recorder + iPi Mocap Studio (body only, round-trips .BVH from Poser and DAZ)
* Fastmocap Professional (export supposedly via .BVH targets for M4 and Poser 6 and 8, body only – but see this Oct 2014 review before buying).
* Visikord (motion-controlled music for VJs, art installations, haunted houses etc).
* UNREAL4MIRROR (Virtual fitting / dressing mirror plugin for Unreal Engine 4).
* “The Claw is an arcade machine with futuristic controls. We replaced the traditional joystick and push button” with the Asus Xtion Pro.
* iClone 5.1 + one of three MoCap Plugins then offered (the latter now deeply unavailable).
* Blender (human motions automatically laid along timeline, to control a water surface).
* Artec Studio (scan 3D objects to meshes).
* Should work with most other object-scanner software. No textures, as that would also require the slightly later Xtion Pro Live’s added RGB camera. But ArmorPaint would do the job on the mesh fairly easily.
* Nuitrack.
* Faceshift (Facial mo-cap. Defunct now, purchased and killed by Apple. Later versions required(?) Xtion Live. But at 2015 they stated “All available cameras which produce good tracking quality are publicly supported by us or will be shortly. In 2015 you could get “a perpetual licence for non-commercial use for $150”, and don’t you now wish you did?).
* Matlab (for science/data analysis).
* GV-3D People Counter (counts the number of people entering a space).
Can also save a capture to an .ONI (OpenNI) file that appears to be .BVH-like… in that it packs all the frames as prerecorded skeleton movement data. This can be loaded to Unity via OpenNIContext. In addition, the .ONI timestamps can be queried with code, it’s said.
Also used in various robotics, medical, science projects etc. It has even been used in farming, as a “3D cow scanner” to detect lameness.
Fitted to some drones by ambitious drone-ers.
Also natively “supports push, wave, and tap gestures” for control of Windows software, and at launch shipped with the Kylo Browser (gesture-based Web browsing). Make “simple rotation gestures to zoom-out and zoom-in”, which sounds like it could get interesting with large digital maps.
At launch in Spring 2012, the list of compatible games included…
* SEGA’s Virtua Tennis 4.
* EA’s Need for Speed: Hot Pursuit.
* Capcom’s Street Fighter 4.
* Rovio’s Angry Birds.
* Beatbooster was a slightly later flagship sci-fi racing/exercise game for the device. Judging by YouTube videos, not one for gamers who dislike motion-sickness. Seems to have vanished.
* Related to games, the TurboTuscany demo. World’s first VR headset with full-body tracking, which used the first Xtion.
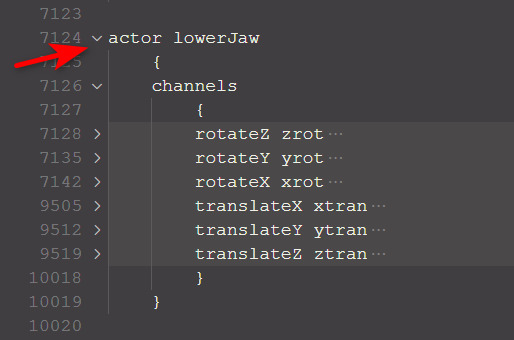
The free desktop PC software Microsoft Visual Studio Code (‘VSC’) is a sort of super Notepad++. It’s what you now want in order to copy-paste coloured code into the Renderosity Python forum, since a recent back-end forum update. Notepad++ on its own can’t do that particular job.
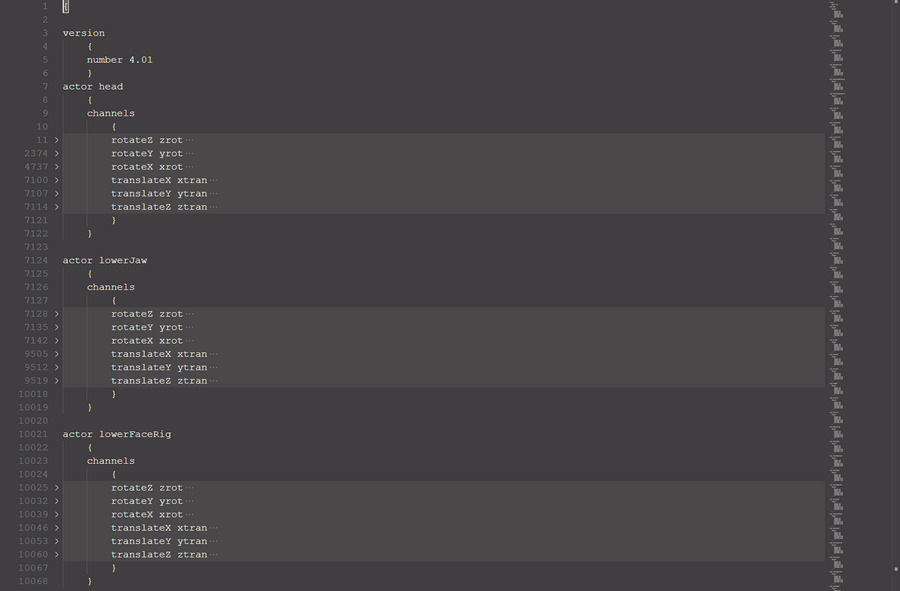
Here’s a handy tip for editing a non-Python Poser file with VSC…
Crtl + K.
Then hands off keyboard.
Then Ctrl + 3.
This collapses the zillion lines of nested code, as you can see here. Much more comprehensible now…
Then Mouseover the blank bit, to reveal the arrows that expand the hidden code block…
Not sure if this also works in Microsoft’s newly launched online version of Visual Studio Code, but it probably does.
Also, in the sidebar of this blog I’ve added links to a couple of free community-made editors for Poser file types (.CR2, .PZ2, etc).