Templum is a new digital arts magazine, now inviting submissions for the second issue. Quite painter-y, but probably open to those who overpaint their DAZ Studio and Poser renders.

Templum is a new digital arts magazine, now inviting submissions for the second issue. Quite painter-y, but probably open to those who overpaint their DAZ Studio and Poser renders.

Micheal 5, the new Genesis-enabled version of Micheal for DAZ Studio, has just been released.

Send your DAZ Studio characters to Hell Blender, with a brand new tutorial and pipeline overview researched and written by Jon Hallier. The Blender guys are of course working on the free Make Human software, which is current stuck at alpha 0.6. But until Make Human becomes usable, Exporting DAZ Studio 4 figures to Blender might come in handy.
DigiTech has posted a lengthy new whitepaper/tutorial on pipelining customised character assets for the popular free Unity game engine, based on DAZ Studio exports…
“This tutorial presents an asset pipeline, and design and code analysis information, to support the character customization workshop project download [available] for Unity game engine. […] The character customization workshop provides a foundation for a startup individual or small team of developers to begin introducing character management to their games.”
A global search-and-replace operation had messed up the links on my DAZ Training Videos page. Apologies for that. All fixed now.
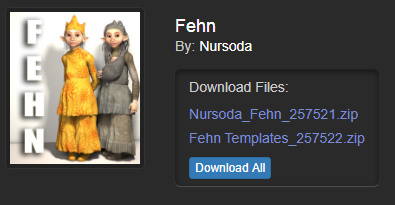
Any new standalone figure from Nursoda is welcome. They are always of excellent quality, and have immense amounts of character. So it’s great news that he’s just launched another excellent characterful older female character called Aina…

Nursoda’s freestuff website has also updated with a fab set of free poses for Aina and his popular Hein figure…
Rampa has posted a file that gives a better starting t-pose, for use in exporting FBX characters from DAZ Studio to iClone using the new 3DXchange5 Pro.
DAZ’s Micheal 5 character is almost ready for release, to join the existing Victoria 5 as DAZ’s flagship male/female characters. This is a preview of what he’ll look like…


Hair taking too long to render? Damage Inc. has just posted a new free 35 minute video tutorial on how to add hair to your DAZ Studio or Poser render, by painting it in with Adobe Photoshop…
The new 3DXchange 5 Pro conversion tool is out. Here’s how to convert and auto-rig a DAZ Studio character, for use in the real-time software iClone…
This new version of iClone converts to the standard iClone format, so characters can accept all standard motions files. A version that can also convert for facial animation will be available soon.
A new original-figure Sherlock Holmes figure and clothes, “Holms” on the Renderosity store. There’s a nasty little copyright troll laying a shaky claim to the Sherlock Holmes name in the USA, which is presumably why this character has been given a slightly different name.


The poses for him only work in Poser. It’ll be interesting to see if these clothes can also be made to fit the excellent Doctor Pitterbill standalone character. He seems to be missing a bow-tie, but there are several such to be found floating around the Web.
I always enjoy those whacky/out-of-the-way DAZ Studio or Poser packs, if they’re well made. Quality model maker The AntFarm has just released one such, “Artifacts”, on the DAZ Store. Two authentic-looking ancient masks…

The third-party high-quality renderer LuxRender hits version 1.0. LuxRender is available for either Poser or DAZ Studio.
NyaNyan’s new “Mirei Anime and Toon Style Shader” for DAZ Studio 4 (not Poser) is now available on the DAZ Store, at $17.47…
“Mirei is a anime toon style shader for DAZ Studio 4. You can use this for making anime manga style illustration.”
It looks promising…

…but I think I’ll be waiting on the video and reviews, showing how easy it is too apply, before I consider a purchase. Five clicks, yes. Five hours of wrangling materials, no.
Not to be confused with Bishounen Taurus’s long-awaited manga-style graphic-novel shaders, which are also due for release very soon.
You may have wondered if there’s a formula for varnishing and overpainting a paper print of a digital artwork. This is done with transparent paint, in order to make the print appear to the untrained eye as if it’s a painting. If done with skill, this potentially makes the work more saleable via small galleries, or enterable into regional competitive shows. Subtle blended use of a Photoshop paint filter layer, on a DAZ Studio or Poser picture, may also help enhance the final painterly effect. Below is one formula on how to go about this process:
The materials:
From an online retailer and/or your local art supply shop you will need…
* A set of proper artist’s synthetic paint brushes, suitable for acrylic paint. Read up on what each type of brush is used for.
* Face mask, goggles, and disposable protective gloves.
* Some small pallette boards for mixing paint, some old jars, and a brush cleaner solution suitable for acrylic paints.
* Suitable masking tape with a firm and even grip, a good-sized heavy wooden back-board, old newspaper sheets or rough sugar-paper.
* 1 x 400ml aerosol can of Golden Archival Varnish (Gloss).
* 1 x 400ml aerosol can of Golden Archival Varnish (Satin).
* 1 x Golden Soft Gel Gloss transparent paint.
* 1 x Golden Heavy Gel Gloss transparent paint.
* Acrylic coloured paint tubes. White for highlights, and a range of suitable colours to tone down the white.
As you can see, starting off down this route is by no means a cheap option. As with most “real media” arts, it’s a rich person’s game. Expect to pay a good deal “up front” for quality materials and disposables, on top of the cost of a getting a good large print of archival quality made on “canvas” paper. Then consider the cost of framing. Not much room for a profit margin after that lot, unless you can charge the sort of prices that make people frown and tut in commercial art galleries. And don’t forget that such galleries often take a cut of 50% or more. So if you’re simply looking for a way to make money, without a $200 up-front investment, then you might instead consider making a Blurb print-on-demand photobook of your collected work.
The workflow:
1. Use the wide blank margins of the print to secure the print to a board, so that it’s flat and tight and it won’t puckle. Tape protective waste paper around the board, to catch excess varnish spray.
2. Put on protective eye-wear goggles, a protective face-mask, and disposable gloves that roll up to your elbows. Spray the print from a standard aerosol can of Golden Archival Spray Varnish Gloss, from about one foot away. Overlap each pass of the spray, until the picture is evenly covered. Dry. Then do this again, until three “coats” of varnish have been evenly applied.
3. Work over the less detailed “washed” areas of the print with Golden Soft Gel Gloss transparent paint. These are usually the larger background areas, skin, and eyes. Follow any visible brush strokes that are to be seen in the print, if you used a paint filter or have slightly overpainted your Poser/DAZ picture in Photoshop. Let the gel dry before deciding if any further overpainting is needed.
4. Now turn to the more detailed parts of the picture. Use a stiff brush loaded with Golden Heavy Body Gel Gloss transparent paint. Try holding the brush at a low angle to apply the paint, rather than 90-degrees.
5. Let the whole thing dry. Optionally, you may then want to add touches of colour in the form of real coloured paint. Small white highlights are the usual thing a painter uses to draw people’s eyes. Beware that highlights in CG work are rarely pure white, and are rarely all the same exact colour. So you may need to mix the white with other colours on some pallette boards, to get a suitable mix of highlighting tones.
6. Naturally dry the whole picture, until it really is dry. Now repeat step 2, but for the last layer of varnish use the Satin can rather than the Gloss can.
7. Allow to dry. Carefully trim the print out of whatever binding you used to fix it to the board, carefully lift and then frame or mount for display.
Printing the picture onto a slight “canvas-effect” paper is probably desirable. Make sure the picture is printed with very wide blank margins, so that it’s able to be properly secured flat to your backboard. Many pro photography printing firms (in the UK I can recommend Peak Imaging) can do great work in printing “real photos” on matte/satin photo paper from digital files, but they will have to be forced to print with wide blank margins. Their automated machines are usually set up to “crop right to the edge” on prints, like you see in holiday snaps.
Fine Art Giclee printing services should have more understanding of your need for wide blank margins.
If all you have is a print that’s been trimmed right to the edge, then consider mounting it properly on heavy art card, using a can of 3M spray mount. Beware that this spray mount has some nasty chemicals in it, as most art supplies do — it needs goggles, gloves, a face-mask, and good ventilation in the area of use.
