A new video from Lightning Boy Studio, Dynamic Outline Inking with Blender. Definitely not as simple to set up or control as Poser 11’s real-time inking, but the video’s result on the test ‘dinosaur mask’ looks production-ready to me.
Category Archives: Tutorials
Unsplash
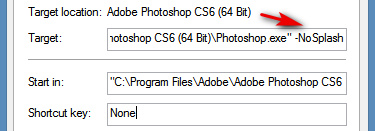
Are you irritated by the Photoshop splash screen that you see 20 times a day? Those with ‘l33t hacker skillz’ can apparently replace the image, but normal mortals are not allowed to. You can, however, simply prevent the Photoshop splash screen from showing. This is done by adding the command…
-NoSplash
… to your start Photoshop launch-icon’s Properties.
How to load your saved render presets in DAZ Studio
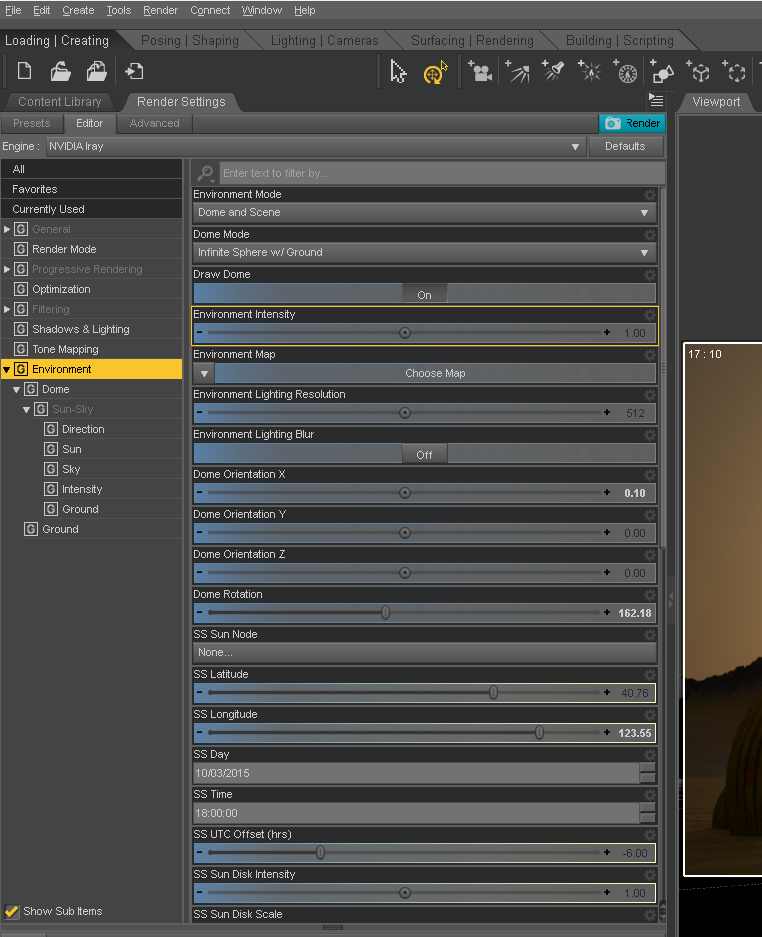
One of the big problems I’ve always had with DAZ Studio is the inability to load my saved Render presets. It’s easy enough to save them: File | Save as… | Render Settings. They are placed in the ..\content\Presets\Render folder as .DUF files.
But then they never ever show up in the Presets tab. This problem has always been there, across multiple different versions of DAZ Studio and even across different PCs. To try to solve the problem, one can copy the render preset files into every possible runtime and content folder that DAZ has access to, but still… nothing will ever show up in the panel. I assume it’s a bug.
The workaround solution is to manually find your presets in Windows Explorer and then drag-and-drop the required .DUF preset file directly onto/into the scene in DAZ Studio. With the Editor open in the Render Panel, you can see the settings change ‘live’ as you drop the .DUF onto the scene. But it would be so much easier just to have them show up in a list where they’re supposed to be.
Poser 11 Webinar Series: Meeting 1
Poser 11 Webinar Series: Meeting 1 January 2020 is a welcome new webinar from Poser expert Nerd3D. Here’s the handy contents-list from the front of the video recording which is archived on YouTube…
I’ve added three red dots on those items likely to interest those who are not store content-developers.
Perhaps, in future, the show might get an even bigger audience if the producers were to front-end it with such general items, and then follow those with the more content-developer-ish items?
Top 5 Python scripts for new Poser users
There are quite a few new Poser 11 users since Black Friday 2019, and by now they may be wanting to get their first small handful of helper Python scripts. I’d suggest the following are the “top five” for new users…
1. “Scene Toy Pro” (2016 version), available paid at Renderosity and Hivewire. An absolutely vital scene helper, in a slick user interface.
2. “Eye-target” in the Poser Python tools with source code pack, also paid at Renderosity. A non-rendering cube that the character looks at. The cube can be moved, and the eyes follow it. An advanced user can manually set up such a ‘eye-target’ for a character, but this script hooks it all up automatically in a micro-second and saves some tedium. Does not work with all characters, but works with many. (*)
3. Ockham’s “SnapTo” mover. Free at Ockham’s site. Move the just-loaded item from Wheretheheckizit to somewhere in the scene where it’s visible/useful. He also has a variant that moves the current camera to the clicked location, useful for large scenes. Note that this uses Tkinter as part of the script, which means Mac users cannot run it (take it up with Apple and their fickle support-policies dept., not Poser).
4. The DAZ “DSON Importer” for Poser. Free. I assume this is Python, though I’ve never looked — it just works. Auto-loads older DAZ Studio content into Poser, which means Genesis 1 and 2 and props of the same era, if you also downloaded and installed that content’s PoserCF files.
5. “ChangeGamma”. Free, and it ships with Poser 11. Find it under: Top Menu | Scripts | Material Mods. For quickly making grungy dark textures lighter in tone, without actually replacing them. “1” is a good initial setting to use it with, when it asks for user input, though the photoreal rendering crowd may prefer a more subtle ‘lift’ than that.
* Are you a Python coder with a large runtime stuffed with characters, and are you looking for a nice project? Note that Posers users would benefit greatly from a more sophisticated version of this script, with the addition of a per-character drop-down menu. Each drop-down line in the menu would call some character-specific code and math to adjust the eye-tracking for eye-size and other per-character foibles, thus giving perfect eye-target tracking.
See also my larger page on Python Scripts for Poser 11, including installation location advice.
How to sell at Renderosity
Renderosity has a new “How to become a vendor at Renderosity Marketplace” guide page with specifications, links to templates, and a vital little visual guide to how to find the right bit in the UI for the first time…
Note that a new vendor is only allowed three products, until they reach a certain amount of sales. Thus, don’t launch with three small or niche “test the market” products, or you may then never be allowed to list your blockbuster products for sale.
How to install Scene Toy Pro (2016)
Scene Toy Pro is the latest December 2016 version, updated and expanded for Poser 11. It’s a vital Poser plugin but the installation instructions are very basic, just one rather vague line in a readme. Here’s what buyers will actually want to know, to get it running…
Short version:
Extract and copy to C:\Program Files\Smith Micro\Poser 11\Runtime\ and not to your usual runtime.
Long version:
i) You copy-paste-merge the extracted .ZIP file’s ..\runtime\ folder into C:\Program Files\Smith Micro\Poser 11\Runtime\ folder (i.e. not into your normal runtime).
In other words, you stop at C:\Program Files\Smith Micro\Poser 11\ and then paste-merge, so that the pasted ..\runtime\ merges with the existing ..\runtime\ Note that this is a method that probably only works on Windows.
ii) You then copy-paste the .zip file’s ..\Runtime\Python\poserScripts\ScriptsMenu\Netherworks\Scene Tools\Scene Toy Pro\+Scene Toy Pro.py script file into C:\Program Files\Smith Micro\Poser 11\Runtime\Python\poserScripts\ScriptsMenu\
Be sure to get right down to that final ..\ScriptsMenu\ folder and not just stop at the ..\poserScripts\ folder and think you’re there.
When triggered, this launcher script +Scene Toy Pro.py will look in the Poser OS runtime path to find and launch the main Scene Toy Pro.py. This is why in step i) you had to paste into the C:\Program Files\ runtime, rather than your usual F:\My-Mega-900Gb-Runtime\Content\Runtime (or whatever you use as your core runtime location).
You’d then start the plugin via the top menu in Poser, looking for +Scene Toy Pro on the menu that drops down from “Scripts”. If you followed step i) correctly then you can also load it via the Netherworks folder in the same drop-down. But having such a much-used item available high in the main menu will save having to remember that “Netherworks = Scene Toy” and then flick through four nested folders to get to +Scene Toy Pro.
Update, July 2021: Scene Toy Pro 2016 is no longer for sale for Poser 11, and a newer Poser 12 version has been under development since February 2021. But the 12 version is not yet released.
2000 3.D.
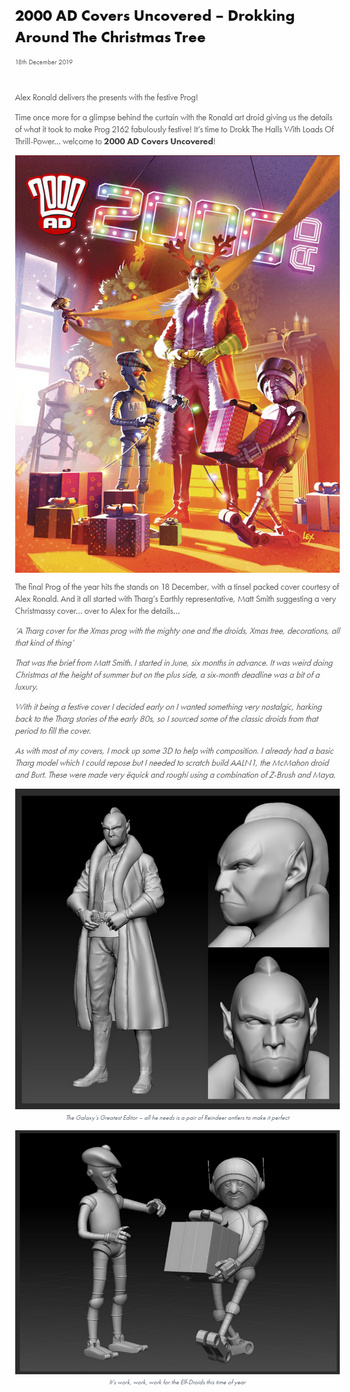
A peep behind the scenes at the 2000 A.D. thrill-factory, showing how 3D was used to help make the Christmas 2019 front cover…
A free solution to remove stray pixels from lineart
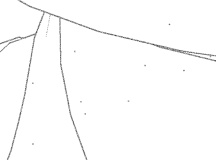
A year ago I posted here about some Photoshop blur-based methods to remove speckles on Poser 11 Firefly renders…
“As you can see, we have tiny unwanted speckly dots. These tend to appear the closer the camera is to objects or characters, are somewhat uniformly distributed, and are specific to a Firefly line-art render mode and to medium and close-ups camera framing. These speckles have been a long-standing problem with Poser ‘toon outlines’ renders.”
The blur method(s) I proposed worked, but were not ideal. They can damage the integrity of the lineart by making it grey out. There’s also an ancient free Polaroid plugin that works, but not on .PNGs and it can often eat into the line edges.
But I’ve now finally got a robust solution for lineart, after much searching. It’s free, and it does not change the lines.
What you want is the free Paint.NET graphics software, which runs on Microsoft’s NET framework and was intended as a replacement for Windows Paint. Then you install its fine Remove White Plugin and its Stray Pixel Remover plugin.
Paint.NET plugins are simple .dll files and are manually installed in its ../Effects/ folder. “Remove White” is then found on the Paint.NET menu under Adjustments | Transparency, and “Stray Pixel” is found under Effects | Object.
“Remove White” knocks out all the white in an image, leaving you with just the line-art and the speckles. “Stray Pixel” then examines the image and if it finds stray specks, stray kind-of lines actually made from tiny separate dots, or tiny islands surrounded only by transparent pixels, then it knows they’re not lines… and deletes them. There are adjustable sliders to control the plugin’s strength. If you then want the image back on white again, simply add a new layer behind, and fill it with white.
Sadly it’s not a Photoshop-native solution. Such a thing does not exist, amazingly, though there are three dead non-working ones from years ago. And Paint.NET doesn’t have Photoshop’s record-able Actions, and thus can’t automate the process into a single click including saving out the cleaned .PNG file. The best it can do there is the limited filter-automation plugin ScriptLab. This will at least save you a few clicks.
This fast and robust solution may also help those bringing hand-drawn line-art into the PC for digital inking, especially if they find their scanner software is not up to the job of removing every single stray dirt speck from the scan.
How to strip your Poser characters
How to strip your Poser characters… to clay.
1. Download SnarlyGribbly’s free EZmat, unzip. Inside there is another EZMat.zip. Unzip that too, and copy the ..\runtime folder there to your usual main ..\content\runtime folder by copy-merging.
2. Then copy the rest of the EZMat folder content to ..\content\ezmat and use Windows Explorer to clipboard-copy the filepath for the \plugins\ folder. e.g.: C:\Users\YOUR_USER_NAME\YOUR_PATH\content\ezmat\Plugins
3. Load Poser. Under the top “Window” menu, and then right down at the bottom, you now find the main way to launch the core EZMat panel…
4. In this core panel you paste in your path to the many EZMat plugin scripts. These are a wide variety of helper scripts, doing things such as adding rust overlays and even special ‘furry moss’ textures for standing stones, all explained in the PDF documentation.
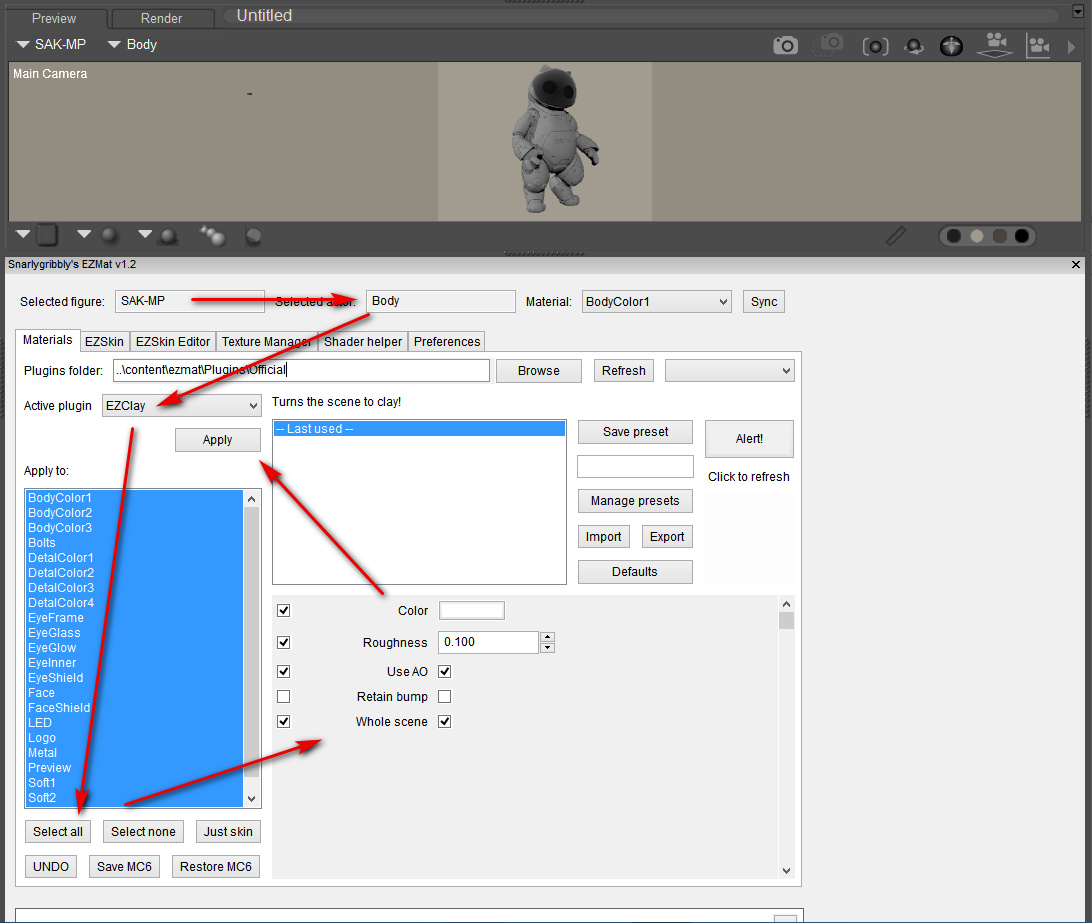
In the screenshot below I have the truncated path ..\content\ezmat\Plugins\Official shown for security, but your own full path will be required in your install. You may then need to reload Poser to get the plugins-list loading into EZmat. Choose the EZClay plugin from the selection in the EZmat panel.
5. The workflow on the EZmat panel is then fairly straightforward, if a little roundabout…
Be warned that ‘apply to “whole scene”‘ is ticked by default.
6. If your translucent or glass materials are then looking jaggy in Preview, such as on Robo-kitty’s visor, then set the shadow quality on your scene lights to 1024 instead of 512.
Enjoy your test Robo-kitty in grey clay. This particular kitty ships for free with Poser 11.2, and once installed is found under Figures | Toys | SA Kitty.
Update: Further testing seems to show a small problem with EZmat in Poser 11.2.x: to load it for a saved Poser scene, its panel first needs to be opened briefly on an unsaved Poser scene. After that it will load fine on saved scenes, but will otherwise refuse to fully do so.
How to reindex your runtime in Poser
Poser users who are getting around to installing their Black Friday haul may want to re-index their runtime(s). Reindexing occurs automatically when you make a keyword search using the internal Poser content library, and the ongoing process is then indicated by a pulsing yellow CD icon…
But those who mostly use a third-party search database like PzDB, will almost never use the search box in Poser. This means their content folders will not be showing their newly installed content yet. For folder-based searchers inside Poser, wondering why their new Poser content is not showing up in a folder-by-folder manual search… you need to do a search for something, and this will set the yellow icon pulsing.
On a large runtime the reindexing process may take a while, but you can still use Poser while it’s ongoing.
Poser script: render each figure/prop separately
Here’s how to get MarkDC’s 2002 render_separate.py Poser Python script working in the latest Poser 11.2.
What it does: It looks at your Poser scene, hides everything, then selectively shows each figure (character) and prop to make a render of it. Then it moves on to the next. One figure or prop, one standalone render. Once the script’s run has completed, it restores the visibility of all the scene elements. “Child props and conforming clothes are rendered with the figure” says the author’s info, but I haven’t tested this bit.
1. First, download and extract the script. The above links are Archive.org links and should be durable.
2. Open the script with Notepad++ and remove the © copyright symbol in Line 3. This symbol is non-standard and it’s what’s causing the fatal error message in Poser 11.
3. Then find the section…
dirPath=”C:\\Program Files\\Poser 4\\PoserFiles\\naoko\\naoko\\”
ext=”tif”
… and change it to something like…
dirPath=”C:\\Users\\YOUR_USER_NAME\\YOUR_OUTPUT_DIRECTORY\\”
ext=”png”
This needs to be a directory where Windows is happy to let scripts save stuff. We want .PNG because we need the masking and transparency.
4. Save. Install the Python script as usual.
5. Build your scene in Poser and set a Main Camera. Then on the top menu go: Window | Animation Palette.
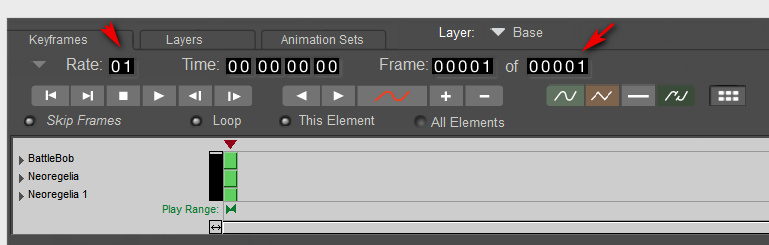
Change the settings to a single frame and keyframe, thus…
If you don’t do this you get 30 renders of each prop or figure, and it’s going to take a looonnngg time to get all the renders for the scene. And there’s no way to stop the script once it starts running, short of Crtl + Alt + Del.
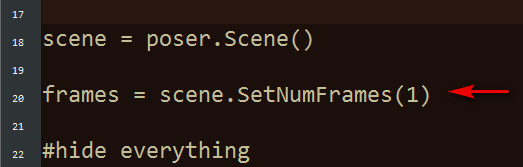
If you’re absolutely sure you have no animation in your scene, or cameras set to render from later frames in the timeline, then you can add this line to the script. It will use the SetNumFrames command to force 1 frame only on the timeline, rather than 30…
6. To see it in action, switch render settings to something quick, like Preview mode and 900px. You’re now done with setup.
Once invoked the script will do its thing, running through the scene’s figures and props one by one and making a standalone render of each.
For some reason it will also make a FocusDistanceControl_0.png render of the camera. Because of this, on completion this will lay a big black X across the live scene. This X is the focus distance assistant in the camera. To clear it, simply switch to the Main Camera parameters tab and turn the focus_Distance dial back to “0”.
7. Now you can use Photoshop 64-bit to go… File | Scripts | Load Files into Stack | Browse…
Do not tick “Attempt to Automatically Alight Source Images”, as these are PNG files with transparency and Photoshop will make a mess of them. They’re all the same size and thus will align fine by themselves.
Note that “Load Files into Stack” does not work in 32-bit Photoshop, and never has.
That’s it. This script works in Preview as well as Firefly, making it useful for comic book work. Run in Preview it can also effectively serve as a ‘mask outputter’ for Photoshop postwork on a full render made with FireFly / SuperFly / Reality, or even with Sketch (though in that case the mask-edges may not quite line up). One can also make a ‘ground shadow’ for a character, by duplicating their render, making it black and then skewing it into the approximate position of a cast shadow.
MarkDC (Markcus Dunn)’s script should probably be included as standard in Poser 12, with a pop-up dialogue added to help newbies set the file path and type, and a reminder to set the scene’s animation frame length to “one” before starting to render.
How to easily combine and merge selected sub-folders in Windows
Problem: You have a massive .ZIP or .RAR file, perhaps an old archive of Poser content you archived a decade or more ago. It has a structure that looks like this:
MyAmazingContent1
| Runtime
|Textures
|Libraries
|Geometries
MyAmazingContent2
| Runtime
|Textures
|Libraries
|Geometries
MyAmazingContent3
| Runtime
|Textures
|Libraries
|Geometries
What you want to do: You want to extract just the sub-folders named “Runtime”, combining them into a single new folder named Runtime, while keeping their lower directory structure intact-but-merged. Because that’s what you’re going to need to do, to merge them back into your main Poser Runtime folder and thus make them usable.
The solution: It can be done quite simply in Windows, and without freeware or command-line code or PowerShells. And without several-hundred tedious manual click-copy-merge operations.
1. First, simply extract the entire .ZIP file. (Don’t waste time messing around with tricky command-line controls for the like of 7-Zip and WinRAR, trying to extract just the Runtime folders. You may be able to do that, but you won’t also get the merged sub-folder structure you want).
2. Now open the resulting extracted folder with the standard Windows Explorer. Add there a new empty sub-directory called Runtime, as a newly added folder among all the extracted folders. We’ll be using it a few steps later.
3. Now use Windows Explorer to keyword search inside your huge extracted mega-folder for the word “Runtime”. A huge list of sub-folders will appear as the search results…
4. Shift-click and scroll on these found Runtime folders to select them all. Then right-click and copy-paste them into the top level of your newly extracted folder. NOT directly into the new Runtime sub-folder we just created. Windows 8’s mighty cyber-brain then spots the empty Runtime folder and thinks… “so that’s where all these same-name folders should go, ok let’s merge ’em all in!”
This method works and takes advantage of an auto-merge feature in Windows, which many Poser folks used to manually dealing with installing to runtimes will be aware of. If you copy-paste a folder with the same name, it merges without any fuss. Thus, in this case, your 250+ Runtime folders become one, while retaining their sub-folder structure…
| Runtime
|Textures
|Libraries
|Geometries
All our Runtime folders are now nicely amalgamated, and ready for a final check and then to be copy-merged in the same way into the main Runtime used by Poser.
Just note that those still on Windows 7 may get a prompt about merging. On Windows 8, you won’t, it’ll just go ahead and do it. I’ve no idea about Windows 10, but I assume it behaves much the same as Windows 8.
Cartoon w/ Line for hard shadows
In Poser 11, the “Cartoon with Line” real-time display mode is another possible way of getting shadows. I’ve usually avoided using it as a shadows layer, because it doesn’t handle eyes or transparency well (e.g. trans-mapped eyelashes appear as oblong blocks), even though it can be rendered to a Preview render in a fraction of a second. But then I wondered… can its problems be lessened in Photoshop, if the layer-blending is subtle and if I find the right blend-mode?
As you can see here, in Photoshop it can be made to blend nicely into my new Poser custom Sketch preset (‘Flat Oils’ at 1800px, flattening and ‘painting-erizing’ while retaining most detail), and it provides shadows that look like part of the artwork. They are also colourised to match the base, while retaining hardness (though a slight blur help them to blend in further). Laying and blending the ink lines from the Comic Book mode completes the hand-done effect, and adding to the hand-made feel is that the inks don’t quite fit the Sketch-rendered colour base layer.
So it’s another way of getting a ‘hard’ shadows layer, rather than a soft AO or similarly fuzzier shadows render. But note that one would need to manually erase trans-mapped sections, such as eye-lashes, or more likely just remove them entirely from the base model.
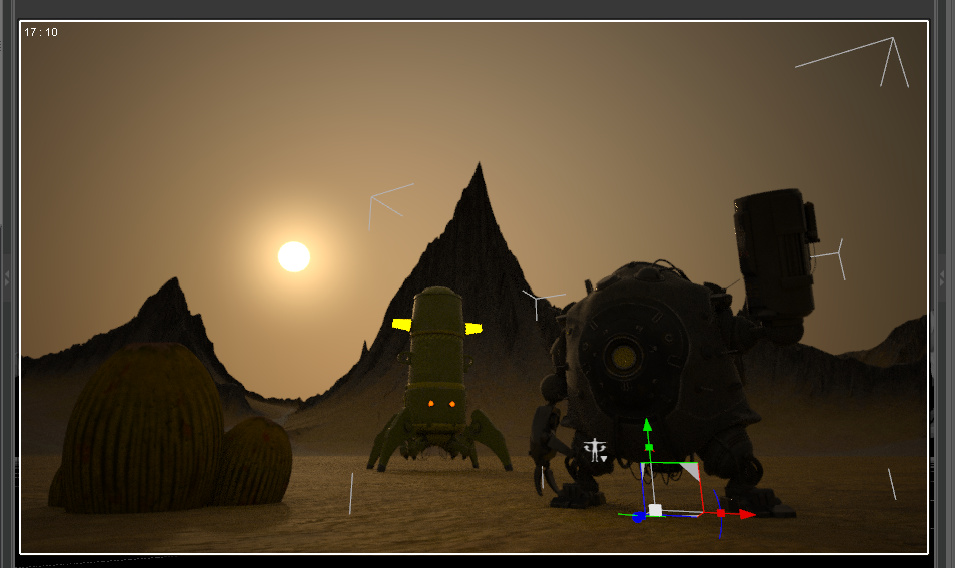
The light here is the un-altered “Dusk by Ocean” IBL AO light that ships with Poser 11.
Everything
My thanks to the editors of the latest PC Pro magazine for making me aware of Voidtools’s Everything freeware. It’s a super-fast file-finding tool, and one which can be restricted to indexing just a specified folder.
It’s freeware, and similar to the old Agent Ransack. But it’s an almost instant file-finder, because it builds a local index. Here it’s showing results for the Torba caveman character for Nursoda’s Doctor Pitterbill…
I installed it without its NTFS disk-indexing option, as I was hesitant about having its driver-services persistently loaded at startup. This meant that I had to run it in Windows Administrator mode, which it then needs to build an index of files. I was pleased to find I could still have it index the main folder containing all my key Poser/DAZ runtimes.
Scanning of all my very large Poser/DAZ runtimes then took about five minutes, and it resulted in the Everything utility instantly becoming a very nice super-quick alternative to PzDB. It’s especially useful for those times when you don’t want to spend time loading and unloading PzDB, nice though PzDB is (because it understands the Poser/DAZ content systems, is a lot faster than P3DO, and has many other features).
Once installed you then just learn a few tricks with Everything…
A plain search for torba will also show DoctorBag in the search results. However if you turn on “Match whole word”, this problem vanishes.
You can search for a phrase the usual way. For example, “lost world”
You can bookmark results. For instance you can bookmark:
*keyword path:libraries
*keyword path:props
*keyword path:face
*keyword path:textures
*keyword case:MAT
You load the bookmark and just replace ‘keyword’ with the real one. The path: command means you only get results from specifically named folders. case: finds only CAPITALS. Useful when all your MAT files use upper-case.
Why the *keyword and not just keyword? Because a partial word won’t do the job. For instance, search for ShaaraMuse3D’s 3S_MysticRedLands props folder with just redlands will get you no results at all. What you need there is *redlands where the wildcard * tells the software ‘could be anything here’. It seems that *keyword and “Match whole word” can co-exist nicely.
However in some curious cases it won’t. For instance, RealMenHair will find nothing. A search for *ealMen will also find nothing. Yet *RealMen* will find the RealMenHair folder. So if you can’t find anything using the above methods, add a * wildcard to the end, as well as to the start of the search.
Also note that words need to be complete. Thus Vacuum will not find Vacuum_Zeppelin.
You can even then view results with Thumbnails of the folders, showing visual hints of what’s inside. One can also sort by “date created” and thus get a basic form of content-clustering. Both settings can be embedded in a bookmark.
What Everything won’t do is try to preview images and files natively. Instead a quick double-quick launches the folder in Windows Explorer, or previews the .PNG in IrfanView (or whatever speedy image previewer you use).
Nor can it add keywords as tags. A use-case for that is: one can’t find all Nursoda content in one’s runtime, because Nursoda does not use his name in the content’s file-path. One would then need to have PzDB to add a “Nursoda” tag to all his characters and their content. This would make them findable in one search.
Can Everything do drag-and-drop to load a character or prop into a Poser scene? If it can show the result directly in results, yes. I had success with the Doctor Pitterbill .CR2 file. However, if the result is inside a folder, then you’ll need to open it in Windows Explorer and drag-and-drop from there.
Everything should be used in combination with the free RSR to PNG Converter, which will add .PNG thumbnails to runtime content if these are missing.
The old Agent Ransack is worth keeping though, as it integrates into your Windows mouse right-click in Windows Explorer, and thus can be used in tandem with Everything…