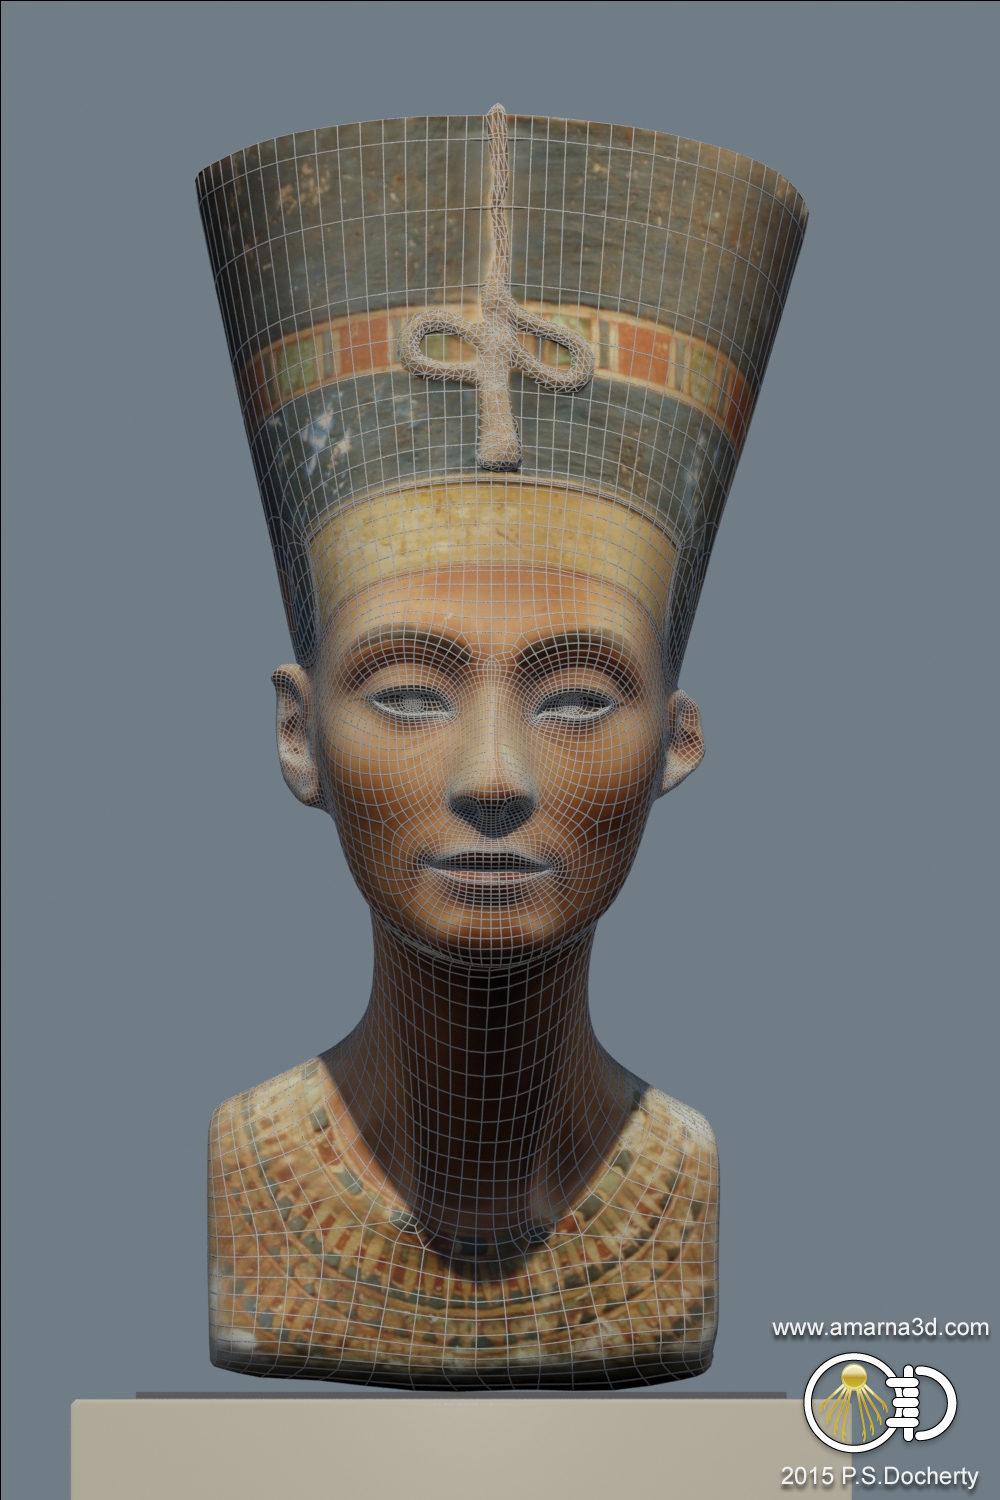
Historical 3D graphics consultant Paul S. Docherty has recreated the famous bust of Nefertiti (Ancient Egypt, c. 1340 BC) in hi-res 3D, using only a variety of public photos (“photogrammetry”). His detailed account of the process is here. The Swiss microengineering specialist C. Yamahata has duplicated Docherty’s process and kindly offers a free .obj for download.
Category Archives: Tutorials
Ten tips for comics production using Poser 11
Here’s my quick selection of the ‘top ten’ tips I spotted during the recent two-hour official Poser for comics webinar. Thanks to Charles Taylor for the first tip, and Brian Haberlin for the rest. There are more tips than these ten, though, so watch the whole webinar. It’s free online.
1. Apply canned stock animations to your character, then scrub along Poser’s animation timeline to find exactly the right pose — the pose and angle that fits the story-moment happening in your comic panel.
2. When using an Infinite light with Poser 11’s Comic Book Preview mode, dial up the Preview Shadow Map Size to 4096 to get quality shadows.
3. Improve texture quality in Preview, by going to Render Settings | Preview | Texture Display, and dial it up to 4096 for quality textures.
4. Different parts of a character or prop can be given a thinner or thicker ink line, when using the Comic Book Preview mode. Simply switch to the Material Room, and then dial the Geometric Edge setting up or down.
5. Simple hand-inking of a face texture can get you nearer to a production-quality comic-book character, when starting with a V4 or M4 character which was intended for photoreal rendering. Hair can also be painted as ink lines.

You can also re-colour individual lines of polygons directly on the mesh, to serve as quasi ‘ink lines’ in the render.
6. For very large landscapes, having the far distance as a wallpapered dome won’t get you the toon ink lines you need. For that you need real geometry. So don’t forget about the low-poly royalty-free game landscapes now being sold fairly cheaply in .obj for Unity.
7. A lone ToonID layer rendered in Firefly (a Poser 11 Pro-only feature) can be used later, in Photoshop, to quickly ‘paintbucket’ flat colour into large areas of the comic panel.
8. Don’t accept the default camera lens for a scene, spin the Focal dial on the camera and see what dramatic effects it can give you.
9. Once you have all the thumbnail planning of your panels and pages firmly nailed down, it’s possible for Brian to produce up to six pages a day when everything is going smoothly. Thumbnailing is vital to prevent wasting hours in fiddling with all the possibilities that 3D offers.
10. It can take a day to fully ‘design’ a production-level Poser character from a stock M4 or V4, runtime-bashing clothing items together to form a unique look, finding or making textures that suit the Comic Book Preview mode, etc. But once the final character is “drawn” in 3D and looking right, the rest of the work is mostly posing and rendering.
Free online: 2hr Poser comics webinar
Now online for free at YouTube, the recent 2-hour official Poser webinar on using Poser for making comics. There’s a very poor microphone being used by the initial tutor, but you can’t sniff at free + two hours long. You might want to start at 27:30 mins then loop back to the starting section later on, to avoid getting bogged down right away in the first 25 minutes of fiddly animation timeline wrangling.
Tutorial: working with the new real-time Comic Book mode in Poser 11
How to get the best from the Comic Book preview mode in Poser 11: a basic workflow using two masked PNG renders of a character.

AIM: to show how the Comic Book preview mode works within a workflow. To get the ink lines onto their own Photoshop layer, with the flat colours underneath the lines on another layer.
USERS: This is for those intending to spend serious time creating a narrative comic-book or graphic novel, and who need the artwork to stand up under the scrutiny of seasoned buyers of comics and comics reviewers. If you’re just making a webcomic gag-strip, shown at a small size on a phone or tablet and seen by readers for 0.3 microseconds, then you don’t need this tutorial — instead just accept the ink lines that the Comic Book Preview mode gives you, rendering them to a big masked .PNG with anti-aliasing enabled.
REQUIREMENTS: Poser 11 Standard or Pro, Photoshop. Please note: this tutorial requires you to be familiar with using Photoshop, and that you can remove a flat colour from across a picture and replace it with 100% transparency.
1. Set up a new Poser 11 scene with a flat single-light IBL light at perhaps 30% intensity, so as to get a toon flatness across your character. Turn off the Ground (i.e.: make any backdrop plate and the floor invisible, even as a mesh), since we want to output a masked PNG later on. ‘Flat’ here means it’s pointed fairly directly at the camera is is not causing many shadows… the lighting that results is ‘flat’.
Note that as well as having a dial setting for Intensity, your single IBL light also has Red | Green | Blue dials. Dialing back the Green a little can add a subtle extra warmth to a character’s skin when using IBL flat ‘toon’ lighting.
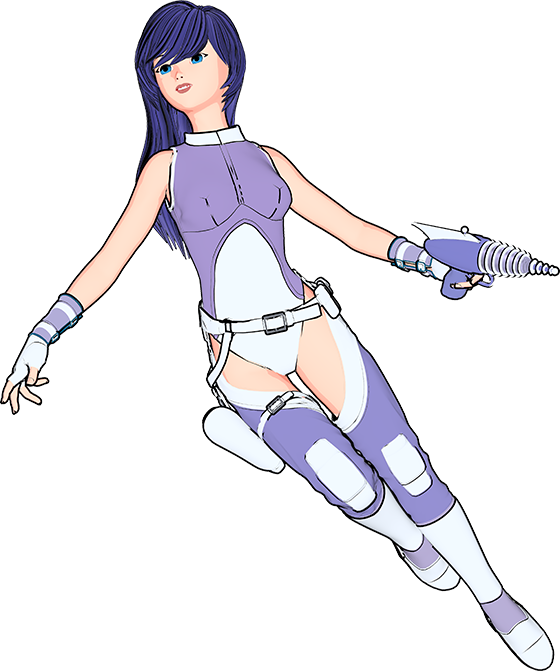
2. Then load a suitable character such as Aiko 3, seen here, who is still excellent for comic book tooning. Here she is with toon materials, but in Poser’s default lighting. As you can see it’s a bit ugly — this is what is about to get cleaned up by the special single-IBL light which will give us relatively flat toon lighting. Without an anime/manga ‘flat’ light (we’re adding that in step 3) you can’t tell if the toon materials do actually toon or not.
One of the nice things about Poser 11’s Comic Book mode is that older vintage characters such as Aiko 3, who are misleadingly deemed to lack something in the age of photoreal rendering, suddenly become useful again for comics and cartoons.
Once you’ve loaded your character then you’ll need to locate a dedicated toon skin material in your runtime, and apply it to the character. You don’t want one that gives you an ink line, though, since we’ve already got that. Ideally the toon skin material will just incorporate a very subtle paint wash effect, as seen in the example below. This helps to suggest rounded limbs, noses, and chins, but without the need for ugly dark shadows…

This example also illustrates why this tutorial’s method is needed. Close-ups will show errors in the ink lines, such as are seen here on the clothes at the shoulders. Having the ink lines on their own Photoshop layer makes these errors so much easier to correct or erase.
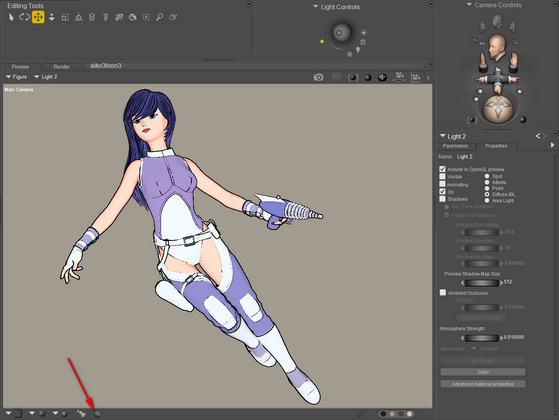
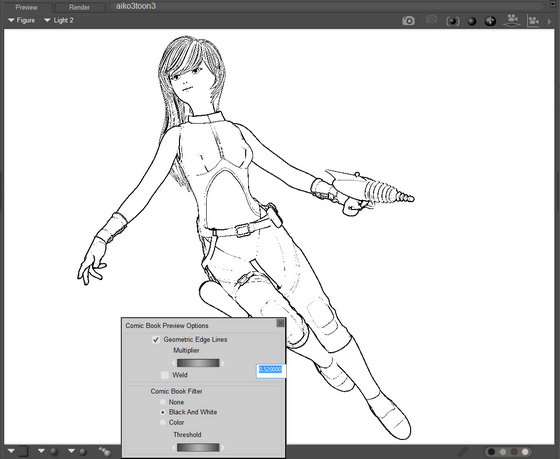
3. Activate Poser 11’s Comic Book preview mode panel (centre of the screen, at the bottom), and tweak this effect to your liking. Note the new flat head-on light.

Now drop the flat or almost-flat colour materials, that you’ll already have scoured your runtime for, onto the clothes and skin. Ideally — in this special lighting and mode — the chosen materials will have just a tiny bit of shadow set to appear at the edges (as seen above on the clothes). Once you have found a suitable material, you can save it out and just use it again and again, simply tweaking its exact colour to your liking via a quick trip to the Materials room.
Find suitable hair, then apply a toon hair material that looks good with the new Comic Book mode (easier said than done, because such materials appear to be rare).
Ensure that any legacy materials are “burned off” by turning up the Threshold dial in Black and White mode, so you just have line-art when in Black and White.

4. Once you’re happy with your Comic Book look in both colour and black-and-white modes, ensure that “Enable Hardware Anti-aliasing” is enabled in the Preview rendering settings, and that the Style Options panel there has “Antialias rendered image” ticked. These should both be on by default, but it’s worth checking. Those without a graphics card should note that Poser 11 no longer requires a GPU for anti-aliasing.

Then set the render size to BIG. For this tutorial I worked with 5000px by 3750px. Render size just doesn’t matter here in terms of speed, since we’re working with real-time OpenGL rendering.
5. Ensure that you are in B&W Comic Book Preview, then Render your Preview + export a PNG. Even at 5000px the Preview render this should not take more than five seconds.
(NOT: OpenGL preview + anti-alias + export, since that won’t give you a masked PNG).

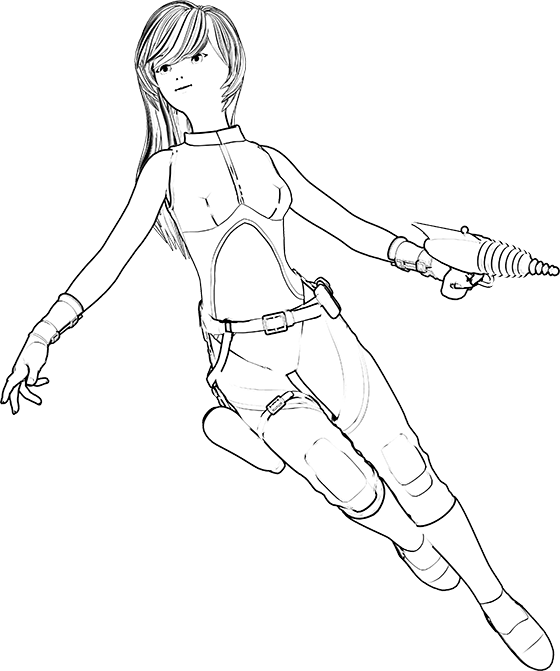
Note here that the line inking is not perfect. The mouth is a fairly ugly line. Bits of the gunbelt are missing lines. A bit of boot is missing a line. Her clothing top’s ink line goes haywire as it approaches her shoulder. There are also some thin mis-placed lines on the top of the thighs, and a line across the eyes (though the latter can’t be seen in this reduced-size picture). Anyone who wants to make a comic that deals in close-ups and a medium-shots is going to have to deal with problems like these.
6. Now turn off all the Comic Book preview inking effects. Yes, that’s counter-intuitive. But, now that we have the ink lines as a render, we only want the Colour Flats or as close to flats as you can get. Without moving the camera or character pose, render the flats out to a 5000px .PNG.

Quite pretty on its own, admittedly. But if it’s going to be part of a narrative comic panel then Aiko needs the quick ‘visual readability’ that strong ink lines will give her, and which will help her to stand out from the background.
The hair still has lines, since they’re coming directly from the toon hair material I added.
7. OK, we’re done with Poser (you might also add a shadows-only render, but that’s not covered here). Close it and start Photoshop. Open the colour flats .PNG in Photoshop. Copy | Edit | Place Special | Paste in Place. Doing it like that helps to avoid the clunky mis-registration of the two layers that might otherwise happen.
Now use Photoshop to knock out all the white in the B&W ink lines layer, so that you just have the black lines on top of the colour flats. Set the line art’s Layer Blending mode to Darken, 100%.
(Ideally, a future update of Poser 11 would enable a dual-layered .PSD from the Preview renderer, for this sort of work).
8. So, why do all this? It’s because you now have the ink lines on their own layer, which allows you to clean up the line-work in a quick way that would otherwise be impossible. Simply chop out any ink lines you don’t like, with the Lasso tool. Or more carefully erase or soften ink lines with the Eraser.
Here you can see that I’ve removed the odd-looking stray lines that had crept up over the thighs, have totally removed the ugly ink line which had been placed across the mouth, and removed two tiny lines that were going right across her eyes. This sort of work may be especially important for larger comics panels containing close-up artwork of your characters.

Because of the large 5000px size it’s also now easy to ink in any lines that may be missing. Or if you have a shaky hand you can just steal nice lines from elsewhere in the ink lines layer, copy+paste them, then rotate and re-size. For instance I did this on the end of the belt-pull.
One can also use Photoshop’s Liquify tools to nudge, smooth and reduce certain lines, and because you’re working at a large size the resulting blurring won’t be too apparent. Make sure the nudged line still aligns with the colour flats render, though.
You may also want to do some very light Dodge and Burn work at this point, just to bring back a little shape and weight to selected aspects of the character. The gun holster and gun body, for instance, might benefit from a subtle visual cue as to their roundness. Or if you’re skilled with art rendering, paint a whole greyscale values layer, blend it and then add highlights.
Perhaps you might even paste in a Shadows Pass or AO pass from Firefly (Shadows-only render) as an additional layer. Though maintaining consistent self-shadows across all panels of the comic will likely generate vast amounts of extra work, and the result probably won’t be satisfactory as either 2D or 3D.
If you need your final .PNG cutout characters to cast a ground shadow, there’s Lyne’s Cast Shadows Action for Photoshop.
There may be a slight overall mis-registration of the layers, but that can add to the comic-cook art effect by making the art just a bit less than perfectly done.
9. Once you’re happy, save the picture as an un-flattened .PSD for future tweaks, emergencies and re-use. Then select the character, Edit | Copy Merged and paste into a new document. Reduce that to the size you need for the target comics panel and save it as a .PNG (so that it retains its transparent background).
10. Your output .PNG is now suitable for dropping into a comic-book page’s frame, and because it’s a .PNG output it will be seamless with any pre-existing background layer you already have in the frame. (You can also Stroke the edge of your output .PNG in Photoshop, if it needs to stand out more from the background, and note that Stroke can be run in Inside and Centred mode as well as along the Outside edge. Alternatively, a black Outer Glow can also give you an edge Stroke, but softer than a Stroke).
Seasoned comic-book readers are now far less likely to sneer at your artwork because of oddly placed ink lines on noses, mouths, or other important areas, or because of some curiously missing lines.
A few additional things I learned in the process of this tutorial…
* In the Black and White mode, turning on Depth Cueing can very subtly change some toon outlines.
* In Black and White mode, adding a 50%-power Spotlight and swinging it around can cause interesting extra ink lines to appear, at the cost of some loss of lines elsewhere.
* Conforming accessories such as belts and goggles etc seem to take toon ink lines especially poorly. I suspect it may just be poor edgework due to the conform.
* And as I’ve written elsewhere, the Sketch Render can be applied to just the ink lines of a B&W preview, for a nice pencil effect. Try the Charcoal preset, with the stroke lightened up a bit and with no background sketching.
* If you really feel you also need 3D-style shadows on the character, you can do an extra render with just a shadows pass, and then blend and partially erase this in Photoshop. Keep in mind that that character shadows may be difficult to control consistently across a 24-page comic-book, especially across multiple characters and settings, and thus may be more trouble than they’re worth.
Update 2020: I’ve learned a lot more in the four years since this tutorial. See my other posts tagged “comics”.
Poser 11 free webinar – get the best from Poser’s SuperFly render engine
Now online, the recent 76-minute webinar for users of the new Poser 11: “How to Get the Best Results from Poser’s SuperFly render engine”…
Update, video was at /l0yjSRMsAjY but is now dead.
A rather unfortunate frame (above) for YouTube to decide to dwell on. Don’t worry, you really don’t have to learn math and draw complex diagrams to use Poser! However, the graphic does indicate the nature of the video.
BE WARNED: this video is a highly technical look at the innards of SuperFly, and is not ‘pretty pictures of space babes and a half-dozen hot rendering tips’. Basically, if you don’t know what “bucket size” is and what “shader nodes” are, your head will explode about half-way through the video 🙂
Poser newbies who do try to watch it should be aware that all this complexity is hidden behind simple presets for render-quality and materials.
I did learn something interesting right at the end of the video though. “Bucket size” can affect the speed of a CPU render, but it depends on the type of scene. Doesn’t seem to work for my simple CPU though, on a test scene…
Bucket size (default Fast Preview preset is 64) | seconds:
16 | 31 seconds
32 | 30 seconds
64 | 30 seconds
128 | 43 seconds
256 | 59 seconds
Update: Those with multi-thread workstations (e.g. 12 fast cores, 24 threads) can go higher up this list and get faster not slower.
Practical hints for art students
Newly available for free on the Hathi Trust archive: Practical hints for art students (1910), a delightfully clear and abundantly-illustrated primer, from an era when the human figure and its posing and lighting were at the heart of art-school practice.

Sculpt of Thrones
“Sculpt of Thrones” is a new live Zbrush sculpting webinar by Digital Art LIVE (formerly 3D Art Direct, now breaking out into both 2D and 3D digital art).
Save a 30% early-bird discount on a ticket, until the end of the weekend (Sunday 27th Sept). John Haverkamp provides live sculpting in Zbrush of the patriarch character from your fave fantasy-intrigue TV series.
3D Art Live Webinar Masterclass – free
Free entry to a 3D Art Live Webinar Masterclass on rigging a 3d airplane, on 30th May 2015. Just use the coupon code on the Web page…
Quickstart on how to access Garibaldi Express hair plugin in DAZ Studio 4.7
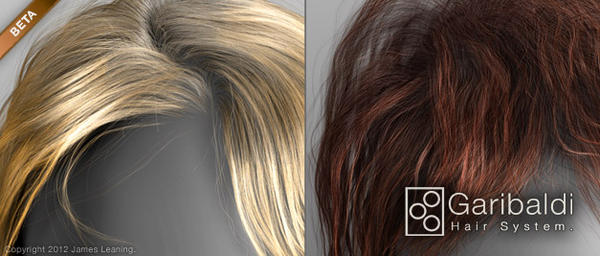
A friend kindly gave me a personal video demo of the Garibaldi Hair System plugin for DAZ Studio 4.5 and higher. Seems to render rather quickly, which is very encouraging. Overall it looks fairly simple to use, once you work out how to access the editor and control the styling of the hair. There are manuals and videos, of course, but for future reference here’s my step-by-step quickstart for this plugin…
Load the Garibaldi Hair System editor:
1. Load a figure in DAZ Studio. Select the figure.
2. Top Menu Bar: Create | Create New Garibaldi Hair… | Select DAZ Geometry Node | Select Character | Accept.
3. You now have a Garabaldi Hair item listed over in the Scene tab list of scene items. Select this Hair item. Now go to Top Menu Bar: Edit | Edit Garibaldi Hair.
4. The special Garabaldi Editor Window will launch.
5. Setup Room: Select Head / Skin on your character | Paint Room: Paint areas of head skin on which to grow hair | Then work the basic hair through the other Styling Rooms.
Save a finished hair style:
1. Select the Garabaldi Hair item listed over in the Scene tab list. Rename it. Grab it and slide it up so it becomes a child part of your character.
2. Activate Parameters tab: Top Menu | Window | Panes (Tabs) | All | Scroll down to “Fit to”, and ensure the hair is set to “Fit to” your character.
3. In the Scene tab list select the root/main entry for your character. In Top Menu | File | Save As… | Wearable preset… Now DAZ Studio should save the hair into …\My Library\Presets\Wearables. Find it as a clickable preview in: Content Library | DAZ Studio Formats | My Library | Presets | Wearables | (may take a few seconds for the preview icon to appear).
Using Terradome with Poser
Coming soon, a free webinar in using Runtime DNA’s TerraDome landscape software with Poser…
Mastering Magnets in Poser
How to change your background colour in Daz Studio 4.7
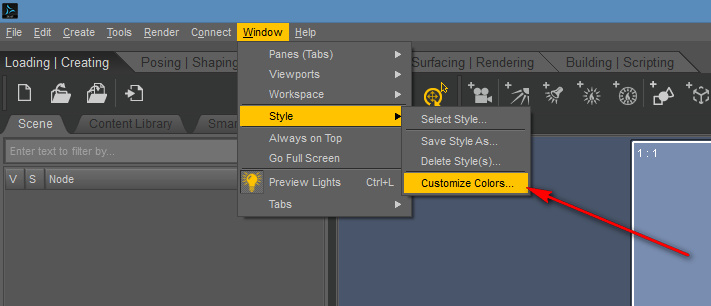
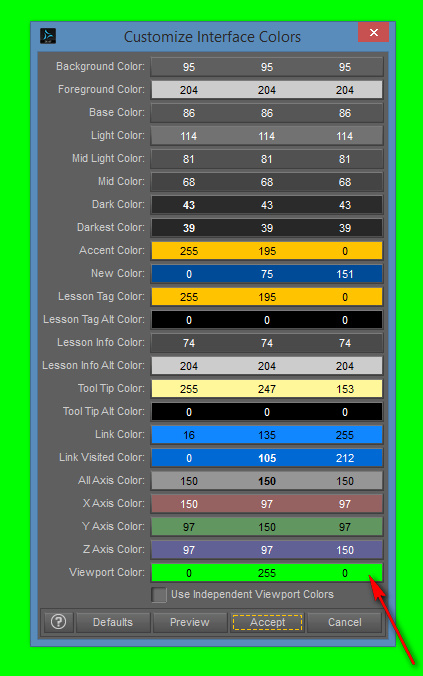
For those wondering where the option to change the viewport Background Colour went in Daz Studio 4.7, it’s now over on the other side of the screen, in Window | Style | Customize Colours…
Don’t choose the top “Background Colour” option (that changes the User Interface colours), but choose the bottom colour named “Viewport Colour”…
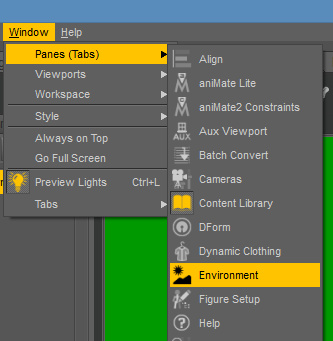
However, even that won’t do the trick. What will actually show up at the back of the render is set in the Environment Pane, found via Window | Panes (Tabs) | Environment. There you can set a solid color or a backdrop picture…
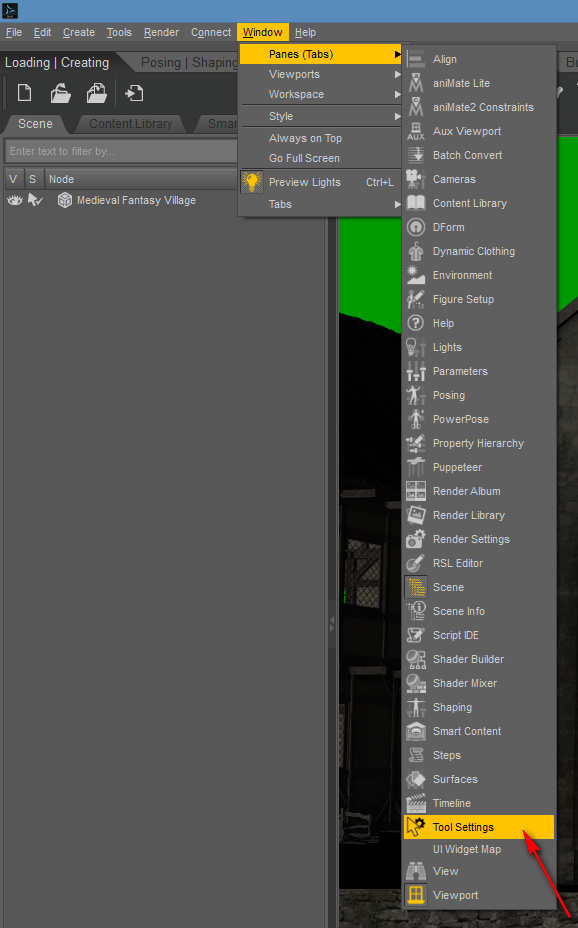
While you’re wrestling with settings, you can also get rid of the hideous ‘orange flashing’ on a new install, which blasts your eyes every time the cursor passes over a model…
Update: at 2020 this setting is now found in: Draw Settings | All.
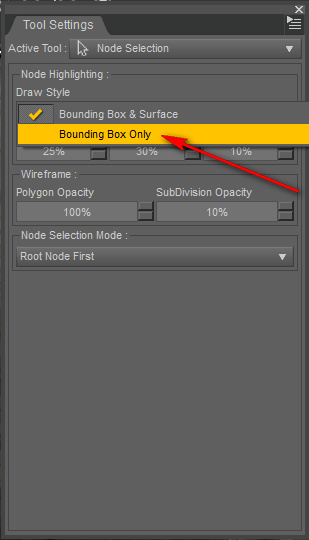
Then switch this drop-down to Bounding Box only…
Where to find Interactive Progressive Rendering in Daz Studio 4.7
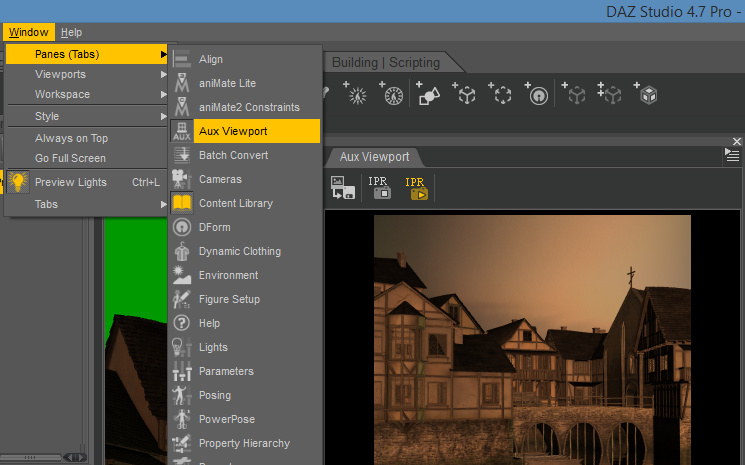
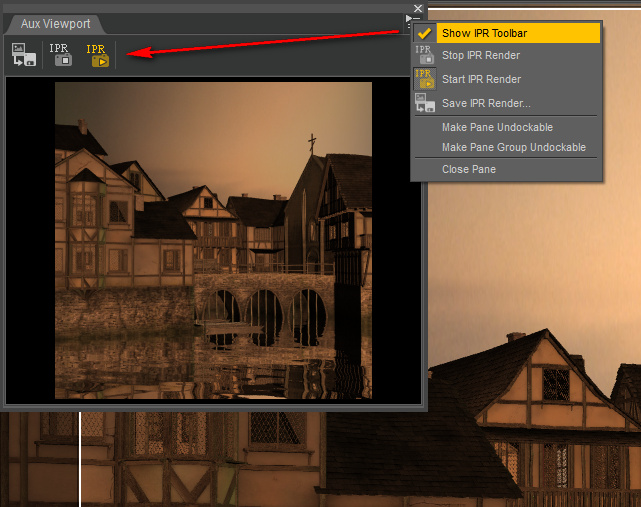
If you’re looking for the most desirable new feature of 4.7, the “Interactive Progressive Rendering” pane, you’ll find it cunningly re-named in: Window | Panes (Tabs) | Aux View…
Even then Interactive Progressive Rendering won’t start until you tap the little arrow + lines icon in the top right of the pane. Enable “IPR”…
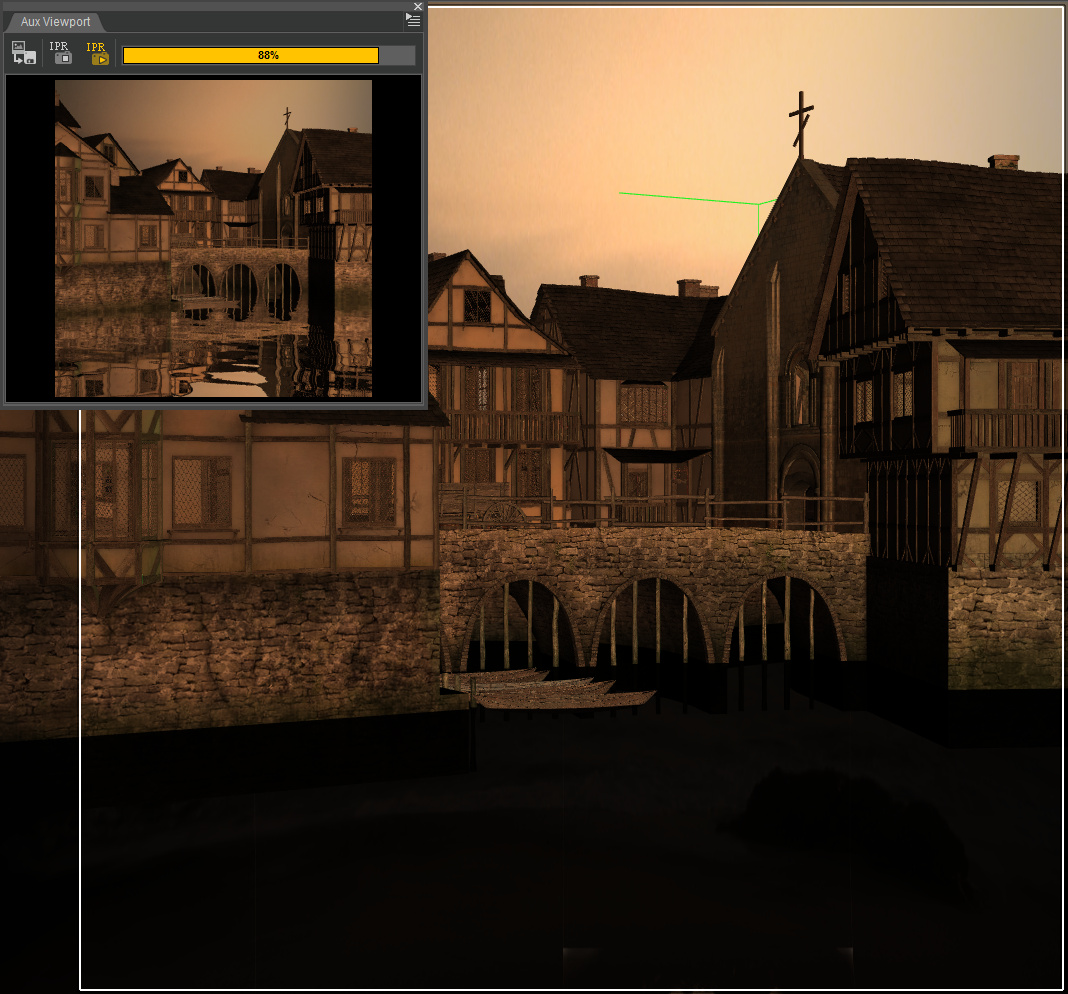
So far as I can see it’s independent of render settings. I had the render set for 600px, jacked it up to 3600px, and the Interactive Progressive Rendering pane was just as fast as before. As you can see here, it’s able to near-instantly preview water + reflections that are black in the OpenGL viewport…
Raytraced rooms
This Saturday, a 3D Art Live tutorial webinar with the experts from Runtime DNA…
Tutorial: import a Poser runtime to Carrara
A handy new 8-minute video showing how to import your whole Poser runtime into DAZ Carrara. Be warned that the tutor is only importing the small amount of free content that ships along with Poser. Not the massive 100Gb+ of runtime that many long-time Poser and DAZ users will have, which I’m guessing may take considerably longer to import. The video’s tutorial on the import process actually starts at 3:18 minutes…