10 Reasons You Need a Falloff Shader Plugin for Carrara. Including to do faux glows, which follows from my recent tutorials here on the subject of doing spillover glow in Carrara…


10 Reasons You Need a Falloff Shader Plugin for Carrara. Including to do faux glows, which follows from my recent tutorials here on the subject of doing spillover glow in Carrara…
Following my recent tutorial on “how to make a simple sphere glow in Carrara 8”, I’ve found that there’s also a way to have a light glow, rather than have geometry glow. Doing it this way takes whole lot less render time than my earlier technique, but the effect seems less convincing unless you want a standard “car headlight” effect. So it seems useful for middle and far-distance lights, especially in instances where you have some geometry objects intersecting the light — objects that would complicate any Photoshop postwork using a gradient glow filter.
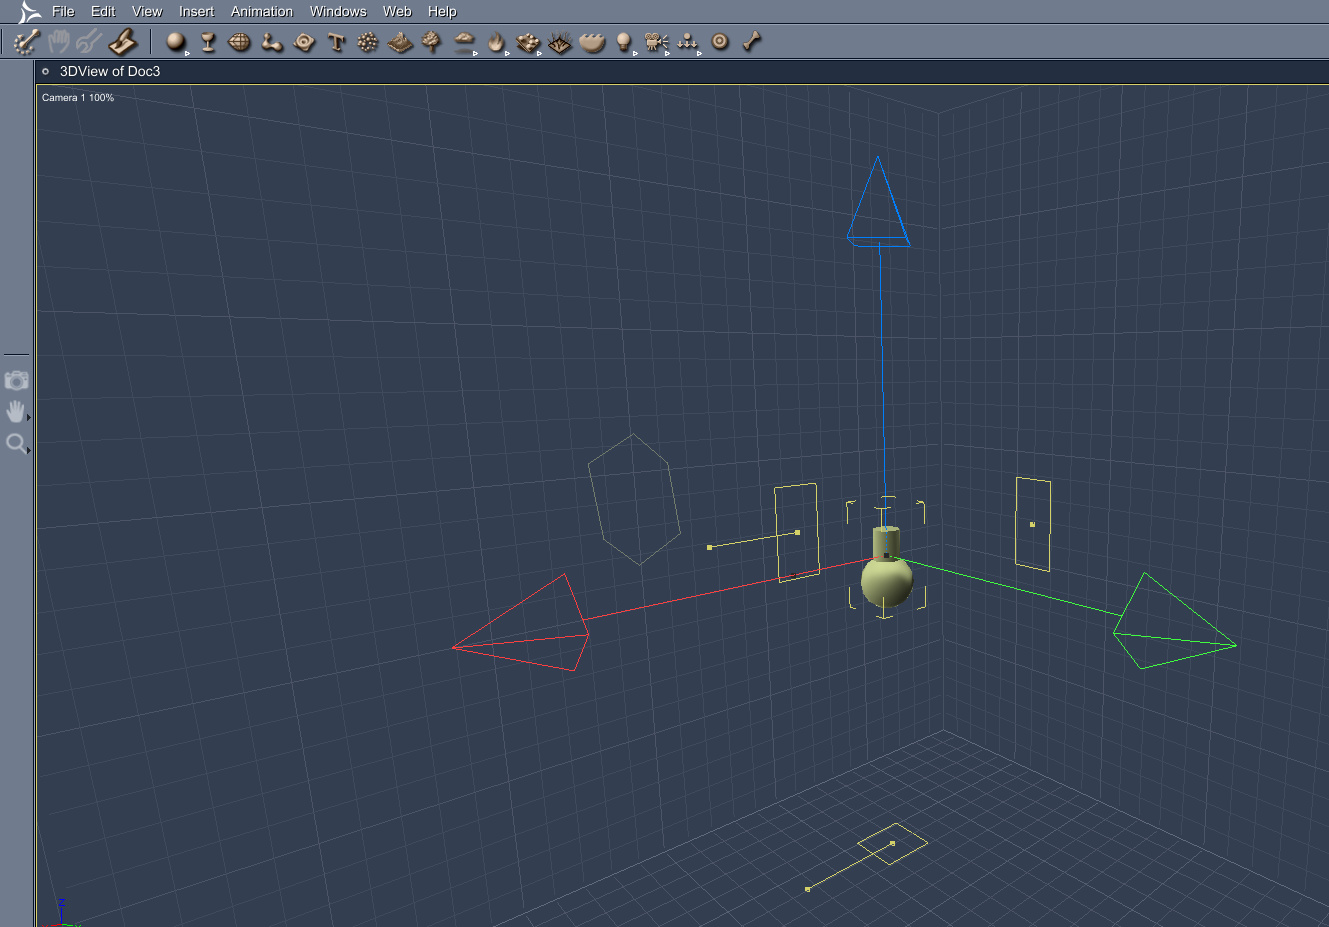
1. First, drop a bulb light onto the stage…
2. Click on the “General” tab in Carrara’s Assemble room. Boost your “Brightness” slider way up, maybe between 170% to 200%. Change the bulb’s colour to the colour you need. Run the “Range Falloff” slider up to 100%. Make sure that “Cast Shadows” is turned on.
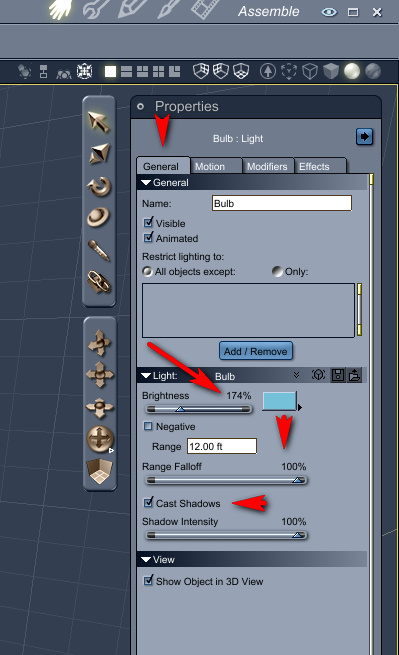
3. Now switch to the adjacent “Effects” tab. There, tick “Light Sphere”, then click the edit button next to it.

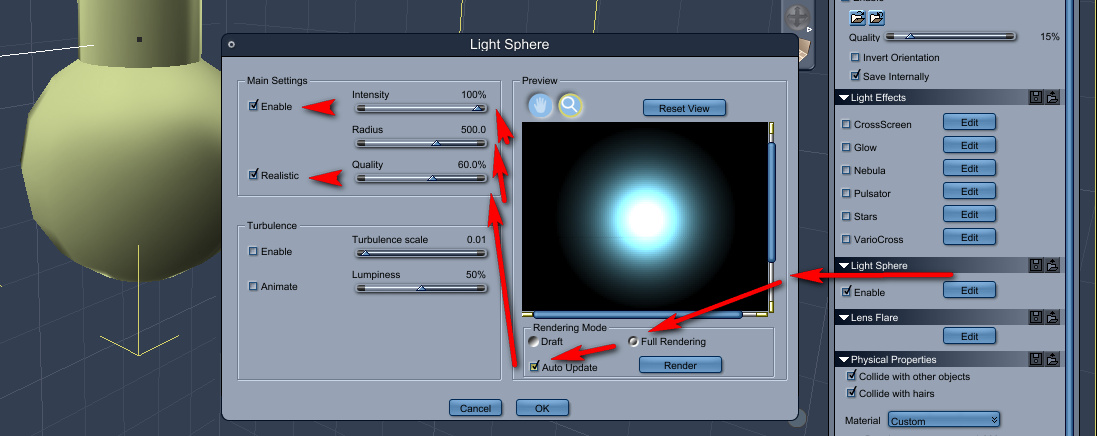
4. Clicking in the “Edit” box will pop-up a window containing all the “Light Sphere” effects. Here, turn on “Full Rendering” and “Auto Update”, so you can preview the glow effect in real-time. Then increase “Intensity” to 100%, “Radius” to about 500, and “Quality” to perhaps 60%.
5. Here’s the final PNG render of the glowing bulb light, with the above settings…
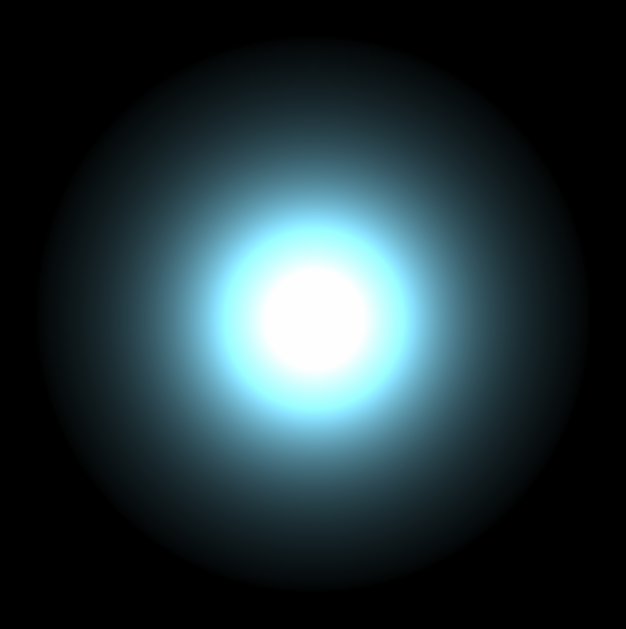
Compare this render to the the more subtle results I got from making a textured sphere glow in the last tutorial…

So, my conclusions from my Carrara glow experiments (so far) is:
* glowing bulb lights are vastly faster to render, and also more suitable for use as middle and far-distance lights in a scene.
* glowing textured geometry is likely to give far better and more subtle effects, and would be a good choice for props and characters that are close to the camera. Although choosing this way to make things glow is likely to significantly increase render time.
(As before, note that Google Chrome’s graphics rendering-engine can’t handle the subtle graduations of the light spillover, and will dither/”band” the glow effect thus making the renders look rather ugly)
How to make a simple sphere glow in DAZ Carrara 8:

1. File | New | Empty Scene
2. Drop a simple sphere primitive onto the stage. Keep it selected.

3. First we apply a basic texture to the sphere. To do this we go over to the General tab, over there on the right of the screen. There we click on “Preset”, in order to choose a texture for the sphere that will match the desired type of glow. I chose the “Blue Chrome” texture.

4. On the right hand panel, switch to the Shading tab, and click “Edit”. This will switch into Carrara’s Texture Room. Here we can see the sphere texture’s “Glow” channel, and we need to switch this channel from “Nothing” to “Texture Map”.
 (Ignore that the screenshot shows “Normal Map” instead of “Texture Map”: I messed up the screenshot).
5. Switch back to Carrara’s main Assemble Room. On the right hand panel, switch to the Effects tab, and then tick “Enable” in the “Aura” panel. Then click on the “Edit” button next to Aura. This will bring up the Aura settings window.
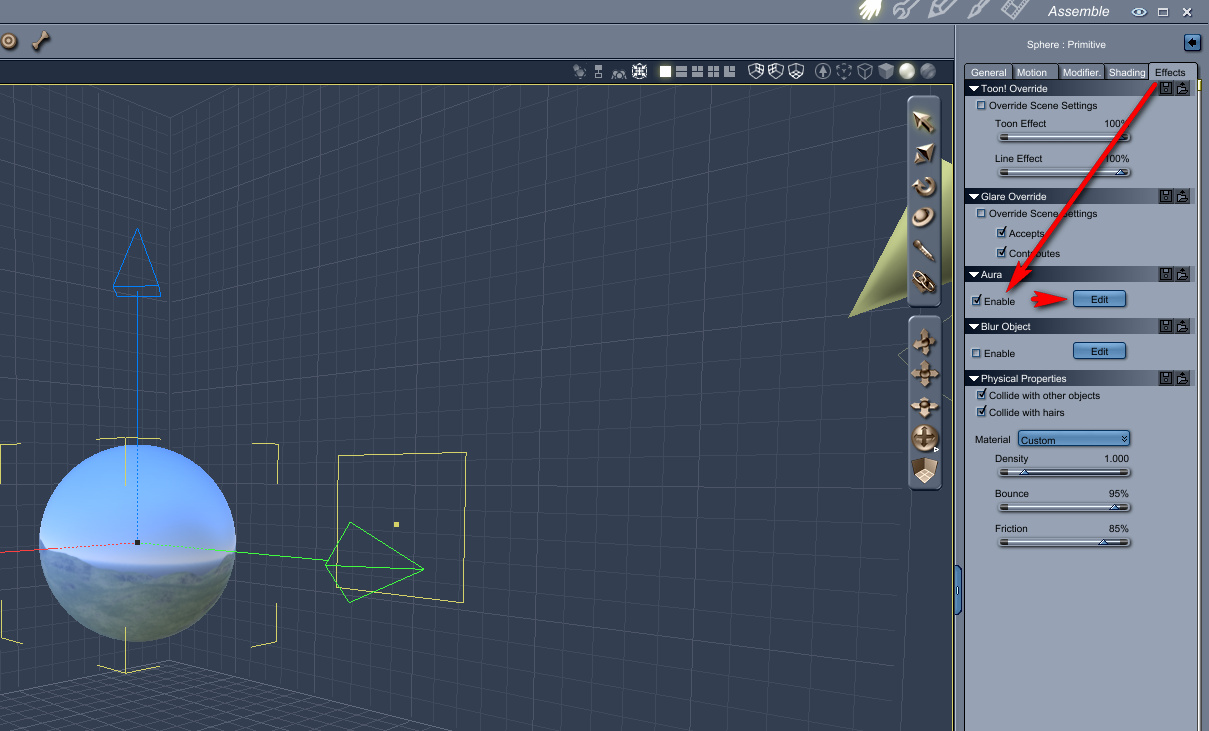
6. Your sphere should be glowing in the Aura setting window’s handy little real-time preview box (see screenshot, below). Click “Auto Update” in Rendering Mode, then slide the sliders to change the glow effect. Here I have the glow Radius at 70 (too high) and have ticked Distance Attenuation (meaning: adding the effect of light spillover, into the air around the sphere). I also have Intensity effect reduced, so that we can still see something of the original sphere texture. And I also changed the colour of the aura to match the sphere’s texture. When you have the glow looking how you want it to, then click OK.

7. Now switch to Carrara’s Render Room. Here I set an 800 x 800px render with Fast anti-aliasing. The initial render of the sphere will be almost instant. But then a little bar will appear at the top of the screen, preparing to overlay the glow effect. This may take a long time to run, even for a simple sphere. If it’s impossibly long for you, pressing Esc on your keyboard will stop almost instantly.

You can try to switch to a fast render preset…

But it hardly speeds up the slow application of the 3D Aura effect. The main render-speed killer here is having ticked that Distance Attenuation box in the Aura settings. A setting of 50 in Distance Attenuation is a good deal faster than 70, and yet still gives you something to add to with a glow layer effect later (when working on your final render in Photoshop). For a complex scene you might have to have minimal Distance Attenuation, and then add more glow later in Photoshop or (for animation) HitFilm.
Here’s my final render with an Aura | Radius | Distance Attenuation of 50…
And here is the same render with a bit of Photoshop enhancement, applying Alien Skin EyeCandy “Gradient Glow” filter to a circular selection (made just inside the rim of the sphere). The edges of the sphere are blended in a little by this Photoshop tweak, and there’s a more believable falloff of light.
(The Google Chrome browser can’t handle the subtleties of the glow banding, and will make it look rather ugly. Save the PNG and view it from your hard drive).
All in all, it’s way too complicated (iClone can make a sphere or any other object glow in about one second of work, and render it in real-time too). But it’s good to know spillover glow can at least be done in Carrara. For a more complex example see the Neon sample scene that ships with Carrara (Browser | Special FX | Luminescent Logo).
The other problem is that if the maker of the figure or model did not name things correctly, you have no way of finding the shader/material you need to glow. Sadly Carrara is not like Poser, where you can just ‘eye-dropper’ on something to find out what its material name is. Thus, though Carrara can do nice glows, the setup can be nearly impossible.
The sci-fi corridors I surveyed here last week feature heavily in the superb sci-fi short Modern Times, from Ben Craig in the UK. The FX and sci-fi sets were done with Carrara, DAZ Studio’s ‘big sister’ software.
MODERN TIMES from BC2010 on Vimeo.
Hat-tip: Carrara Cafe.
DAZ Carrara, DAZ Studio’s big sister software, is getting an upgrade. Daz Carrara 8.5 will be released 26th August 2013. Featuring…
* Support for the new DAZ 4 stuff: Genesis characters with autofit; Content Management System integration; and DSON importers.
* Better animation tools.
* Better identification of lights in the viewport.
* Memorize and restore shapes and poses.
* Mesh SubDivision and smoothing tools.

And don’t forget that Carrara now also has a third-party plugin for LuxRender.
It’s great to see that Dreamlight has released his new outdoors lighting and compositing system Light Dome Pro -R for DAZ Studio 4. This updates his old Light Dome Pro 2 and appears to combine it with parts of his old Mood Master 2 (both of which only worked in DAZ Studio 3.x until now). There’s also a welcome speed boost.
The new Light Dome Pro -R looks like a “must-have” for those who use DAZ Studio to create large outdoor scenes and then tweak them with Photoshop. I know from past experience that Light Dome is fairly simple to use once you learn a few easy steps, and that it gives great results. Light Dome Pro -R comes with a handy Photoshop Action which automatically loads all your seven render passes into Photoshop layers, where they can be automatically blended and adjusted with filters in real-time — thus cutting DAZ’s render-time dramatically. Since it’s only an Action, I’m guessing it’ll work with any version of Photoshop above about CS3?
Here’s the new video showing how it’s done (the intro sequence ends at 1:00 minute in, when the step-by-step tutorial begins)…
There’s also a longer 23-minute version of the video.
Of course, there’s nothing to stop you adding a render from the same camera with more dramatic lighting applied, to throw another flavour into the Photoshop mix of layers.
Also worth mentioning is the “glow effects” in the features list for Light Dome Pro -R. Be aware that this is just a whole-scene videogame-like high-contrast ‘bloom’ (yuk), rather than the ability to add per-object glow spillover of light into the air.
Included in Light Dome Pro -R is the old Mood Master 2’s simple Depth Fog / Haze, for easily adding a nice Vue-like z-depth fog to your landscape or cityscape. The fog effect alone is a good reason for getting Light Dome Pro -R, even if you’re not impressed by the other features. But we do appear to have lost Mood Master 2’s weather effects layers, such as rain etc. Possibly a new weather-tastic Mood Master 3 for DS 4.x will be coming along next from Dreamlight, along with time-of-day and night presets? Just my guess.
This works with 3D Delight as a renderer. There was also a later iRay version, but it was nowhere near as automatic or seamless.
Update:
Note that “- R” version 1.0.5 changes where you find it in your runtime. Instead of having to burrow around to find it down in My Library, it’s now up on Dreamlight | LDP-R, and is thus more easily found…
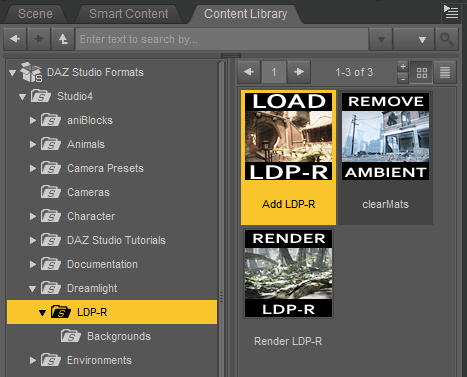
The basic workflow for “- R” is now…
1. Dreamlight | LDP-R | right-click on Load icon, “Open as New”.
2. Select the Skydome in the Scene tab. Then in the Content Library, drop down a level to find Background images, and apply a suitable sky to the Skydome.
3. Save the basic scene file. Load in your objects and arrange the scene artistically using the special LDP-R camera to view and frame it.
4. Ensure the scene’s render settings are as in PDF. This version of Light Dome Pro only works with 3Delight, not iRay.
5. Approximately set sun position by looking through Sun camera.
6. In the Scene tab, look through the Parameters LDP-R, set fog-depth – default is likely to be too far away. Try 2000 instead of 20000.
7. In Parameters, ensure set Ray-tracing is set. This is independent of the main Render setting.
8. Render, pick folder to save the output. ( C:\Users\YOUR_USER_NAME\Documents\DAZ 3D\Studio\Render Library\.. ) Close render windows when FOG finishes rendering, as it’ll be the last of the set. Save scene file and close DAZ. Load Photoshop, load renders into a single file by using the LDP-R Action.
Are you a DAZ Carrara user, but jealous of the DAZ Studio and Poser plugins for the free advanced LuxRender 3D renderer? Well, now there’s a new Luxrender plugin for Carrara! It’s called Luxus for Carrara and has just been released, at an introductory price of 30% off. There are 32-bit and 64-bit versions, and it works on Windows or Mac.
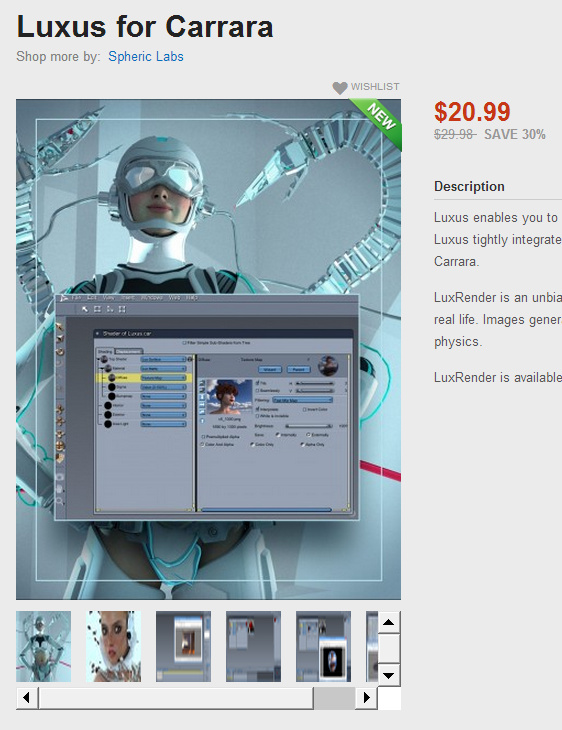
Freebies and an extra manual for Carrara Luxus can be had over at the Carrara Cafe website.
[Hat-tip: Jose Rendero]
3d fantasy artist DeeDee has a very interesting real-world comparison between Poser and Vue as a render…

Here’s a quick and easy ten-step workflow tutorial for DAZ Studio 3 users, on how to use a combination of Light Dome Pro 2 and Mood Master 2, to quickly light and then to fog/haze a large-scale outdoors scene. Followed by an easy compositing of the renders in Photoshop, and adding some FX.
Here’s the final picture which this tutorial will work toward…

Please note that LDP2 and MM2 only work in DAZ Studio 3.x.
1. Load and position your large-scale test scene in DAZ Studio 3.x. Here I’ve swiftly thrown together Stonemason’s Urban Sci-fi / Block 39 / Urban Future, pushed one tall building way back in order to try to create a sense of depth, and pointed a 35mm camera at it from the pavement corner. I didn’t apply any special DAZ MATs to the buildings. The “canyon” nature of the scene aimed to give LDP2’s system a good “workout”, in terms of getting the lighting to reach down into the canyon.
2. Find and load your Light Dome Pro 2 plugin, from DAZ’s “View” menu…

Then open up LDP2’s lights presets window…

3. Now simply double-click on a LDP2 lighting preset, to load its lights into the scene. In the example shown I’ve used the basic sunlight “Sundsvall 25” LDP2 preset. Note that you can go to LDP’s “Move and Scale” tab, and rotate the LDP2 dome so that the sunlight falls where you want it to.
I then switched from “Raytracing” to “Shadow Mapping” for my LDP2 shadows, and lightened the shadows with a 200% slider setting. It doesn’t look too bad, at least in DAZ’s real-time OpenGL preview, although note that this OpenGL image is not at all an accurate preview for your final render…

4. Important! Now save your DAZ Studio scene file [ File | Save | Scene ]. Call it something like “MyScene-Lights”. From now on, do not move the camera.
5. Open your DAZ Studio render settings, and ensure that you’re using DAZ’s native 3Delight renderer. You may want to do a few tiny thumbnail test renders first, say 300px with the default 16 lights.
Once you’re happy with the general look, switch over to the “Light Settings” tab again in the LDP2 control-panel. There bump up the Light Intensity from the default “16” to “32”. Doing this doubles your lighting quality (but it’s unwise to go beyond 32, unless you have a very speedy modern rendering PC)…

Then do your full render (1920px is the size I’m using here) to a file called something logical like render1.png.
On starting to render, LDP2 may automatically swop out all the preview lights for its LDP dome lights. This is nothing to worry about. This what this temporary effect looks like…

Here’s my final 1920px render using the above preset and settings, which took 14 minutes (inc. calculating 32 shadow maps) on what’s now a fairly old PC…

Yes those shadows look too dark, but we’re going to be using Photoshop’s Screen blending mode several times later on — which will lighten up those shadows as we blend.
(Of course, you could also get a similar quality ‘global illumination’ render with an external renderer like Reality 2.2 (for DAZ 3 + a PC with an Nvidia graphics card). So feel free to substitute Reality etc as your renderer, at Step 5. But by using the LDP2/MM2 method and DAZ’s native renderer I’m explaining here, we avoid the need to tediously adjust all the scene’s textures to suit Reality.)
6. Now save your scene again — this time using “Save as” [ File | Save As… | Scene ]. Name the new file something logical like “MyScene-MoodMaster”. It’s vital to make a second extra copy like this, since in the next step MoodMaster is about to destroy all the Light Dome Pro 2 lights! So make sure you have two DAZ scene files saved out: “MyScene-Lights” and “MyScene-MoodMaster”.
I then deleted all the LDP2 Pro lights from the Mood Master version of the scene, and applied a very dark light (in this case, DNA Winter_3’s “WN 004”) and then made a basic OpenGL render of it. This gave me a basic “glowing lights only” layer to work with later, in Photoshop…

Another way of doing this type of simple mask might be to use Dreamlight’s Mask Creator for Daz Studio.
7. Without moving the camera at all (very important!) in your scene, apply Mood Master 2. MM2 is not a plugin, so you’ll find it over in your Contents library…

Like LDP2, Mood Master is quite simple to use. Double-click the icon to “Add Mood Master 2” to the scene, then apply the simple “Z Depth” preset. This is what we get…

Now save this as a new render. Be careful not to save over your precious main render! Rendering this “Z Depth” render will be a lot faster than the main render was! For me, this MM2 Z Depth render took 90 seconds.
Now apply and render out any of the other Mood Master settings that you’d like to play around with blending in Photoshop. For this picture I also saved out “Miami Haze and Gradient” and one of the “Rain” presets. Remember that if you use a MM2 “Rain” render, then you’re going to have to create an extra “wet pavement + reflections” layer later in Photoshop.
OK, now we have all our required renders we can close down DAZ Studio…

8. Open up Adobe Photoshop and start a blank document that’s exactly the same size as your renders. Paste in your main base render. Then open the MM2 “Z-Depth” render and paste it over the top of your main render. Blend it [ Layer | Layer Style | Blending Options ] in “Blend Mode” set to Screen at 100%…

Hurrah, you just got a nice but basic Vue-like distance haze on the tower. Now save it out as a starter Photoshop file.
9. Looking good, but we’ve lost all the sky detail. Let’s bring back the sky, but better.
i. Merge the Main and Z-depth layers and name them “Main”.
ii. Create a new blank layer called “Sky”, and copy into it a suitably stormy sky photo. Send this layer backwards, then set its Layer Blend Mode to “Soft Light” at 100%. With a big soft 200px Eraser, remove most of the overlap, leaving just enough to suggest a damp sky that’s roiling above the tower and creeping down over the building edges. Then roughly select the tower itself with lasso, feather 50px and delete the selection — doing this helps retain the original Z-depth haze.
iii. Paste in your Haze render, desaturate it, and then blend it exactly as you did with the Z-Depth layer…
Now we have a nice convincing rainy sky…

Now paste in your OpenGL lights layer, and blend with our old friend the Screen 100% mode. Then duplicate this blended lights layer and add Gaussian Blur to it at about 6%. This will make the lights look like they’re being diffused into the rain. To remove any unwanted intensification of the Screen mode lightening, then use the Magic Wand on both Lights layers, and erase anything that’s not a light…

10. Now you can continue to play around in Photoshop with the extra MM2 layers you rendered, such as Rain. In the final picture I used the Rain layer twice, once slightly tilted. Then I added a reflections layer to serve as a “wet” pavement, some steam escaping from the manhole cover and two vents, the flower, some rain seepage staining onto the concrete, and another application of the Haze layer (which served to generally lighten the shadows on the main render)…
Then I added the final layer — a DAZ/Poser character which I posed then exported as an OBJ (without its reflection maps). I used Photoshop to match the robot’s colour to the background, and then used a dodge brush on it to correct a few inconsistencies in the lighting.
That’s it!
To summarise the basic workflow:—
Open your DAZ scene, import 3d models, pose, and set the camera view.
Apply Light Dome Pro 2 preset. Adjust Sun, Shadow Density, Light Density.
Save scene file. Render.
Save scene file again, as a new Mood Master copy.
Apply Mood Master 2, and then render out its Z-depth and other renders.
Open Photoshop and blend the Z-depth and Main renders (Screen, 100%)
Blend in other Mood Master layers (Screen, 100%), as you see fit.
Please note that this workflow is best used on large-scale open views/scenes.
Note also that there’s also an LDP2 addon which adds presets for sci-fi and fantasy scenes, Sky Pack: Out Of This World.
A first look at the upcoming OctaneRenderer render plugin for Poser, showing the workflow…
It’s also coming for DAZ Studio 4.5 too…
A free one hour Poser webinar on Lighting, 18th May 2012. Booking now.
A very cool set of Poser / Keyshot renders by David Constantine…

The workflow is…
1. Export a posed character as a FBX (DAZ) or Collada (Poser) file.
2. Import to Keyshot and stand your character against your chosen background.
3. Apply the background’s matching HDR light.
4. Render.
Keyshot is blindingly quick at rendering, at least with single objects against a 2D background. Keyshot ships with a range of background images that have matching HDR lights. These lights help the objects look as though they belong in the scene (as you can see above).
Sadly Keyshot is aimed at engineers and commercial product-photography people, rather than hobbyists, and so costs $1,000. Which does at least mean it’s blissfully simply to use, and can be fully learned in an hour. This is because it’s designed for those who are unfamiliar with 3D software, and who run screaming from the ludicrous interface complexities of software such as Blender. But the cost of Keyshot will put off many. It’ll cost even more, if you want an add-on HDR Light Studio pipeline (the latest version of this can apparently make a matching HDR from any background that you feed it).
Still… Keyshot is certainly one to consider, if you’re looking for a tax write-off and you want an alternative render engine for still images of Poser figures. Just keep in mind that you’ll need to fix eyes and eyelashes on Poser faces after import, and that Keyshot only ships with one skin material that takes ages to render.
In re-learning Poser Pro 2014 after some years away from Poser, these are the two most important things I’ve yet learned — in terms of how to make “speed previews” to check lighting and positioning:
1. You should turn off Anti-alias in the OpenGL Preview, which has the effect of removing the 20-second delay on moving from wireframe to OpenGL preview and generally speeding up the real-time viewport. Update: no longer needed on Poser 11.

2. On the default FireFly settings, simply turn Pixel Samples down to “2” and Min Shading Rate to “12.50”. Save it as a manual preset. Using this preset means you can render a small 640px preview in about five seconds. The textures will be soupy, but you’ll see how the lighting will actually look in a final render.

These simple tweaks (save them as Render Presets) vastly improve the experience of working with Poser.