Lucian Stanculescu, maker of Neobarok, has released v.0.9 for his equally free 3D modeller Clavicula. “Clavicula supersedes Neobarok, with more functionality and PCVR support”. As innovative and open source and stylish as Neobarok.


Lucian Stanculescu, maker of Neobarok, has released v.0.9 for his equally free 3D modeller Clavicula. “Clavicula supersedes Neobarok, with more functionality and PCVR support”. As innovative and open source and stylish as Neobarok.
Well, well. I find my new bargain depth-camera once worked with, of all things… iClone. To be specific, with iClone Pro 5 at 5.1 or above. Also required the Reallusion Mocap Device Plug-in v.1.1 (for the first Kinect for Xbox version, running the OpenNI 32-bit drivers). This plugin is not in the 5.x Resource Pack and is now utterly unavailable.
I discovered the iClone 5 compatibility because, many years ago, the official forum moderator stated of the Asus Xtion and iClone 5.x…
“The Asus Xtion will work with the Primesense/Open NI version of the plugin, but it lacks the advanced features of the Kinect For Windows version, including Near Mode and Head Rotation.”
This is confirmed by this screenshot, which shows the three mocap plugin packages then available with 5.1…

Great, though of course the Xtion camera owner must then have an archive somewhere of 5.x AND the first MoCap plugin (which had in it all the SDKs and other requirements). The latter was always a $150 purchase, never free or a bonus so far as I know, and I never bought it.
In practice, though… it may not have been terribly useful. It’s not as though you could do simultaneous face + body, driving the character in real-time WYSIWYG, and you’d be missing hand and head animations.
Out now, a new version of ArmorPaint, the PBR materials maker and 3D paint-on-the-mesh painter. Think of it as ‘Substance Painter for $20, without the subscription shackle’.

0.8 is described as “a major update” and it apparently also now runs on Android and the iPad, and has a new Cloud-based assets library. It’s sort-of-free. Free to compile from source code, or buy it ready-to-install for $20.
On the sidebar ‘directory’ of this blog, there’s now a new “motion capture” set of eight links. All in some way Poser/DAZ friendly. Some of this software has been around a while, in fact so long that it’s vanished from sale (mocap software tends to do that).
But the latest software is Movmi V1.2.4 (October 2021), which is freeware. From one-man developer Ahmed Askar, making a free AI-powered 2D video-based motion detector software for Windows 7. Movmi has had mocap extraction capabilities added in the last few weeks. Export appears to be to .FBX for now?
It’s AI, so the download is hefty at 1.1Gb. He probably needs to get it on a torrent, in time for when the masses arrive, but for now it downloads fast. The lad’s got the right idea: Windows 7 support, free, no sign-up required and ‘just download it’.
The free desktop PC software Microsoft Visual Studio Code (‘VSC’) is a sort of super Notepad++. It’s what you now want in order to copy-paste coloured code into the Renderosity Python forum, since a recent back-end forum update. Notepad++ on its own can’t do that particular job.
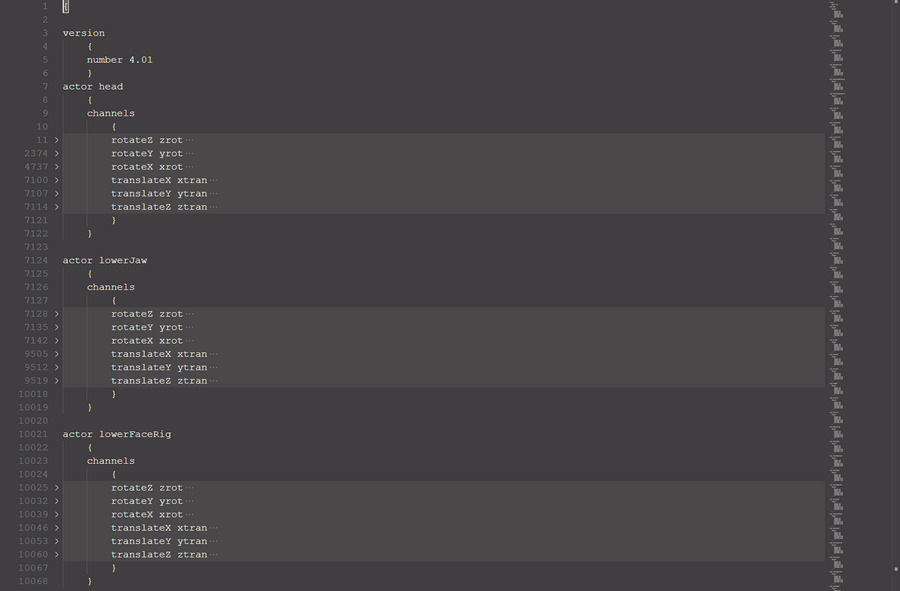
Here’s a handy tip for editing a non-Python Poser file with VSC…
Crtl + K.
Then hands off keyboard.
Then Ctrl + 3.
This collapses the zillion lines of nested code, as you can see here. Much more comprehensible now…
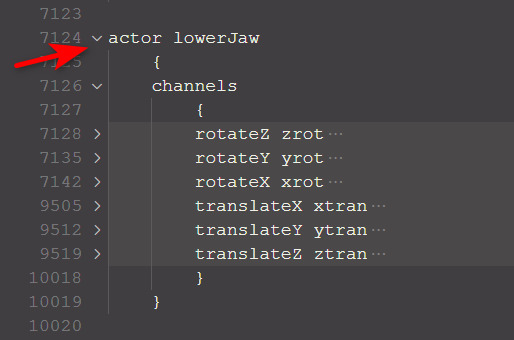
Then Mouseover the blank bit, to reveal the arrows that expand the hidden code block…
Not sure if this also works in Microsoft’s newly launched online version of Visual Studio Code, but it probably does.
Also, in the sidebar of this blog I’ve added links to a couple of free community-made editors for Poser file types (.CR2, .PZ2, etc).
Black Friday 2021 falls on Friday, 26th November 2021 this year. Way too late. Less than a month to Christmas. Haul it forward by a complete month, would be my suggestion. That’s what sensible consumers will be doing with their Christmas buying, for fear of truck-driver shortages, packaging shortages, gadget and computer shortages, fuel shortages, power-cuts, Internet outages, port snarl-ups and lockdowns.
Cyber Monday on the 29th November looks a bit more viable, though if Black Friday effectively comes forward then you have to wonder if anyone will have any Paypal left by the end of November.
Not a great deal left for my wants-list this year:
Two remaining Raffy Raffy Vue landscapes, Path Forest in Vue and Dangerous Canyon in Vue.
Two remaining Xurge M4 armours, ATES for Mike 4 and HYPER SUIT for M4.
Some CrossDresser Licenses. Not vital, but nice to have for a couple of Nursoda characters and I think I’m still missing Mavka.
A few 90%-off sub-$4 picks from the “nice to have, but don’t really need” items in the WishLists at DAZ and Renderosity and ArtStation Marketplace, with Renderosity edging ahead in terms of quirk-appeal. But that assumes a 90% off sale.
Blambot fonts, and Retro Supply’s $20 TOOM Horror Comic Font.
AKVIS Decorator 8.1 for Photoshop. But it never goes low enough, when you factor in the 20% UK sales tax that’s added at the Checkout. 50% off and bundle it with a 50%-off Charcoal, might do it.
Booksorber, for quickly digitizing books and journals with a digital SLR camera.
Poser 12 still doesn’t appeal — due to the need for Python 3 scripts and lack of changes at the Comic Book / Sketch end of rendering.
Note that the free G’MIC will not launch in Photoshop if the layer being filtered has multiple areas of transparency, as you might get from a .PNG render of a 3D scene. In which case, right-click on the layer and ‘Convert to Smart Objects’ first. Then G’MIC will launch for that layer. Apparently the mighty Photoshop still cannot handle more than one area of transparency in a layer, without such a conversion being done. Other similar software has no such problem.
Also, when filtering real-time Poser Comic Book renders for detail, such filtering is usually aided by having good quality (rather than muddy / low-res) textures loaded. Here’s how you do that with a Preview render…
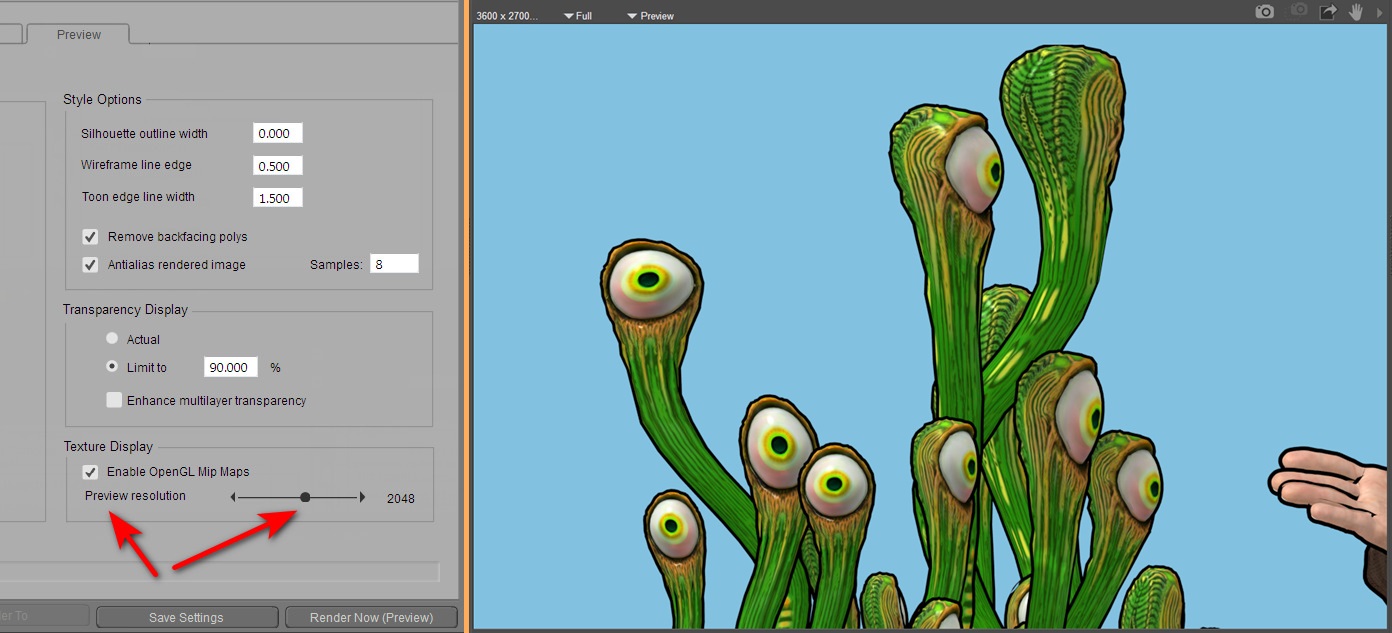
Obviously if you’re instead rendering for a Colour Flats layer in your Photoshop layer-stack, then the low-res textures don’t matter so much. Because you’re going to scour off all that unwanted grunge and noise with Topaz Clean 3.1 or G’MIC’s Comic Book filter. Ready to lay the Lineart layer on top.
New version of ADP’s free Poser to Blender script, with new fixes to run in Poser 12. Scroll down to 10th September 2021 post and install notes…

There is also now an automatic Blender to Poser conversion script, that goes the other way. Quickly liberating the wealth of Blender content locked in .blend files, for use in Poser.
Blender 3.0 now has an official release-date, 1st December 2021. This will bring its asset browser, aka a Content Library. It will also have many Freestyle and Grease Pencil improvements nailed down (as much as anything ever can be, in Blender), and the new Cycles X renderer. “X-what?”. Think normal Cycles but…
* 2 to 7 times faster
* apparently gets faster with the complexity of the scene
* works like iRay, the speckled complete scene pops in and then the speckles are progressively refined. No more tiling squares running across the screen.
* it overhauls the underlying render architecture, which should lead to further advances in the future.
Poser 11 and 12 use Cycles (branded as ‘SuperFly’), and thus Cycles X seems likely in Poser at some point in the years to come.
But I’m guessing Cycles X is probably not going to be CPU / GPU agnostic, like iRay is. Contrary to all the NVIDIA marketing ra-raa, any recent version of iRay will run perfectly well on CPUs alone. If you have enough CPU cores/threads for it. But it sounds to me like Cycles X will need a hefty and expensive GPU / graphics card.
I missed the news on Reallusion’s excellent Cartoon Animator 4.5, which had an update in July.
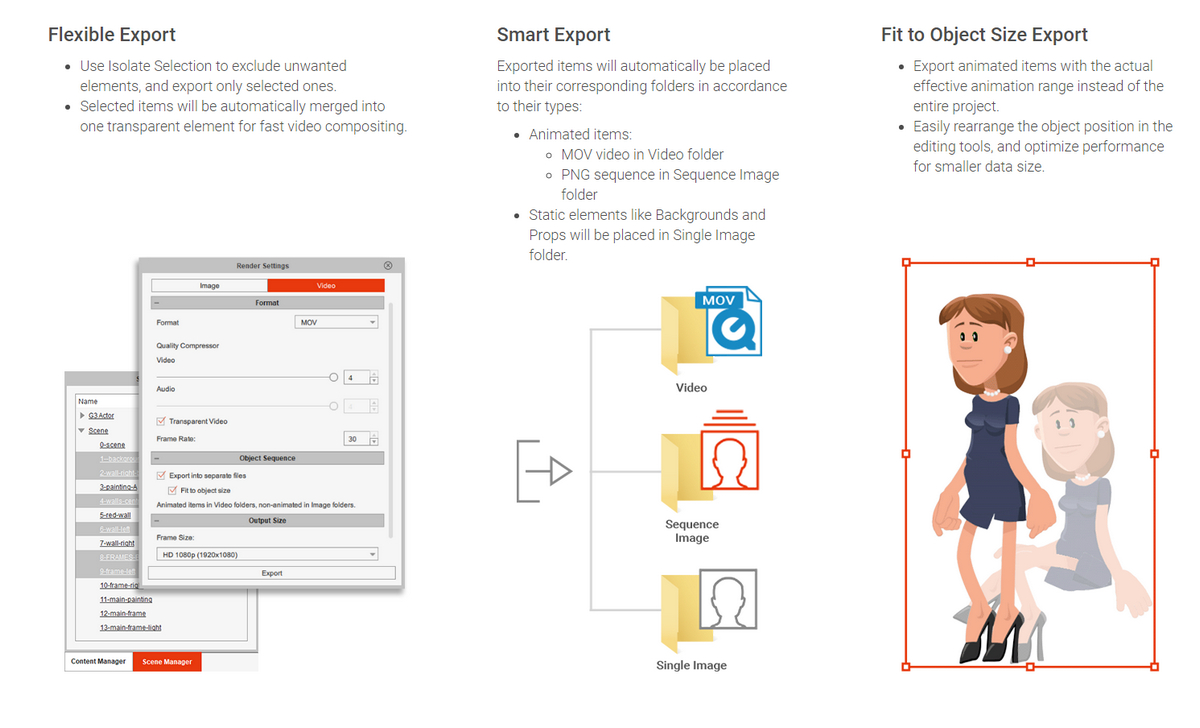
Version 4.5 supports export of transparent-background video (.MOV as ProRes 4444) and alpha-masked image sequence (.PNG, lossless, cropped to visible pixels). This means you can just layer the exported animation over your existing video footage, and it should blend in nicely. No green-screening needed, no ugly fringing of pixels at the edges. There’s a new video tutorial on YouTube…

Update, June 2022: this solution is now broken in the latest G’MIC, due to regrettable changes in the required filter. Should work on G’MIC 3.0.x or lower.
I’ve found a way to just about emulate the Topaz Clean 3 Photoshop plugin, using the free G’MIC filter set in its new Photoshop .8BF form. Since G’Mic also runs on Paint.NET and PhotoLine, it will also work there. I can’t vouch for Krita, as Krita bundles its own variant of G’Mic.
Why is this needed? Because Topaz Clean 3 is no longer sold. Clean was unique and useful for 3D comics people, old manga scanners, and those who wanted to perk up character screenshots from The Sims etc. My specific use case is filtering a ‘colour flats’ base render from Poser, which could be very nicely de-grunged with Clean 3.1 in Photoshop.
This is as close as I can get in 2021 to Clean 3. It uses G’MIC’s standard Artistic | Comic Book filter with the sliders tweaked as you see below. There is also a comparison with the original and the old Clean 3 result. The original render had already been taken some way by using a flat IBL light in Poser, but still had unwanted grunging and speckling.
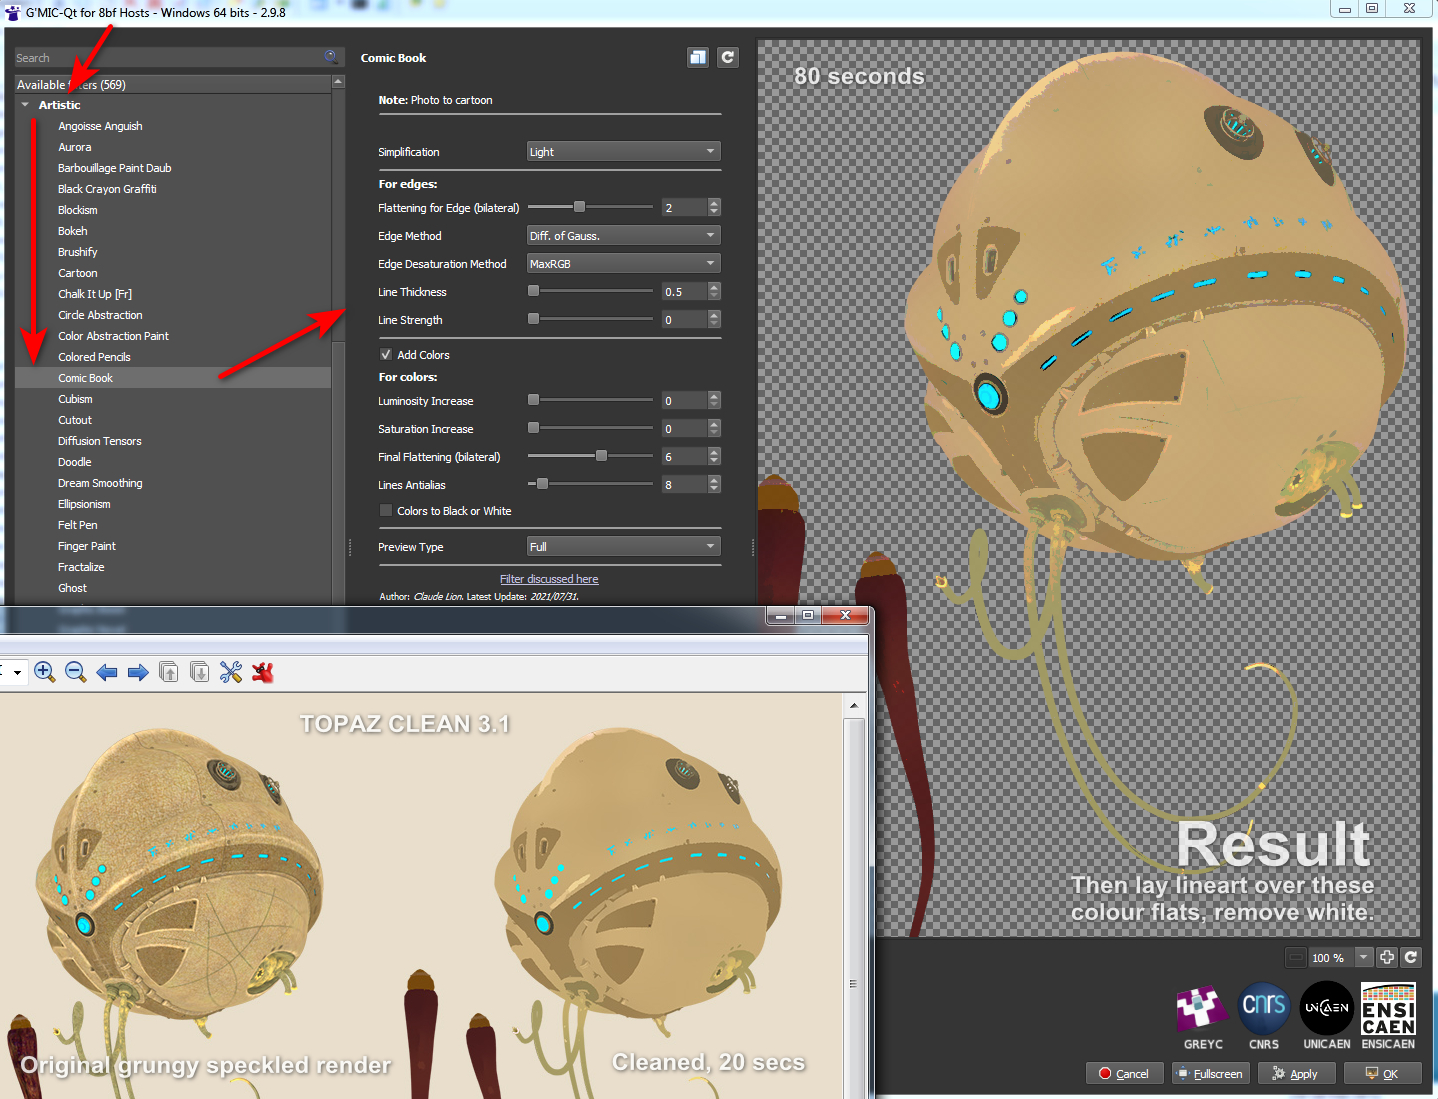
Pretty close, but there are drawbacks:
1. It takes a long time to run, 60 to 80 seconds on a workstation. Compared to a much more nippy 15 to 20 seconds for Topaz Clean 3.1.
2. You cannot take the Comic Book lines off altogether. Their lowest setting is locked at 0.5. This matters little, however, as you’re going to drop a real-time lineart render on top.
3. There are still some artefacts, that seem like posterization of the colours, here and there. Topaz Clean smoothly cleans them away, but G’MIC doesn’t.
But there you go… if you need free and no longer have Topaz Clean 3 for some reason or can’t (cough) find a copy, then this should help with the degrunging job for 3D comics when using layers (colour flats / details / lineart / shadows, all on their own filter-able and editable layers).
And it can do so in a more satisfactory way than the obvious and cringe-y ‘Posterized in Photoshop’ look, or by applying some swirly-blurry mess-filter that destroys edge details. The aim here being to somewhat emulate the crisp ‘paint-bucket’ flats that a professional comic-book colourist might start the colouring process with.
Call me ‘delicate’, but I’m not so keen on painful swollen fingers and hurty-squinty eyes. Thus I went in search of a way to bypass the thin dark scrollbars in Poser 11 and DAZ Studio. Of course you can always ignore them and click into a panel/window to get ‘focus’ on it, then scroll and scroll again using a central mouse wheel and big twisty finger-movements. That’s not ideal, and such clunkiness is compounded by mouse-wheels that tend to become gunked up and anything but free-wheeling.
But imagine you could just hover your mouse over a Library window pane in either DAZ or Poser, auto-focusing the mouse into that window. Then with a single ‘right-click and hold’ (anywhere) start elegantly scrolling the window’s contents down or up. With the scrolling all then under the control of very subtle mouse movements. No need to shift focus to a different Library pane, by first clicking inside it. No need to then scrollwheel and scrollwheel again and again to get down a long list.
There’s a surprising lack of Windows helper software to do this. Some of the functionality is built into modern mice, but while they sort-of work well on browsers they can’t do what I describe above. Nor can they distinguish between different Library panels in DAZ and Poser. Is there software that can? Well, Google Code has kept the old abandonware MoScroll_0_7 beta around, but I found it very basic and so far as I can tell no longer does anything at all after install.
The best option that can is the equally old Windows abandonware called Pointix Scroll++ 2.02. Basically its unique function can be summed up as “right-click anywhere to smoothly scroll, under the control of subtle mouse-movements”, and it can handle focusing into subtly-different Library panels with ease. This software has now turned up at at WinFiles Mouse and Keyboard Utilities. There is also a slightly different copy of 2.02 on Archive.org in an old cover-disc bundle of freebies and shareware titled ‘(Czech) PC World 1999-06 CD-ROM.’ Yes, it’s that old. But… like many old bits of Windows shareware it still works fine!
After getting it (ideally from WinFiles, which is what worked for me) you then visit Carlton Bale’s page “How to Scroll if Your Mouse has No Scroll Wheel”. There he has the Netplaque and zeroes you need to enable this old abandonware. He also offers some useful settings screenshots. Tested and working for me on the WinFiles download of v.2.02. He also hosts an archive of the slightly more advanced 2.05 version, but so far as I can tell neither his Netplaque or regfix work on that.
So… 2.02 is still working fine, is stable and doing a lovely job (though I can’t vouch for it on Windows 10). Version 2.02 may thus be enough for you, especially if you need scrolling on a scroller-free device. It works very nicely with auto-focusing on and scrolling the Poser and DAZ UIs, and does the same with the PzDB 1.3 external content library manager. Very useful when scrolling past 463 similar MAT files. It’s also said to be especially unique and handy for handling scrolling and zooming on large 3D CAD files, which may also interest some readers. A commenter on the Carlton Bale page linked above said…
in CAD its function is to zoom in and out wherever you place the cursor. This is currently done with the wheel in jumps, as you can zoom only to the extent the finger can turn the wheel. And the wheel gets ruined very often. It’s a delight to just press the button and get to the required zoom at fantastic speed.
Which kind of suggests it may also be of use for things like Google Earth, though I’ve not tested it with that. I know it also works nicely with Trello, as it can also scroll sideways. A normal mouse will only scroll up and down on a Trello column. The original market was business people with big spreadsheets to navigate, hence it had to go sideways as well as up/down.
Back in Poser 11 it does not affect or work on the Poser dials, which is good, though it will scroll down a big list of morphs like any other long UI panel. It will not scroll up and down a long list of render presets in Poser, regrettably. Nor will its side-scroll work with the Poser 11 side-scrolling Material Room.
You can still make a static right-click and get the usual Windows context-menu.
Now my main problem was that it uses the right-click button, a problem possibly unique to me. Because using Scroll++ meant my trusty old StrokesPlus mouse-gestures software was bjorked, and StrokesPlus is vital for things like Back / Forward in a Web browser and in Explorer. Eek! Could StrokesPlus perhaps emulate the unique Scroll++, I wondered? Well, while it can assign things like a clunky PageUp key as acSendKeys(“{PGUP}”), its ‘local’ scrolling commands all now fail to work (not because of Scroll++, I might add). So no, StrokesPlus is not going to do what Scroll++ can do.
The most obvious solution, for me, was to…
– run StokesPlus set to a right-click.
– run Scroll++ set to a middle-click.
… and thus they don’t conflict and fight over the right-click. It’s easy to swop them over, if that proves more convenient for long periods of either 3D or Web work.
But this meant that my trusty five-year old and somewhat gunked Microsoft mouse was no longer up to the job of the middle-click. Even a cleaning and a generous squirt of WD40 would not fix it. Thus a new mouse was needed… with a highly sensitive middle-click (unlike the old one). Thankfully I had picked one up in a sale a while back, and it had been stashed in a drawer ‘waiting for the day’. It’s HP’s perfect wired clone of my previous and also perfect wired Microsoft mouse. I presume they’ve licensed this very affordable re-brand of Microsoft’s usually very expensive mouse. Get them while they’re hot.
So there, for those who need it, is the obvious additional solution to running StokesPlus (old LuaScript version) and Scroll++ 2.02 in tandem. A new mouse. The middle-click button is now a pressing-only button, although can also finesse the scroll with a slight nudge, and is thus less likely to become gunked up too quickly.
Project Dogwaffle’s Howler 2020 has been released for free on Windows, although you are “encouraged to make a donation to fund future development”. As noted here on this blog, v.2020 saw… “a revamp of the legacy brush engine, new paper textures, and rationalised de-cluttered media presets”. The latest release is Howler 2022.1, which is several bounding doggie-leaps ahead of 2020. But still only $77 for a perpetual licence. Definitely worth a look, and you’re sure to find a use for it at some point.
QuarkXPress? Isn’t that the ancient crumbly DTP software that your grandpa once used, and which vanished long ago?
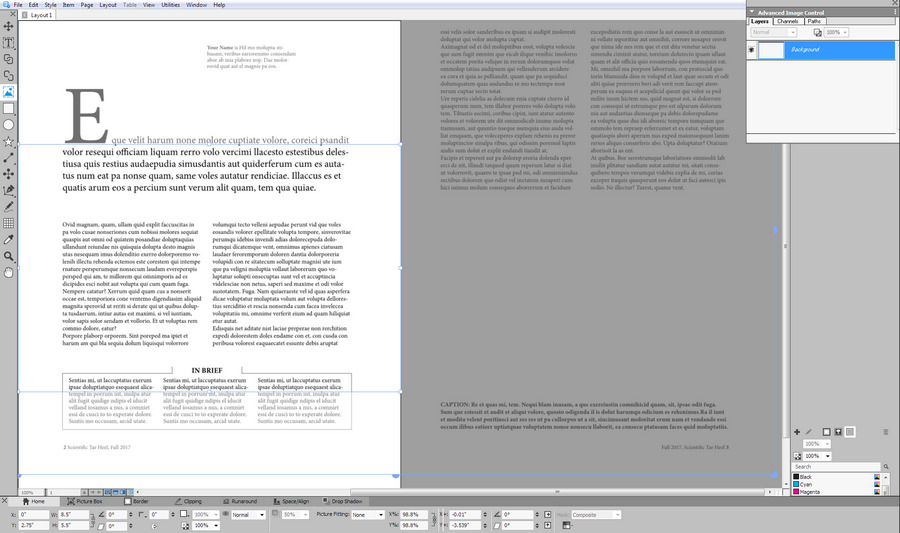
Oh, my… how times have changed. The DTP desktop software QuarkXPress is still here and still venerable, yes, but their sprightly annual releases have been playing ‘the tortoise and the hare’ with Adobe since 2015. Six years later it’s catching up in numerous ways, and even surpasses InDesign in many features. Their polished 2021 version is now out, and has .SVG support among other things. I recently took a look at the free trial and was pleased to find it very mature and with annual updates at a one-time purchase of £362 (an annual subscription, but if you cancel then it appears you get to keep the software). Expensive but not the silly prices of yesteryear, and within reach of many. Oh, wait… 50% off for August which puts it about £180…

It’s no longer just for laying out PDFs for magazines, books and academic journal articles. A key feature is support from absolute reproduction of a DTP print layout in Web browser-friendly HTML5, plus support within that for animated elements (slide-in banners, slow zooms into pictures) and looping animated GIFs (v.2020) and now SVGs (v.2021). Also video and 360-video. Its scripts are standard javascript. The increasing range of creative possibilities are thus obvious, and you can also leave a gap in the layout then hack the HTML to add whatever unsupported Web do-dah you want to display in a browser. Although in the latest version you can also insert snippets of HTML.
The cheap and relatively friendly Affinity Publisher and Microsoft Publisher don’t offer HTML5 export at all. Adobe’s equivalent DTP software InDesign still requires a third-party plugin to export an HTML5 layout, and both are monthly subscriptions.
So I’m pleased to find that QuarkXPress seems a viable Adobe-alternative for DTP and the WYSIWYG Web. It is now sitting at a quite nice point in the market, in terms of a reasonable price, superb export features, and having a perpetual licence version. There’s a QuarkXPress 2021 free-trial (Windows 8 and up, v.2018 being the last Windows 7 version). One to look at if you want to make a device-responsive online magazine with creative interactivity that goes beyond page-curls and a few clickable Web links.
That said, it may not be what some will need for making motion-comics or basic 2D interactive Web ‘visual novels’. There is now software dedicated to such things.
As with all major software these days, there has to be a warning as it’s being newly mentioned here: Windows 10 and Mac OS desktop updates may bjork your favourite feature or break the software totally. But that doesn’t appear to be the case here.
Until today I’ve been a clueless newb when it comes to finding and loading/running the Python scripts that shipped with Blender 2.79. I knew Blender could run Python, but had no idea where to find that in the folders or the UI. Here’s what I learned with Blender 2.76, an older (2016) version needed to access many older free assets in .blend files. All this assumes that you don’t have a weird custom UI embedded in the .blend file you downloaded, which unfortunately is perfectly possible to set up in Blender’s utterly vile UI. In which case you may never find the following items.
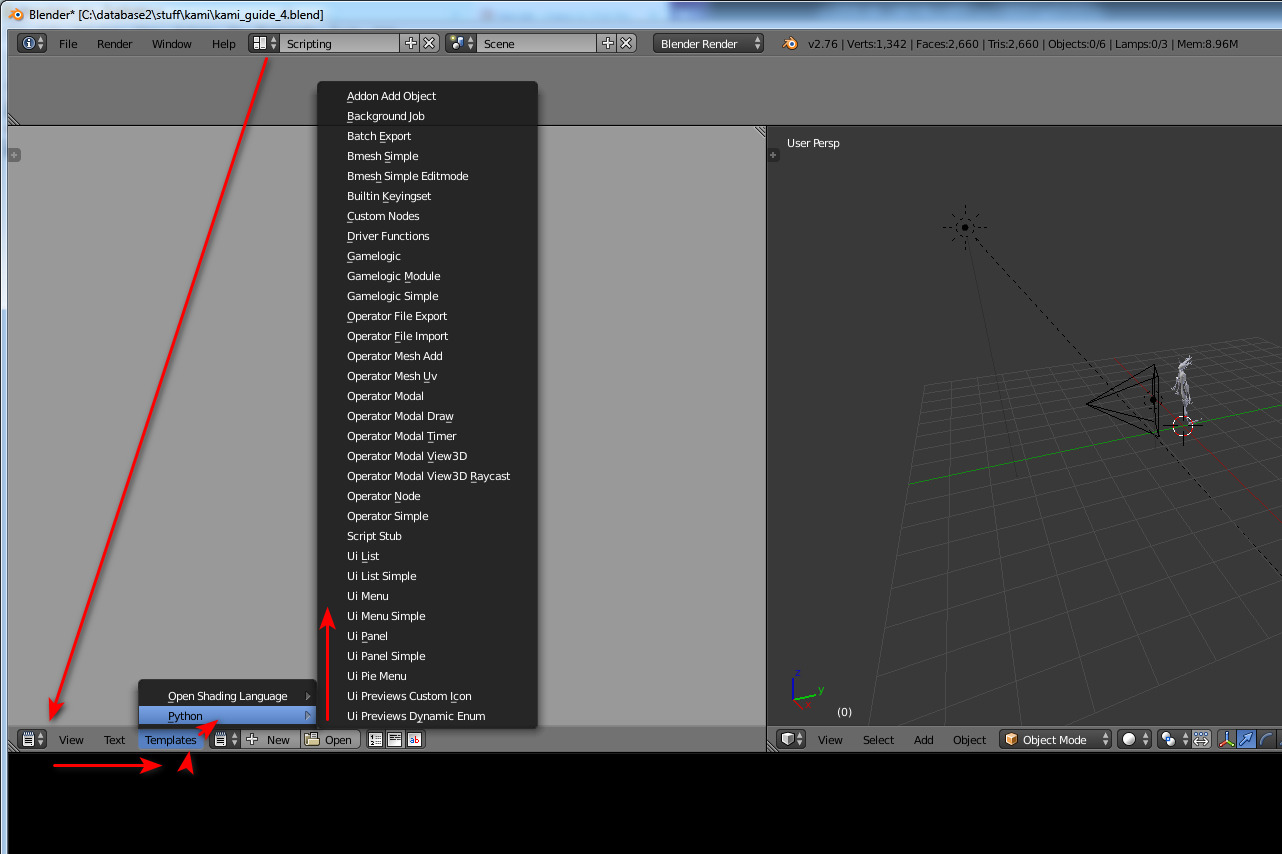
Anyway, in Windows a set of free helper (‘template’) scripts are installed to…
C:\Program Files\Blender Foundation\Blender\2.76\scripts\templates_py\
Then in a sensibly set up normal Blender UI, you can find these at…
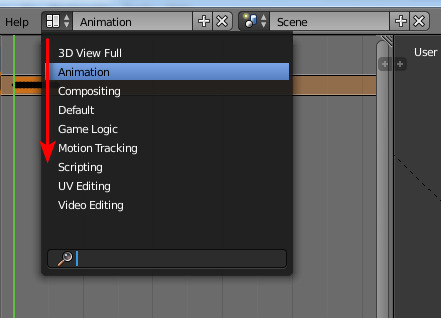
The Animation UI also has access to the same “Templates” menu-item, but it seems the other UI panels do not.
You can also paste your own .PY Python scripts in the above folder, and they will also show up in the UI via the same method. If you only have a few (you’re likely just being forced to use Blender to export from some free .blend files for DAZ or Poser use) then you probably want to prefix their name to get them to the top of the list (e.g. AAA-my_script.py).
Note that you don’t need to re-start Blender after pasting a new script in there (as you do with Poser), in order to see it on the list.
The above then appears to be the somewhat trickier-to-find equivalent of Poser’s Python scripts folder…
C:\Program Files\Smith Micro\Poser 11\Runtime\Python\poserScripts\ScriptsMenu
And of Poser’s rather more obvious Scripts drop-down…

The other and more ‘console-like’ temporary way to test an in-progress script in Blender is to go into Scripting or Animation, as seen above. But then…
1. Click on Text menu label.
2. “Create a Text Block” (Crtl + N).
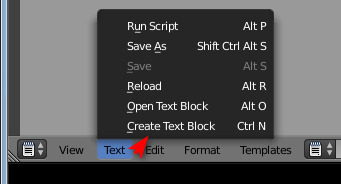
3. You see an empty panel. Here you paste in the script from a plain text editor such as Notepad++.
4. Slide the infernal UI out the way, as it’s likely hiding the ‘Run Script’ button over on the right.
5. Run script (Alt + P). You can also do this by going back into the Text menu, where it is the top command.