
DALL.E 2. has launched in beta. $15 effectively buys you three or four text prompts per day, across a month. The lucky beta “users get full usage rights to commercialize the images they create”. There’s also a bung for those around the world who can’t afford that… “Artists who are in need of financial assistance will be able to apply for subsidized access.”
Category Archives: Automation
A small Python script to load and render a Sketch Preset in Poser 11
Copy-paste, save as a .py Python script. Make sure the ” ” are not fancy curly quotes. They need to be straight quotes… " "
|
1 2 3 4 5 6 7 8 9 10 11 12 13 14 15 16 17 18 19 20 21 22 23 24 |
# A Python script to load and render a Sketch Preset in Poser 11. # Do the usual setup stuff. import poser scene = poser.Scene() # Tell Poser we are going to want to load a Firefly options preset. option = scene.CurrentFireFlyOptions() # Set Firefly as the render engine. scene.SetCurrentRenderEngine(poser.kRenderEngineCodeFIREFLY) # Load the Sketch render preset, and Firefly will # accept it even though it's not a .prp Firefly preset. # Note that the backslash is required on the file path. option.LoadPreset("C:\sketch_preset.pzs") # Now the important bit, we have the script switch # Poser's render mode to Sketch. scene.SetCurrentRenderEngine(poser.kRenderEngineCodeSKETCH) # Do the render with the current Sketch preset and Sketch # engine, and adopt the other current render settings. scene.Render() |
Yous custom Sketch presets are found at:
C:\Users\YOUR_USERNAME\AppData\Roaming\Poser Pro\11\SketchPresets
or
C:\Users\YOUR_USERNAME\AppData\Roaming\Poser\12\SketchPresets
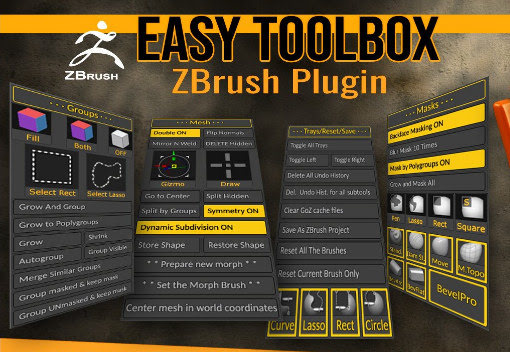
Release: Easy Toolbox ZBrush Plugin
Posted on
by
 Posted in Automation, Companion software, Special Offers and Discounts, Spotted in the News
Leave a comment
Posted in Automation, Companion software, Special Offers and Discounts, Spotted in the News
Leave a comment
Looking rather useful for $3.50, Easy Toolbox ZBrush Plugin aims to speed your work with the software’s uncongenial and confusing interface, by…
“gathering together, in a single interface, many of the most useful functions of ZBrush that you use all the time.”
DAZ 3D bridge for Photoshop – it needs Photshop CS6 32-bit for full functioning
After a little wrangling and bashing I was able to get the DAZ 3D Bridge for Photoshop, posted about yesterday, fully running. Including its “Update” and “AutoUpdate” features.
Required:
1. As per my tutorial yesterday, the latest DAZ Studio 4.20.0.17 64-bit, and its latest DS4_3DBridge_1.13.0.17_Win64.exe Bridge. This Bridge then installed to both DAZ 4.20 and to my 64-bit Photoshop 2018. The latter is here superfluous though, as we also need to get another and 32-bit Bridge plugin into Photoshop CS6 to get the Bridge fully functional.
and
2. Photoshop CS6 32-bit, with its 32-bit plugin installed from an old DS4_3DBridge_1.6.2.70_Win32.exe installer I found on an old backup DVD. Note that install of this requires a DAZ Studio 4 32-bit version to be present (I used an old 4.12.x 32-bit), or else the vital Bridge install will be refused. 32-bit parity between the two is important. You may also want your old DAZ 4.12 Pro serial to activate the 32-bit DAZ, though that is probably not needed. No serial was needed for the Photoshop side of the old 32-bit Bridge. No damage was done to my DAZ Studio 4.20.0.17 64-bit by the install of an old 32-bit version over in C:\Program Files (x86)
It’s possible you don’t even need that old 32-bit Bridge installer, as a there’s also a current 32-bit one still available in your DAZ Product Library. The current is DS4_3DBridge_1.13.0.17_Win32.exe

Usage:
Then I just load Photoshop CS6 32-bit, load its 32-bit version of the DAZ Bridge, it will then auto-launch my latest DAZ Studio 4.20.x 64-bit. Then, the 32-bit CS6 plugin can happily talk to the latest Bridge script/camera in the 64-bit latest DAZ Studio. Update and Autoupdate work perfectly. Importing an iRay render into Photoshop also works fine. Use the 3D Bridge camera. I assume it’s all direct script-to-script talk at that point, and thus no .EXE bit-parity is required.
So… the problem appears to have been that everyone had moved on to 64-bit Photoshop, partly breaking the Bridge’s “Update” and “Autoupdate” features. But the current plugin still works fine if you give it a 32-bit Photoshop CS6 with an old 32-bit Bridge plugin located in Photoshop’s plug-ins directory.
I should say that all this happens for me in Windows 7 64-bit, and that later versions of Windows may not be so co-operative.
Also found: the original Bridge PDF User Guide from 2008. Never updated, it seems.
Up and running with 3D in Photoshop, via the free DAZ Bridge
Here’s how to get the free DAZ Bridge running with Photoshop, and streamline a chunk of the workflow with my additional automated script.
1. Download the Bridge.
BRIDGE: Most people will want the 64-bit installer current at DS4_3DBridge_1.13.0.17_Win64.exe and this is working with the latest DAZ Studio 4.20.x. DAZ Studio lacks Poser’s ability to render to a multi-layered Photoshop .PSD, so this is the only official way to get renders over to a layered Photoshop file.
PHOTOSHOP: In this 64-bit case you need a 64-bit Photoshop that also supports 3D. Adobe recently pulled all 3D support from Photoshop, for rather murky reasons. Technically that should not matter, as all we’re doing here is bringing in a 2D render via a Bridge. But you may still want to revert to an older 3D version of Photoshop. The following tutorial assumes Photoshop 2018 on Windows.
2. Install the DAZ bridge. In the installer, you specify the plugins directory for the version of Photoshop you want to target. In this case…
C:\Program Files\Adobe\Adobe Photoshop CC 2018\Plug-ins
3. Once installed, go look in your regular Photoshop’s ..\Plug-ins directory and you should see a new ..\DAZ 3D folder there, and inside that a psdzbridge.8li file. Success.
4. Now load Photoshop. Open the backdrop image (aka ‘background’, aka ‘backplate’) you want as the base layer for your picture, above which your 3D DAZ renders will appear as adjustable layers. Ideally this backdrop is not at some huge size, but rather more like 1800-2400px wide. Then you run the Bridge script thus…

6. The Bridge’s mini UI panel will then appear in Photoshop. DAZ Studio will also be auto-launched at the same time, if it wasn’t already running. Give it time to load. In DAZ you will see you now have a special camera which is being used to get and pass the renders, and you will automatically be looking through that camera.
7. In DAZ, the Backdrop now needs to match the same one you have open in Photoshop. I wrote a script that automatically takes care of all the fiddly steps involved in this: it first invites the user to select and load the same backdrop they’ve already loaded in Photoshop. Ignore other manual switches, as the script will take care of them. This is how you load a backdrop image…

Then, once you’ve done that, the script continues. It auto-sets the Viewport ratio to the new backdrop, then also matches the current render size to it in pixels, and finally it turns off visibility of the backdrop in renders. The script also sets the iRay Max Time (i.e. maximum render time) to 30 seconds.
* Script (save as Photoshop_Bridge_helper_script_for DAZ_Studio.txt and then rename to .dsa).
(I have a tutorial here on how to pin a script to your DAZ UI’s ‘Scripts’ menu).
8. Both DAZ and Photoshop should now have the same auto-magically matched backdrops. Set up your prop or figure in DAZ, via the special Bridge camera, so as to match the backdrop in terms of position and lighting.
For 64-bit users to get a cutout render on transparency, you need to first click “Preview Image”. This doesn’t Preview in 64-bit (see below for details) but does set up “Render to New Layer” to render onto transparency. 32-bit users with CS6 need no such workaround.

In Photoshop and via the Bridge’s mini UI, you then “Render to New Layer”. The resulting render will perfectly match the backdrop in Photoshop, and will also be a cutout on transparency.
And the DAZ render time is now reasonable, taking 30 seconds to get into Photoshop. The seconds can be adjusted at the foot of my script. Adjust the time to as long as you can bear…
// Max Time in seconds
oProperty.setValue(30)
oProperty.getValue()
Yes, sadly 64-bit users have to do a proper full render in DAZ before it’s brought into Photoshop. Because the Bridge’s “Preview” button no longer works in 64-bit. What “Preview” was supposed to do was… “create an image or layer in Photoshop using the current DAZ Studio viewport image.” But for most this no longer works. Bridge now only works fully if you can use this method which involves having CS6 32-bit on a 64-bit system.
Thus for most people the best way to get an iRay render into Photoshop with any speed is to manually cap the render time to just 30 seconds, which my script does for you. At my default of 30 seconds the iRay render’s result is grainy, yes… but that doesn’t matter for me. The aim in Photoshop is “painterly via a filter”. The grain thus gets smushed away by the filter, and the painterly effect is perhaps even helped along a bit by the grain….

Alternatively you could try setting your DAZ engine to use a superfast custom iRay preset you have working with a ninja $1,000 graphics-card, or manually set the near real-time render-engine of OpenGL, after my script has run.
The advantages of rendering to layers over a matched background are various. Layers can be filtered differently or faded out for a ‘depth fog’ effect. Cutout edges can be stroked. Layers can be moved or deleted without having to go back into a big 3D scene. Very large complex pictures can be built, potentially with many elements, without burning out your PC trying to render some DAZ mega-scene all in one go.
That’s it. Enjoy, as the DAZ Photoshop Bridge could have cost you $200 back-in-the-day!
Testing DAZ 4.20.0.17
The DAZ installer 4.20.0.17 (latest installer) has been installed here and the new DAZ has had some testing.
1) I found I had to recreate my Scripts menu and re-assign a custom shortcut. The items were still there (F3 | left panel | Custom | expand) but there was no scripts menu for them and one vital item had lost the keyboard shortcut.
They had all lost their native ‘Scripts’ UI menu, off which they hang. This menu had vanished, despite the UI layout preset being the same.

2) The slightly older 4.20.0.2 had a bug which I found. This prevented it from fully returning to the UI after fullscreen (Shift + F11). This bug appears to have been fixed with the new 4.20.0.17 (latest installer), but for keyboard presses only.
‘Why would you want to fullscreen’, you ask? Because doing so with the Viewport set to iRay means you can save the largest possible iRay ‘File | Save Last Draw…’ render. You already have an iRay render in your Viewport, so why render it again? It’s there, so just save it out in a micro-second. Admittedly it may be far from perfect after maybe eight seconds or so of rendering, but good enough for use in a complex compositing mix over in Photoshop.
So, keyboard fullscreen is fixed with 4.20.0.17. However, the scripted automation is not fixed. Using the script commands…
MainWindow.goFullScreen()
MainWindow.exitFullScreen()
… has the same problem as before. It works, and as if you were pressing keys. But the Viewport is then found to be kaput on return, whereas it was fine for simple key-presses. After the scripted fullscreen the Viewport is found to have lost all its widgets, and the display hangs forever displaying a ‘uniform grey’. DAZ has to be closed to cure the problem.
This script bottleneck is cured in VisNews #30 (April 2022), when the reader is shown how to chain together DAZ scripts, custom keyboard commands, mouse-gesture freeware and a Python script, such that…
I can now draw a simple “N” mouse-gesture in DAZ… and 90 seconds later I automatically have an eight-layer Photoshop .PSD file of quality artwork, ready for further creative compositing work.
This timestamped .PSD, dropped onto the Desktop, also has a Viewport ‘Save Last Draw…’ iRay render in in, made in fullscreen.
I should say however, that the VisNews solution is Windows-only and all renders must be at 1681px by 1141px. The size is due to the impossibility of forcing the Viewport Draw to be larger than the 1200px-height monitor size being used.

Synthetik Studio Artist 5.5 and Poser 11
There are plenty of bits of software that will take this sort of lineart and filter it. This unfiltered example of source lineart is from Poser 11, with the real-time comic book option set to b&w and simple lighting.

Such lineart can be filtered by, for instance, the free G’MIC which has a big range of filtering options. The new G’MIC 3.1 will be out for Photoshop in a few days, and will add another comic-oriented filter. Then there’s Digital Auto-Painter (DAP), though only its graphic-novel preset is of real use for lineart — and with a bit of twiddling that can be emulated with the free G’MIC. A nice one I rate is Redfield’s Sketchmaster, especially if you want a kind of soft pastels look. Some people even work wonders with the native Photoshop filters, chaining them together in an Action. AKVIS Charcoal I tried some years ago, and though kind of nice it was slow. It may have improved since.
Topaz Clean 3 is also useful for cleaning off the bump-map and muddy-texture grunge, prior to any filtering. That can also be emulated with the free G’MIC. Though the sadly-discontinued Topaz Clean 3 is more than twice as fast, on what is a very slow process.
Now I’ve found another new way of filtering. I discovered that the maker of DAP had launched a new Style Animator 1.0 at $40. It vectorizes lineart, and can then apply a preset style. Kind of like SketchUp’s line styles, which many readers will be familiar with. I tried it, it’s nice, it works, but… is somewhat limited in its range.
Yet the idea of Style Animator 1.0 led me to discover software that’s been hiding in plain sight for the last 20 years. So much so that I don’t think it’s ever had a review. At least, I can’t find one. It’s Synthetik Studio Artist, which is from developer John Dalton and recently had a major update to 5.5.5. If the $40 Style Animator is a cute little furry Bush Baby, then the $200 Synthetik Studio Artist is a massive chest-beating 500lb Mountain Gorilla. And just as fearsome to approach, as it’s not easy software to learn despite the 560-page manual and a wealth of video tutorials. ‘Autopainter’ it may be… but it sure takes some getting used to. Yet recent intensive testing shows it has at least half a dozen great possibilities ‘out of the box’, when fed Poser lineart. When I say great I mean ‘looks relatively hand-made, without being cheesy’. The next edition of VisNews will have the details.
There’s a generous non-expiring free trial for it, and I’ve made two free preset actions for it which are on Dropbox.
1. Open File | New Source and Canvas (Ctrl + N), and select some Poser lineart.
2. Type number 100 in the h Mult box on the import parameters, to get the Canvas the same size as the Source image you’re loading onto it. Sadly this step can’t be automated.
3. Run one of my preset actions. If you loaded a .PNG with an alpha mask, then run the main action. If you loaded a render from Poser’s Sketch (no alpha possible), then run the Sketch one.
4. Either should result in the output of a cleanly masked .PNG file , when you use “Save Canvas as…” to save a .PNG file.

The Poser inks after my preset

A Poser Sketch render after my preset
There are of course just starting points. The idea is you bring the output into Photoshop. Output should be the same size as the source, and so easy to composite. Here G’MIC has added a finishing touch, seen most clearly on the toes. Not one line of this was inked by hand…

Figure is ‘BioBot’ by AntFarm.
G’Mic as a Topaz Clean replacement
Update, June 2022: this solution is now broken in the latest G’MIC, due to regrettable changes in the required filter. Should work on G’MIC 3.0.x or lower.
I’ve found a way to just about emulate the Topaz Clean 3 Photoshop plugin, using the free G’MIC filter set in its new Photoshop .8BF form. Since G’Mic also runs on Paint.NET and PhotoLine, it will also work there. I can’t vouch for Krita, as Krita bundles its own variant of G’Mic.
Why is this needed? Because Topaz Clean 3 is no longer sold. Clean was unique and useful for 3D comics people, old manga scanners, and those who wanted to perk up character screenshots from The Sims etc. My specific use case is filtering a ‘colour flats’ base render from Poser, which could be very nicely de-grunged with Clean 3.1 in Photoshop.
This is as close as I can get in 2021 to Clean 3. It uses G’MIC’s standard Artistic | Comic Book filter with the sliders tweaked as you see below. There is also a comparison with the original and the old Clean 3 result. The original render had already been taken some way by using a flat IBL light in Poser, but still had unwanted grunging and speckling.
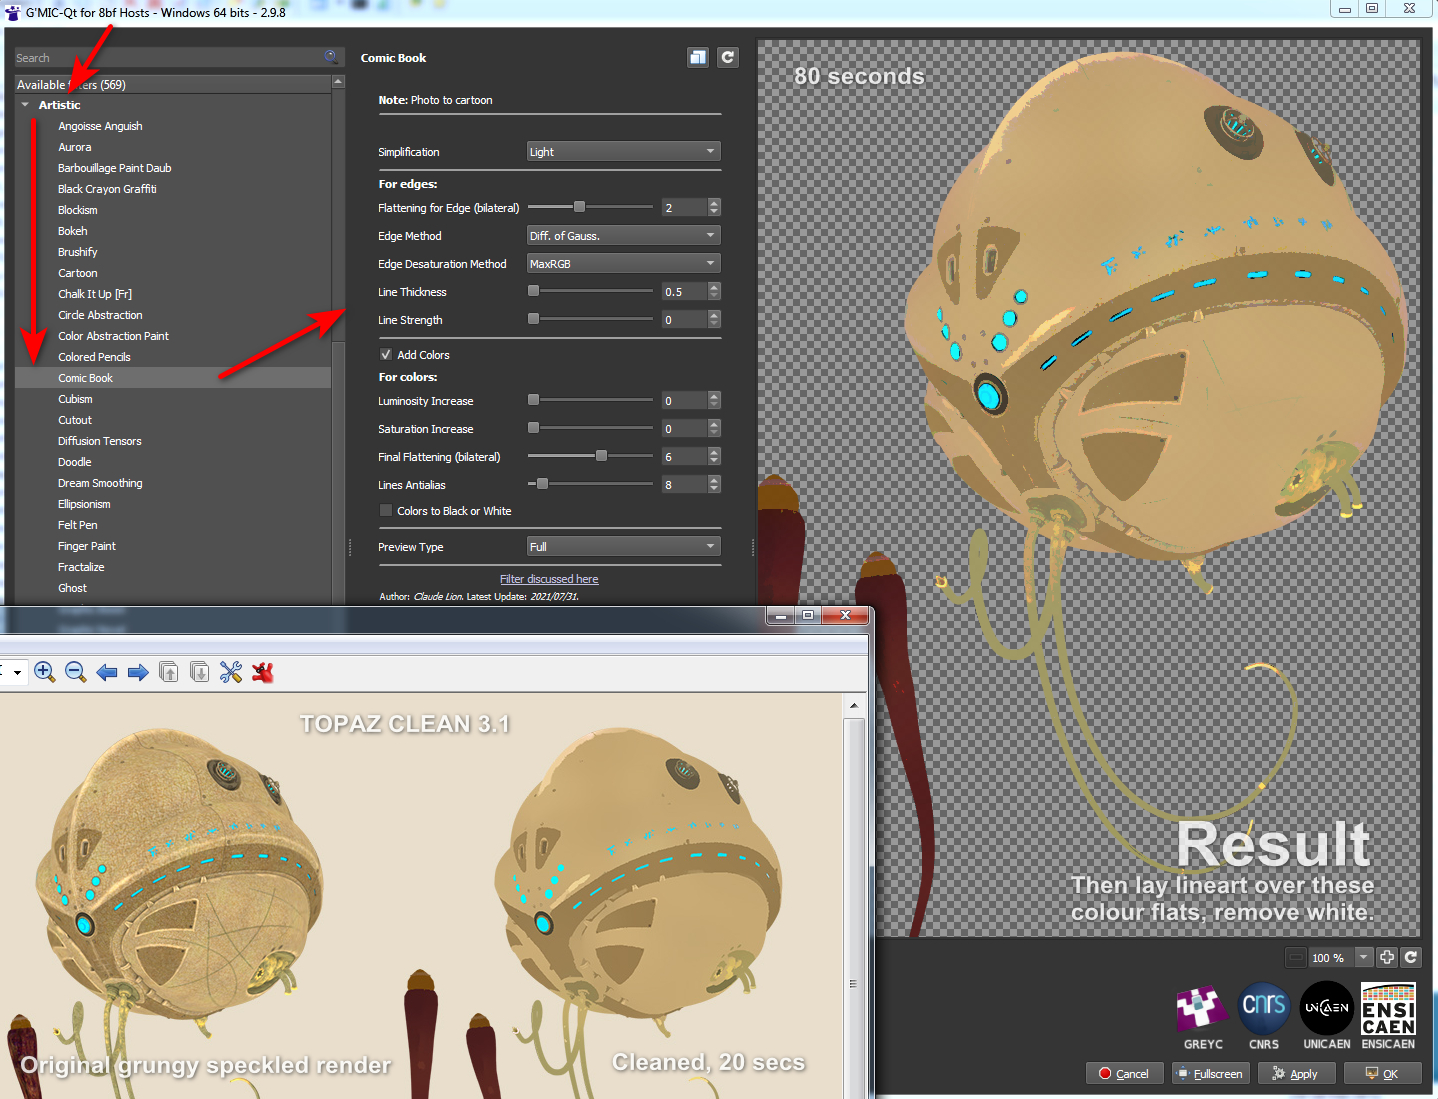
Pretty close, but there are drawbacks:
1. It takes a long time to run, 60 to 80 seconds on a workstation. Compared to a much more nippy 15 to 20 seconds for Topaz Clean 3.1.
2. You cannot take the Comic Book lines off altogether. Their lowest setting is locked at 0.5. This matters little, however, as you’re going to drop a real-time lineart render on top.
3. There are still some artefacts, that seem like posterization of the colours, here and there. Topaz Clean smoothly cleans them away, but G’MIC doesn’t.
But there you go… if you need free and no longer have Topaz Clean 3 for some reason or can’t (cough) find a copy, then this should help with the degrunging job for 3D comics when using layers (colour flats / details / lineart / shadows, all on their own filter-able and editable layers).
And it can do so in a more satisfactory way than the obvious and cringe-y ‘Posterized in Photoshop’ look, or by applying some swirly-blurry mess-filter that destroys edge details. The aim here being to somewhat emulate the crisp ‘paint-bucket’ flats that a professional comic-book colourist might start the colouring process with.
Bypassing the scroll-bars problem in Poser and DAZ: with Pointix Scroll++ 2.02
Call me ‘delicate’, but I’m not so keen on painful swollen fingers and hurty-squinty eyes. Thus I went in search of a way to bypass the thin dark scrollbars in Poser 11 and DAZ Studio. Of course you can always ignore them and click into a panel/window to get ‘focus’ on it, then scroll and scroll again using a central mouse wheel and big twisty finger-movements. That’s not ideal, and such clunkiness is compounded by mouse-wheels that tend to become gunked up and anything but free-wheeling.
But imagine you could just hover your mouse over a Library window pane in either DAZ or Poser, auto-focusing the mouse into that window. Then with a single ‘right-click and hold’ (anywhere) start elegantly scrolling the window’s contents down or up. With the scrolling all then under the control of very subtle mouse movements. No need to shift focus to a different Library pane, by first clicking inside it. No need to then scrollwheel and scrollwheel again and again to get down a long list.
There’s a surprising lack of Windows helper software to do this. Some of the functionality is built into modern mice, but while they sort-of work well on browsers they can’t do what I describe above. Nor can they distinguish between different Library panels in DAZ and Poser. Is there software that can? Well, Google Code has kept the old abandonware MoScroll_0_7 beta around, but I found it very basic and so far as I can tell no longer does anything at all after install.
The best option that can is the equally old Windows abandonware called Pointix Scroll++ 2.02. Basically its unique function can be summed up as “right-click anywhere to smoothly scroll, under the control of subtle mouse-movements”, and it can handle focusing into subtly-different Library panels with ease. This software has now turned up at at WinFiles Mouse and Keyboard Utilities. There is also a slightly different copy of 2.02 on Archive.org in an old cover-disc bundle of freebies and shareware titled ‘(Czech) PC World 1999-06 CD-ROM.’ Yes, it’s that old. But… like many old bits of Windows shareware it still works fine!
After getting it (ideally from WinFiles, which is what worked for me) you then visit Carlton Bale’s page “How to Scroll if Your Mouse has No Scroll Wheel”. There he has the Netplaque and zeroes you need to enable this old abandonware. He also offers some useful settings screenshots. Tested and working for me on the WinFiles download of v.2.02. He also hosts an archive of the slightly more advanced 2.05 version, but so far as I can tell neither his Netplaque or regfix work on that.
So… 2.02 is still working fine, is stable and doing a lovely job (though I can’t vouch for it on Windows 10). Version 2.02 may thus be enough for you, especially if you need scrolling on a scroller-free device. It works very nicely with auto-focusing on and scrolling the Poser and DAZ UIs, and does the same with the PzDB 1.3 external content library manager. Very useful when scrolling past 463 similar MAT files. It’s also said to be especially unique and handy for handling scrolling and zooming on large 3D CAD files, which may also interest some readers. A commenter on the Carlton Bale page linked above said…
in CAD its function is to zoom in and out wherever you place the cursor. This is currently done with the wheel in jumps, as you can zoom only to the extent the finger can turn the wheel. And the wheel gets ruined very often. It’s a delight to just press the button and get to the required zoom at fantastic speed.
Which kind of suggests it may also be of use for things like Google Earth, though I’ve not tested it with that. I know it also works nicely with Trello, as it can also scroll sideways. A normal mouse will only scroll up and down on a Trello column. The original market was business people with big spreadsheets to navigate, hence it had to go sideways as well as up/down.
Back in Poser 11 it does not affect or work on the Poser dials, which is good, though it will scroll down a big list of morphs like any other long UI panel. It will not scroll up and down a long list of render presets in Poser, regrettably. Nor will its side-scroll work with the Poser 11 side-scrolling Material Room.
You can still make a static right-click and get the usual Windows context-menu.
Now my main problem was that it uses the right-click button, a problem possibly unique to me. Because using Scroll++ meant my trusty old StrokesPlus mouse-gestures software was bjorked, and StrokesPlus is vital for things like Back / Forward in a Web browser and in Explorer. Eek! Could StrokesPlus perhaps emulate the unique Scroll++, I wondered? Well, while it can assign things like a clunky PageUp key as acSendKeys(“{PGUP}”), its ‘local’ scrolling commands all now fail to work (not because of Scroll++, I might add). So no, StrokesPlus is not going to do what Scroll++ can do.
The most obvious solution, for me, was to…
– run StokesPlus set to a right-click.
– run Scroll++ set to a middle-click.
… and thus they don’t conflict and fight over the right-click. It’s easy to swop them over, if that proves more convenient for long periods of either 3D or Web work.
But this meant that my trusty five-year old and somewhat gunked Microsoft mouse was no longer up to the job of the middle-click. Even a cleaning and a generous squirt of WD40 would not fix it. Thus a new mouse was needed… with a highly sensitive middle-click (unlike the old one). Thankfully I had picked one up in a sale a while back, and it had been stashed in a drawer ‘waiting for the day’. It’s HP’s perfect wired clone of my previous and also perfect wired Microsoft mouse. I presume they’ve licensed this very affordable re-brand of Microsoft’s usually very expensive mouse. Get them while they’re hot.
So there, for those who need it, is the obvious additional solution to running StokesPlus (old LuaScript version) and Scroll++ 2.02 in tandem. A new mouse. The middle-click button is now a pressing-only button, although can also finesse the scroll with a slight nudge, and is thus less likely to become gunked up too quickly.
On the Kirb
A quick experiment to see if Mike M’s “Jack Kirby in 3D” dream is actually possible. The style can certainly be approximated, and quickly.

Yes, I know, shadows and other embellishments would need to be added. The colours would also need to be muted back to more of a “faded 1960s comic-book” look (I’m not a fan of garish re-colours of 1960s comics, printed as reprints on slick white paper). A firmer holding-line would need to enclose the character, and some clean up is needed on the over-complicated head.
“Get a Sammy on the job…”
It’s always good to hear about a new semi-automated AI assistant feature for the free Unity engine, to remove some of the drudge-work. The ArtEngine apparently automates seamlessly tiling of materials, and also…
“up-resing, de-blur, un-warping, color matching”

Drawbacks: appears to need an NVIDIA graphics card, and costs a ridiculous $1,140. Still, it’s likely to be a herald of things to come in Semi-automated Assistant AIs.
We probably need a short name for those in creative production, actually. How about SAMAI or SAMAAI, to be pronounced in conversation using the friendly non-scary name “Sammy”. A Fully Automated Routine AI would be a FARAI, pronounced “Fairy”. Or just said as “Sam-eye” and “Far-eye”.
Out of the shadows
Portrait Shadow Manipulation is an interesting new technology, hot from the Google labs.
It automatically lifts hard shadows in a head-and-shoulders portrait, these being the shadows of the sort commonly seen in pictures and videos casually made by amateurs in sunny places. Here’s the research video and a useful screenshot from it.
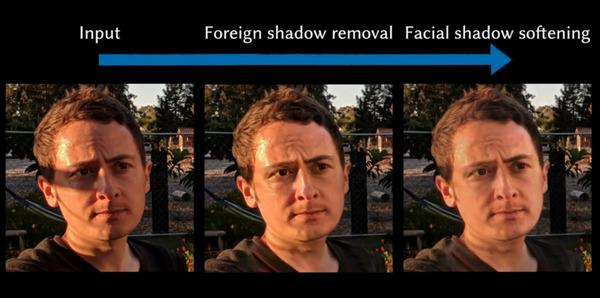
It also removes ‘sweat-shine’ highlights.
As you can see, if plugged into a graphics package, this technology might produce better base-portraits from which to then build comic-like art and line-art. Since what you want for your comics ‘colour flats’ layer, under the lineart, is a fairly ‘flat’ lit face or body. To which you add the shadow-render as a separate and adjustable third layer. Otherwise you’re never going to control the shadows so they display in a believable and uniform way, across the 120 panels of a 28-page comic.
What would be even more interesting would be to go the other way with the new technique, and to ‘auto-cast’ shadows onto fairly flat-lit faces, just by knowing where the eyes / mouth / shoulders are.
Freebie: Automatic OBJ Exporter
What’s that you say? You want semi-automatic speedy export of any Genesis figure from DAZ Studio, to use with Poser’s real-time Comic Book mode? What? And you also want it posed and clothed?
And you’d like to add fast and stable poly-reduction to about 200,000 polys, to make the figure wieldy inside Poser in real-time? And you want all but the unwanted specular textures loading back onto the OBJ, when you load it in Poser?
Oh, and you’d also like the poly-reduction to be done by an efficient stable super-fast third-party decimator that doesn’t crash or stall (i.e. MeshLab), or take forever to produce a crumpled mess (i.e. DAZ Decimator), or which needs three hours of wrangling and head-scratching to even start to make work (i.e. Blender)?
You’d also like this done in less than four minutes?
So… you want a miracle, right? Well, it’s here. All this is available in the new free Automatic OBJ Exporter suite of scripts, which provides a step-by-step and highly-automated way of getting posed/clothed Genesis figures to Poser for tooning. Works in Windows only, and to be so fast it requires the $52 Atangeo Balancer — which a script will launch from an icon inside the DAZ Studio Library.
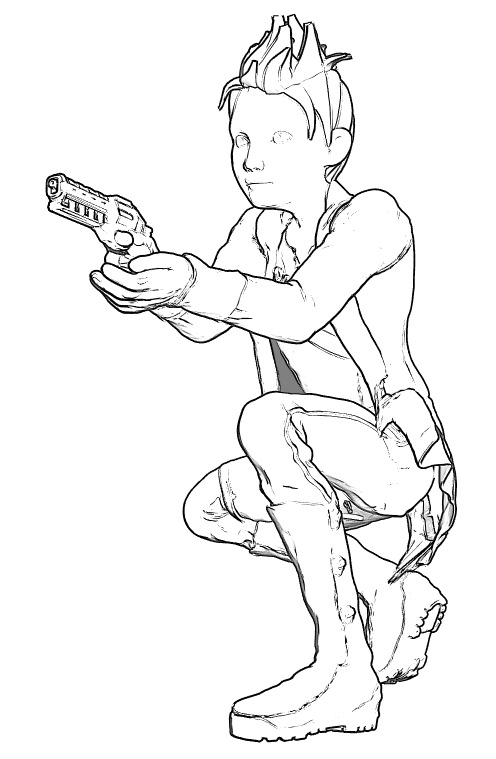

G8M, with lineart and toon in Poser 11. Yes, with extreme poses / tight clothes you may have to fix some poke-through via Photoshop’s heal/clone brushes. And yes, you’ll also likely want to blend in a shadows render too, which hasn’t been done for this demo.
There’s a clear read-me, but here are a few extra tips on use:
1) On importing to Poser, there will be a message that the Specular materials cannot be found. They’re not needed for toon and are not available because they were deleted earlier by a script. Just carry on loading and the rest of the textures will load on fine.
2) Once you’re happy with your reduced OBJ in Poser, obviously you then re-name its export sub-folder to something meaningful like Export_0001_Kid_Bounty_Hunter_01 and also delete the larger original OBJ in that folder (it’s the one that now has a -bak file-name). The next time you run Automatic OBJ Exporter, you rename the final created export sub-folder as Export_0001_Kid_Bounty_Hunter_02. And so on. Otherwise Automatic OBJ Exporter will over-write your older exports.
Actions for Blender
Blender has record-able Actions, like Photoshop. Who knew? It’s a free third-party add-on, now in v.3.3.1 (August 2020).
Fixing line-breaks in Poser lineart – the solution
Right, so after more research I find that there are in fact two ways to have Photoshop play “spot the differences” across an image stack, and to extract those differences. This solution relates to my previous post on Poser 11’s Comic Book Preview lineart, and the desire to fix small breaks and missing ‘chips’ of inked line.
I had discovered that a click of the current Display Mode’s ball-icon subtly randomises the coverage and break-patterns of the line-art available from Comic Book Preview in Poser 11. I was thus looking for a Photoshop plugin to combine multiple PREVIEW renders made in this way, but I now find… the feature is already native in Photoshop and can be done via two different methods!
First you’d assemble your slightly variant lineart renders, made as described here. 1.png through 6.png should do it, though you could go to twelve renders if you wanted to be really thorough.
METHOD ONE:
Top Menu | File | Scripts | “Load files to Stack” (Stack is 64-bit only, do not tick “Automatically Align”). Shift-select all layers in the Layers Palette. Top menu: Edit | Auto-blend Layers | Stack Images. That’s it. Photoshop will then whizz through the stack as fast as a whizzly weasel, spot the differences, and produce a single unified image containing all those small differences.
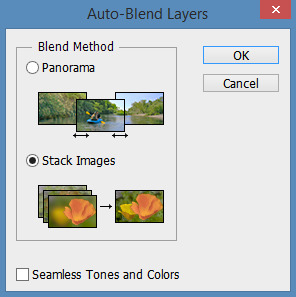
The result is not as adjustable later, since Photoshop does it a weird way and you don’t get discreet cutouts on new layers, each containing ‘just the bit that was different’.
I never knew this feature existed. Never heard it mentioned in umpteen years, or had cause to use it. It’s generally though of as a focus-stacker for macro photographers.
METHOD TWO:
1. Top Menu | File | Scripts | “Load files to Stack” (Stack is 64-bit only, do not tick “Automatically Align”).
2. Select top layer in the Layers Palette. Set its layer blending mode to Difference. Invert. ‘Select Colour Range’ – white. White highlights the bit(s) different from the layer beneath it.
3. ‘Copy merged’ and ‘paste in place’ your selection to a new layer at the top of the stack, invert it to return it to black. Ensure the new layer’s blending mode is set to Normal.
4. Delete the source layer and have the Action move down to the next layer in the initial stack. Repeat.
Eventually you have a base layer and all the differences are isolated, extracted and stacked on top. This stack of differences is more adjustable than the results for method one, for instance allowing you to delete a layer with a manky eye if needed. However, it’s probably not as computationally precise compared to Method One, because the process can only ever compare with the layer beneath it. Fragments may also have slight unwanted fringing around them.
In terms of speed, once you have Method Two as an Action they’re both about the same speed.
Either method is still not going to automatically fix tiny hairlines running across eyeballs, or noses that have double lines or broken ridges when seen at certain angles.