
Blender has record-able Actions, like Photoshop. Who knew? It’s a free third-party add-on, now in v.3.3.1 (August 2020).
Author Archives: jonahjameson
RDNA forums saved
I can now report on my experiment with a gig on Fiverr that offered to “Download an entire website from the Internet Archive Wayback Machine”. You can only choose one date to grab, and hope for the best. I had picked a date in late 2015.
Joseph came through and provided a 310mb .ZIP containing 1.1Gb of archive that Archive.org had backed up from the RDNA forums. 3,000+ forum threads, plus individual posts, back to 2005. It’s something I’d have never have obtained otherwise, since it involves typing in command lines and other ikky stuff. He knows how to do it, and is happy to do so for just £6. I’ll use him again for this sort of thing.
I didn’t expect Joseph to re-link everything, and make the RDNA forums ‘as if on a working site again’ — because it was a .PHP driven site. For that reason, it’s highly unlikely to ever go online again as a working site.
Once the delivered .ZIP was extracted I then had dtSearch index all text in the files, thus providing desktop keyword-search across the archive. If you’re following in my footsteps, and need a free desktop search tool, then DocFetcher is a good freeware equivalent to the paid dtSearch.
Here’s what I get on a test search across the archive. Definitely worth $6 to save this sort of knowledge, I’d say…
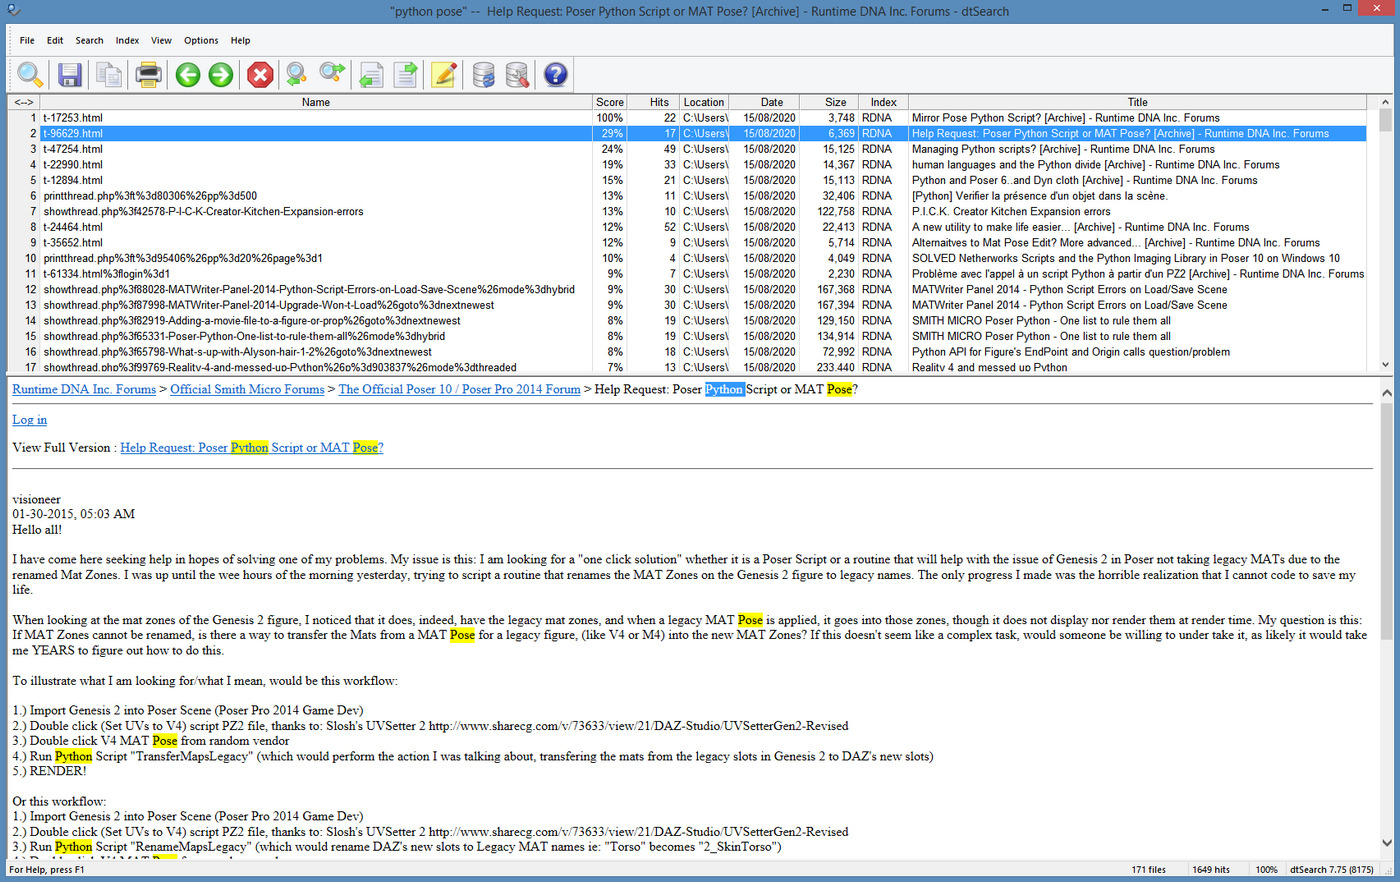
Possibly some of the Poser official forum was later ported to Smith Micro, but I also see Okham stuff back in 2005, on this search. It’s likely only a partial capture, but it’s pretty large.
Update: Community archive of the old Runtime DNA forums at the Internet Archive.
Heavy Vue users may also be interested in grabbing the old and vanished Cornucopia forums. Does anyone have the URL which those used be located at? Update: found it at cornucopia3d .com / forum / index.php — but Archive.org does not appear, at any point in time, to have archived any of the actual posts. Just the names of the forum threads.
How to make custom Poser thumbnails, with Windows freeware and a free Python script
I found gnuThumbnailer 1.2. It’s a free thumbnail generator and batch image-processing tool from 2015, in English and German.
What can it automatically apply to a batch of thumbnail renders?
Images can be stained (sepia effect, grayscale, user-defined color).
The colors of images can be overlaid.
Can make images lighter or darker.
You can add a colored or a transparent border to your images.
You can add a watermark to your pictures.
Very nice, especially since I can’t get the Netherworks Thumbnail Designer to work, which I bought a couple of years ago. gnuThumbnailer appears to do more or less the same thing as Designer, albeit working outside of Poser.
gnuThumbnailer is free for non-commercial use, and is pay-what-you-want if you use it for commercial work. It’s for Windows and Linux and requires Java, but it has a portable version (which means, if a future Java upgrade breaks the software, as can happen, the Portable should still keep running because it bundled the required Java runtimes).
So, Poser content makers reading the above description will see the options here, for helping to automate the making of standard 91 x 91 pixel Poser thumbnails in 16-bit .PNG, but… with your own border and brand overlay easily added via an automated batch process.
Ah, but how to get a nice set of uniform thumbnails for gnuThumbnailer to work on? What you want there is D3D’s batch “Render Content” script that ships for free with Poser 11, as an ‘official partner’ script. This is found at… Top Menu | Script | Partners | Dimension3D.

This script appears to be a expansion of what used to be his “Batch render poses” script (which no longer loads for me in Poser 11, even with AVfix). The new “Render Content” can make batch renders from a set of Poser poses, and there’s also a slot to load a reset pose in…
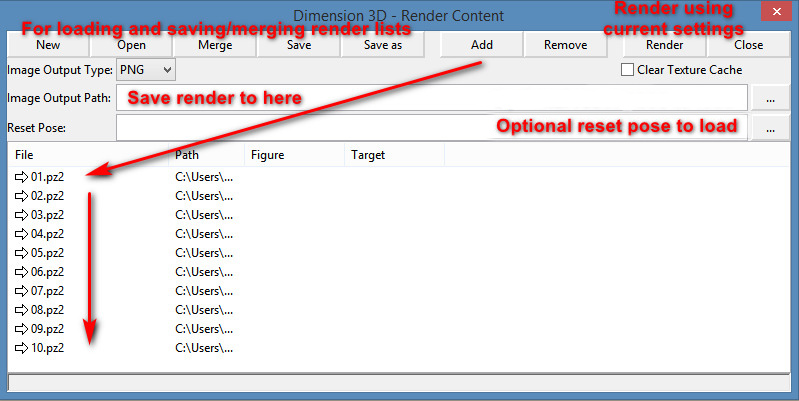
There’s no Help or entry in the Poser PDF manual for this, but it’s fairly easy once you’ve spend 20 minutes figuring out what the buttons do and testing it. Your Poser pose sets should be found down on the folder path…
..\content\Runtime\Libraries\Pose
… though a few freebie makers may have used ..\Poses But I guess if you’re a maker you have have saved out the finished poses saved out elsewhere, in a production folder.
The script does not also move the camera to frame the applied pose, which means some poses may fling the figure out of view of the camera. You might want to hack it, so that the figure is placed back at the scene origin before rendering.
The batch “Render Content” script then uses your current render settings, so be sure you don’t set it running on 100 SuperFly renders at 4000px, or your PC will be running through that for days. The script has no QUIT! option, once the renders are underway.
Fixing line-breaks in Poser lineart – the solution
Right, so after more research I find that there are in fact two ways to have Photoshop play “spot the differences” across an image stack, and to extract those differences. This solution relates to my previous post on Poser 11’s Comic Book Preview lineart, and the desire to fix small breaks and missing ‘chips’ of inked line.
I had discovered that a click of the current Display Mode’s ball-icon subtly randomises the coverage and break-patterns of the line-art available from Comic Book Preview in Poser 11. I was thus looking for a Photoshop plugin to combine multiple PREVIEW renders made in this way, but I now find… the feature is already native in Photoshop and can be done via two different methods!
First you’d assemble your slightly variant lineart renders, made as described here. 1.png through 6.png should do it, though you could go to twelve renders if you wanted to be really thorough.
METHOD ONE:
Top Menu | File | Scripts | “Load files to Stack” (Stack is 64-bit only, do not tick “Automatically Align”). Shift-select all layers in the Layers Palette. Top menu: Edit | Auto-blend Layers | Stack Images. That’s it. Photoshop will then whizz through the stack as fast as a whizzly weasel, spot the differences, and produce a single unified image containing all those small differences.
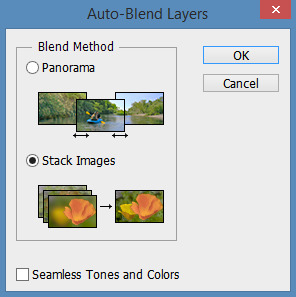
The result is not as adjustable later, since Photoshop does it a weird way and you don’t get discreet cutouts on new layers, each containing ‘just the bit that was different’.
I never knew this feature existed. Never heard it mentioned in umpteen years, or had cause to use it. It’s generally though of as a focus-stacker for macro photographers.
METHOD TWO:
1. Top Menu | File | Scripts | “Load files to Stack” (Stack is 64-bit only, do not tick “Automatically Align”).
2. Select top layer in the Layers Palette. Set its layer blending mode to Difference. Invert. ‘Select Colour Range’ – white. White highlights the bit(s) different from the layer beneath it.
3. ‘Copy merged’ and ‘paste in place’ your selection to a new layer at the top of the stack, invert it to return it to black. Ensure the new layer’s blending mode is set to Normal.
4. Delete the source layer and have the Action move down to the next layer in the initial stack. Repeat.
Eventually you have a base layer and all the differences are isolated, extracted and stacked on top. This stack of differences is more adjustable than the results for method one, for instance allowing you to delete a layer with a manky eye if needed. However, it’s probably not as computationally precise compared to Method One, because the process can only ever compare with the layer beneath it. Fragments may also have slight unwanted fringing around them.
In terms of speed, once you have Method Two as an Action they’re both about the same speed.
Either method is still not going to automatically fix tiny hairlines running across eyeballs, or noses that have double lines or broken ridges when seen at certain angles.
Script: Hair settings transfer for Poser
A free Python script Copy Dynamic Hair Room Settings…
Prompts the user to select a dynamic strand-hair prop as a template, and copies its parameters to the currently selected dynamic strand-hair prop. If no HairProp is chosen from the list, but OK is clicked, the script defaults will be applied.
Great. So to try it out I recalled that Rosemary kindly has free Fur Caps for M4 and a Dynamic Fur Capelet for M4. These can, effectively, work with the script as a mini library of hair presets.
1. Install the fur items from Rosemary. I had decided to amalgamate the M4 props under the fur cape location. Thus they were all found at…
..\props\Dynamic Clothing
2. Load one of her furred items, and place it alongside a target prop. In this case my target was a mask.
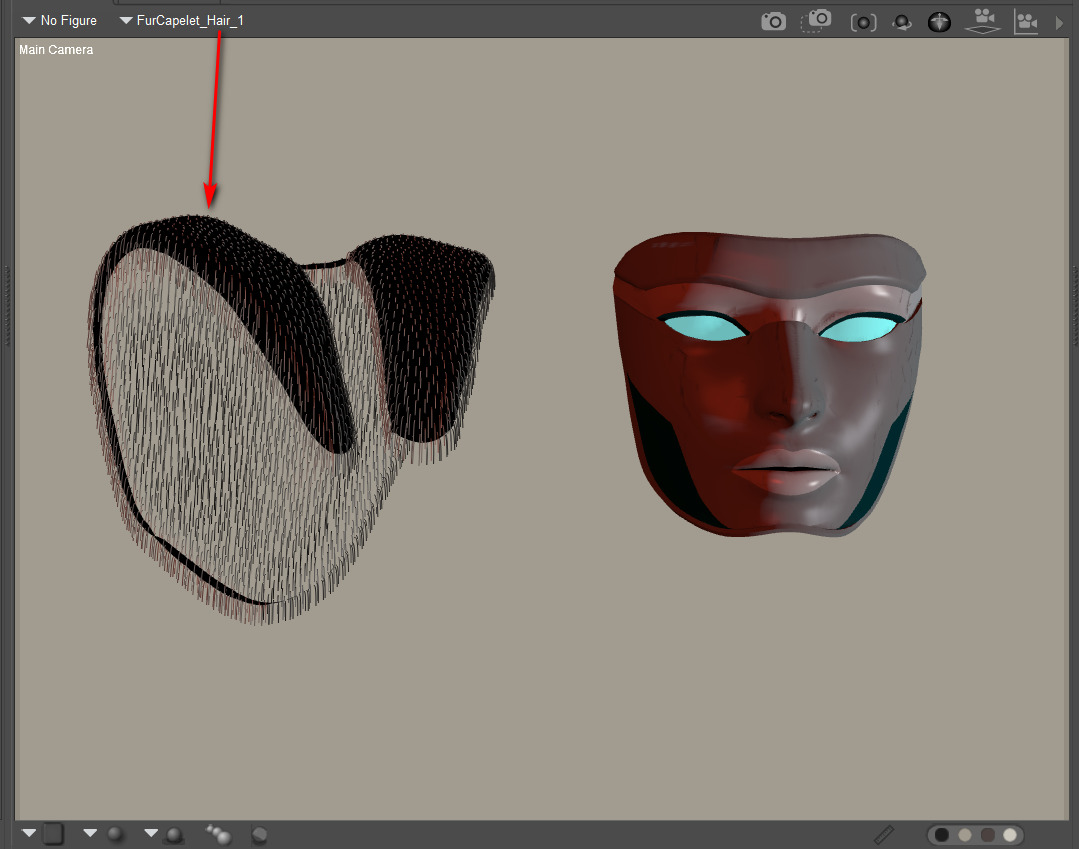
3. The hair to hair settings-transfer script of course requires… hair. Any old hair, so to add it to the mask: Select Prop Hair Room | ‘New Growth Group’ | ‘Edit Growth Group’ | Select All | exit panel | Click ‘Grow Guide Hairs’ with default settings. Your mask prop should instantly be super-sprouting with default guide hairs!
I don’t know of any PoserPython script to do all of the above basic hair setup automatically, though it should be possible. Thus a visit to the Hair Room is still needed with this script.
4. OK, now I selected the group of default guide hairs on the mask. The script was run. The other hair groups in the scene became available for selection for transfer, via a simple drop-down list.
5. In an instant, the script then copies over the selected hair’s settings to the mask. Here we see the rendered result of a transfer from one of the hair groups used to make Rosemary’s hats. Only one was copied but several were used to make the hats, meaning that the results were a little sparse. That was solved by simply cranking the Hair Density Setting to 300,000 and giving the hair a slight ‘Pull Down’ of 0.00008.
Hurrah, a hairy mask…
Now what’s needed is an auto-setup script to run step 3 on any selected prop, even if you’re not in the Hair Room. And a handy library of 50 hair setting presets, each growing on a simple ball prop, to transfer from.
Fixing line breaks and ‘chips’ in Poser Comic Book lineart
This post is about how to partly fix line-breaks and missing ‘chips’ in Poser 11’s Comic Book Preview lineart renders. Solutions are not being sought here for the purposes of ‘closing gaps’ to enable easy flood-fill colouring in paint software. Since, if you’re doing it right, Poser already gives a ‘colour flats’ render. I’m thus assuming that your basic output layers are colour flats, lineart, and shadows/highlights, each as a separate render from the same scene and ready for a Photoshop Action to composite and tweak. Thus your lineart is on its own layer, making it vastly easier to filter and correct later on.
Here the solutions are being sought simply to have nicer lineart with fewer or no breaks.
Update: the solution. It’s No.1 + a couple of little-known Photoshop features.

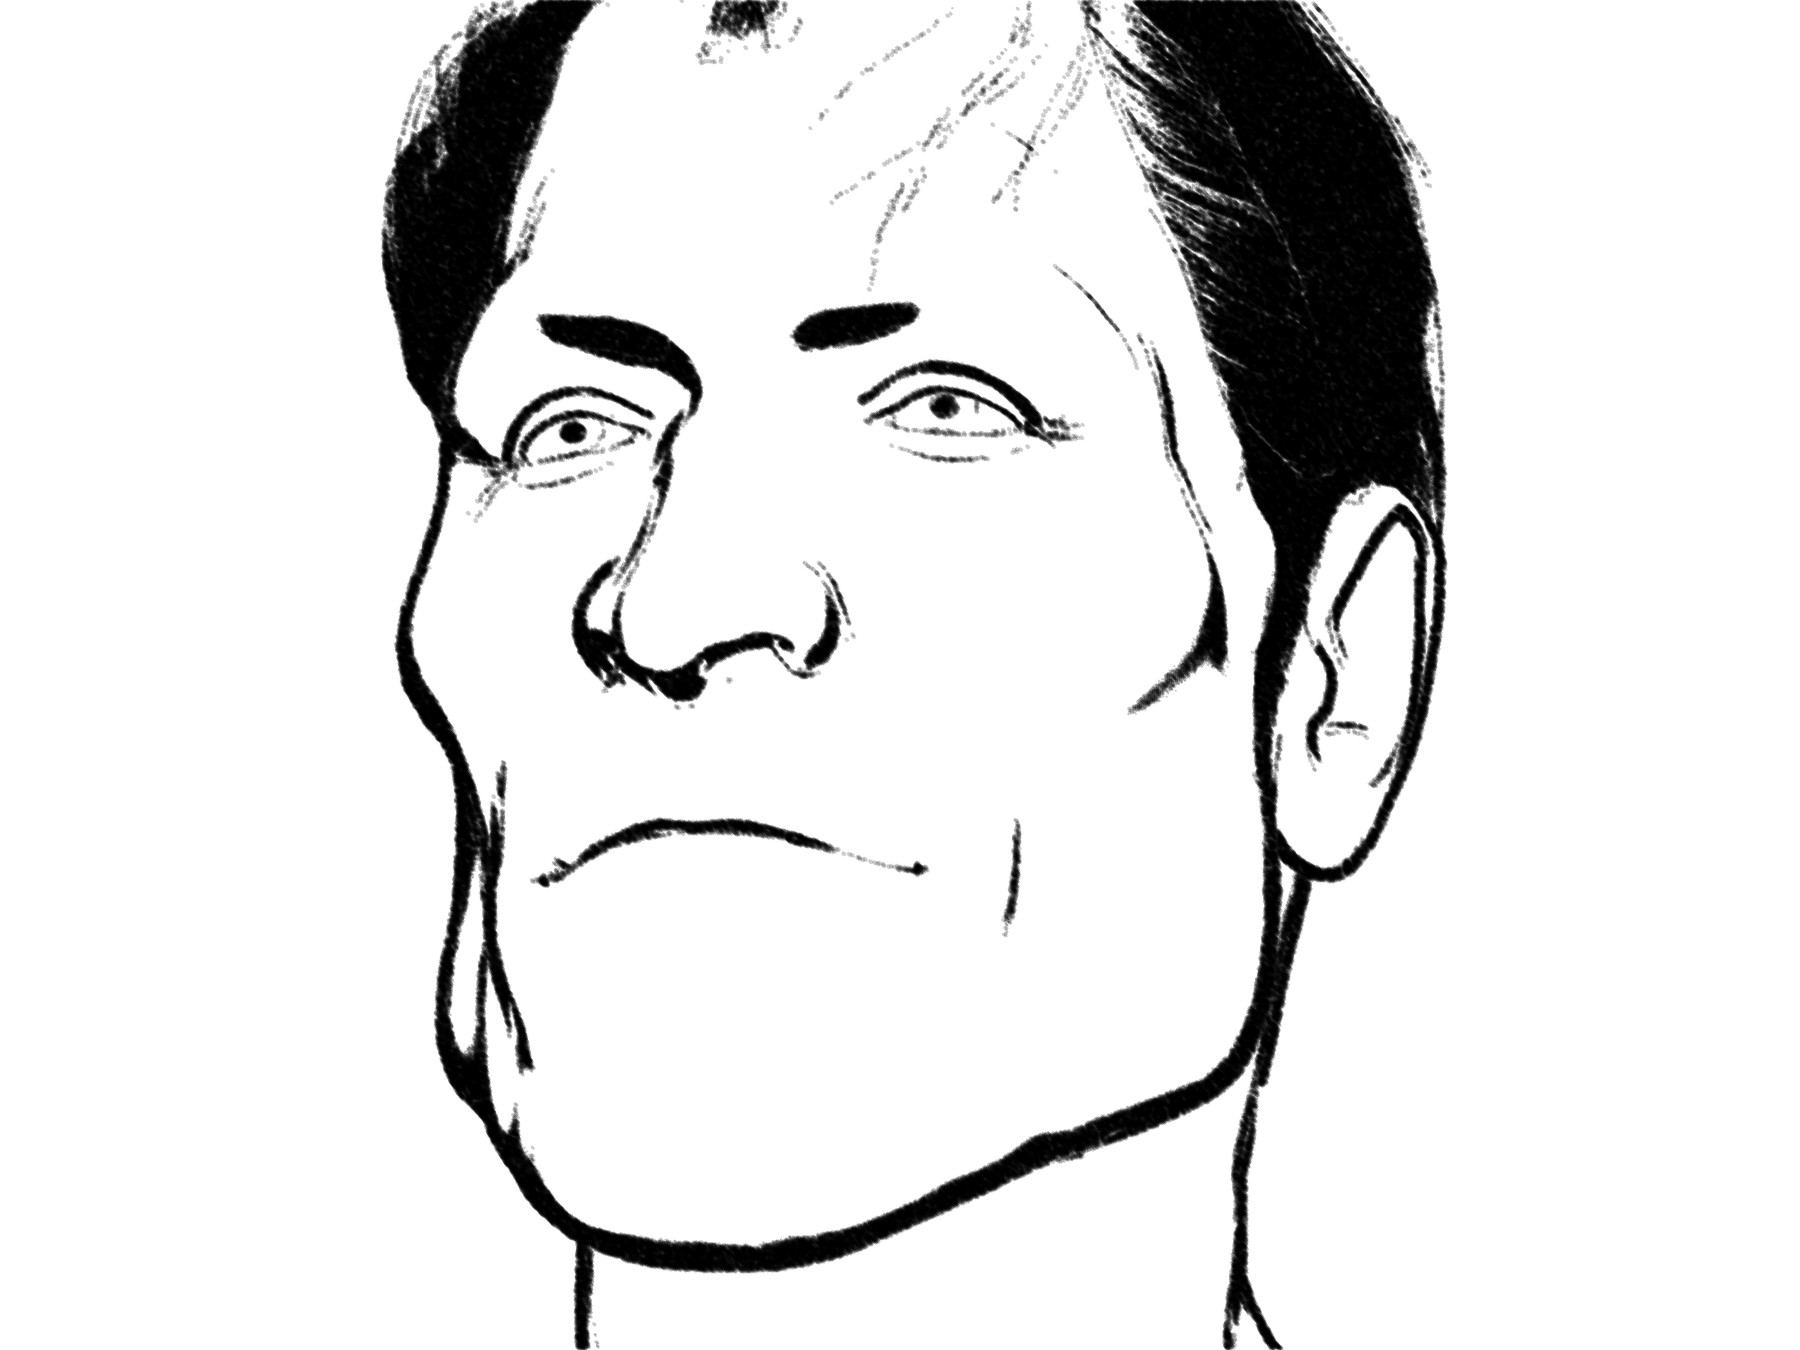
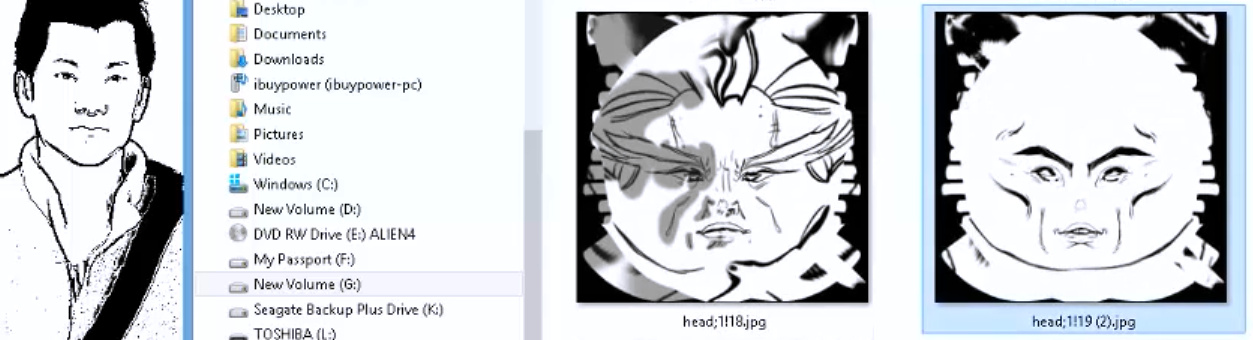
Here we see a deliberately extreme example showing the breaks and gaps that can happen in a raw lineart pass from Poser. We’re in Poser’s Smooth Shaded Display mode here, and on B&W in Comic Book Preview, and thus some of the Neal Adams-style inking is coming from shadows cast by one of the two lights. Poser is running in real-time with OpenGL, and it’s all WYSIWYG. Brom’s hair (‘Mature Mark’) is of course completely un-optimised for tooning as yet.
As you can see his nose and eyes may still need some manual clean-up, even when using some of the tricks given below. Manual clean-up of such source linart is not ideal. If cleanup takes just under an hour per page, and you have a 28 page comic, that’s perhaps four days of extra work. Per month, perhaps! Across a six-issue series intended to become a graphic novel that’s… way too much fiddly and non-creative work.
Here are a few of the options I explored…
1. PARTLY WORKS. In Poser, before you render to PREVIEW you click the Document Display Style ‘ball’ again. Then do it again. You’ll notice that each time you click, Poser slightly randomises the lines-joins on the inking, and may also make other lines look better. Nice.
Sadly, it’s not viable to then do six clicks, save a PREVIEW render from each, and then combine them all to ‘fill the gaps’ in Photoshop. I’ve tried it and the accumulated result is just dark and grungy blurgh. We would need a Photoshop plugin able to computationally ‘spot the differences’ between a near identical set of lineart. (Update: the solution is that Photoshop has this natively).
So, ‘click the ball again’ is simple and a neat trick, but there’s also not much this trick can do about the nose when the faces is seen at certain angles (see example above).
However, it does has two advantages:
i) it quickly enables you to at least find a state that offers a balance between ‘good eyes’ and ‘reasonable lack of line-breaks’. Such a balance may be good enough, when mixed into a final complex blend of colour flats, lineart, and shadows. You have to remember that your ‘artist eyes’ see things in the art that the general reading public never even notices, and especially so if the intended audience is under age 12.
ii) it also offers the possibility of making just two near-identical lineart renders, one where the eyes are at their best, and another for the rest of the linework. Then you’d make a loose Lasso selection around the eyes and have a Photoshop action feather, switch layers, ‘paste in place’ and merge, and then drop back down the layer stack to delete the source layer.

Bad eyes
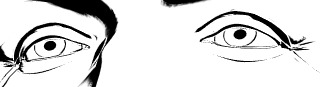
Good eyes
iii) there are also more complex ways of using Photoshop in which you effectively just ‘paint in red’ on nice lines you want to keep. But here we’re trying to avoid the whole ‘spend an hour carefully fixing the lineart across six panels per page’ thing.
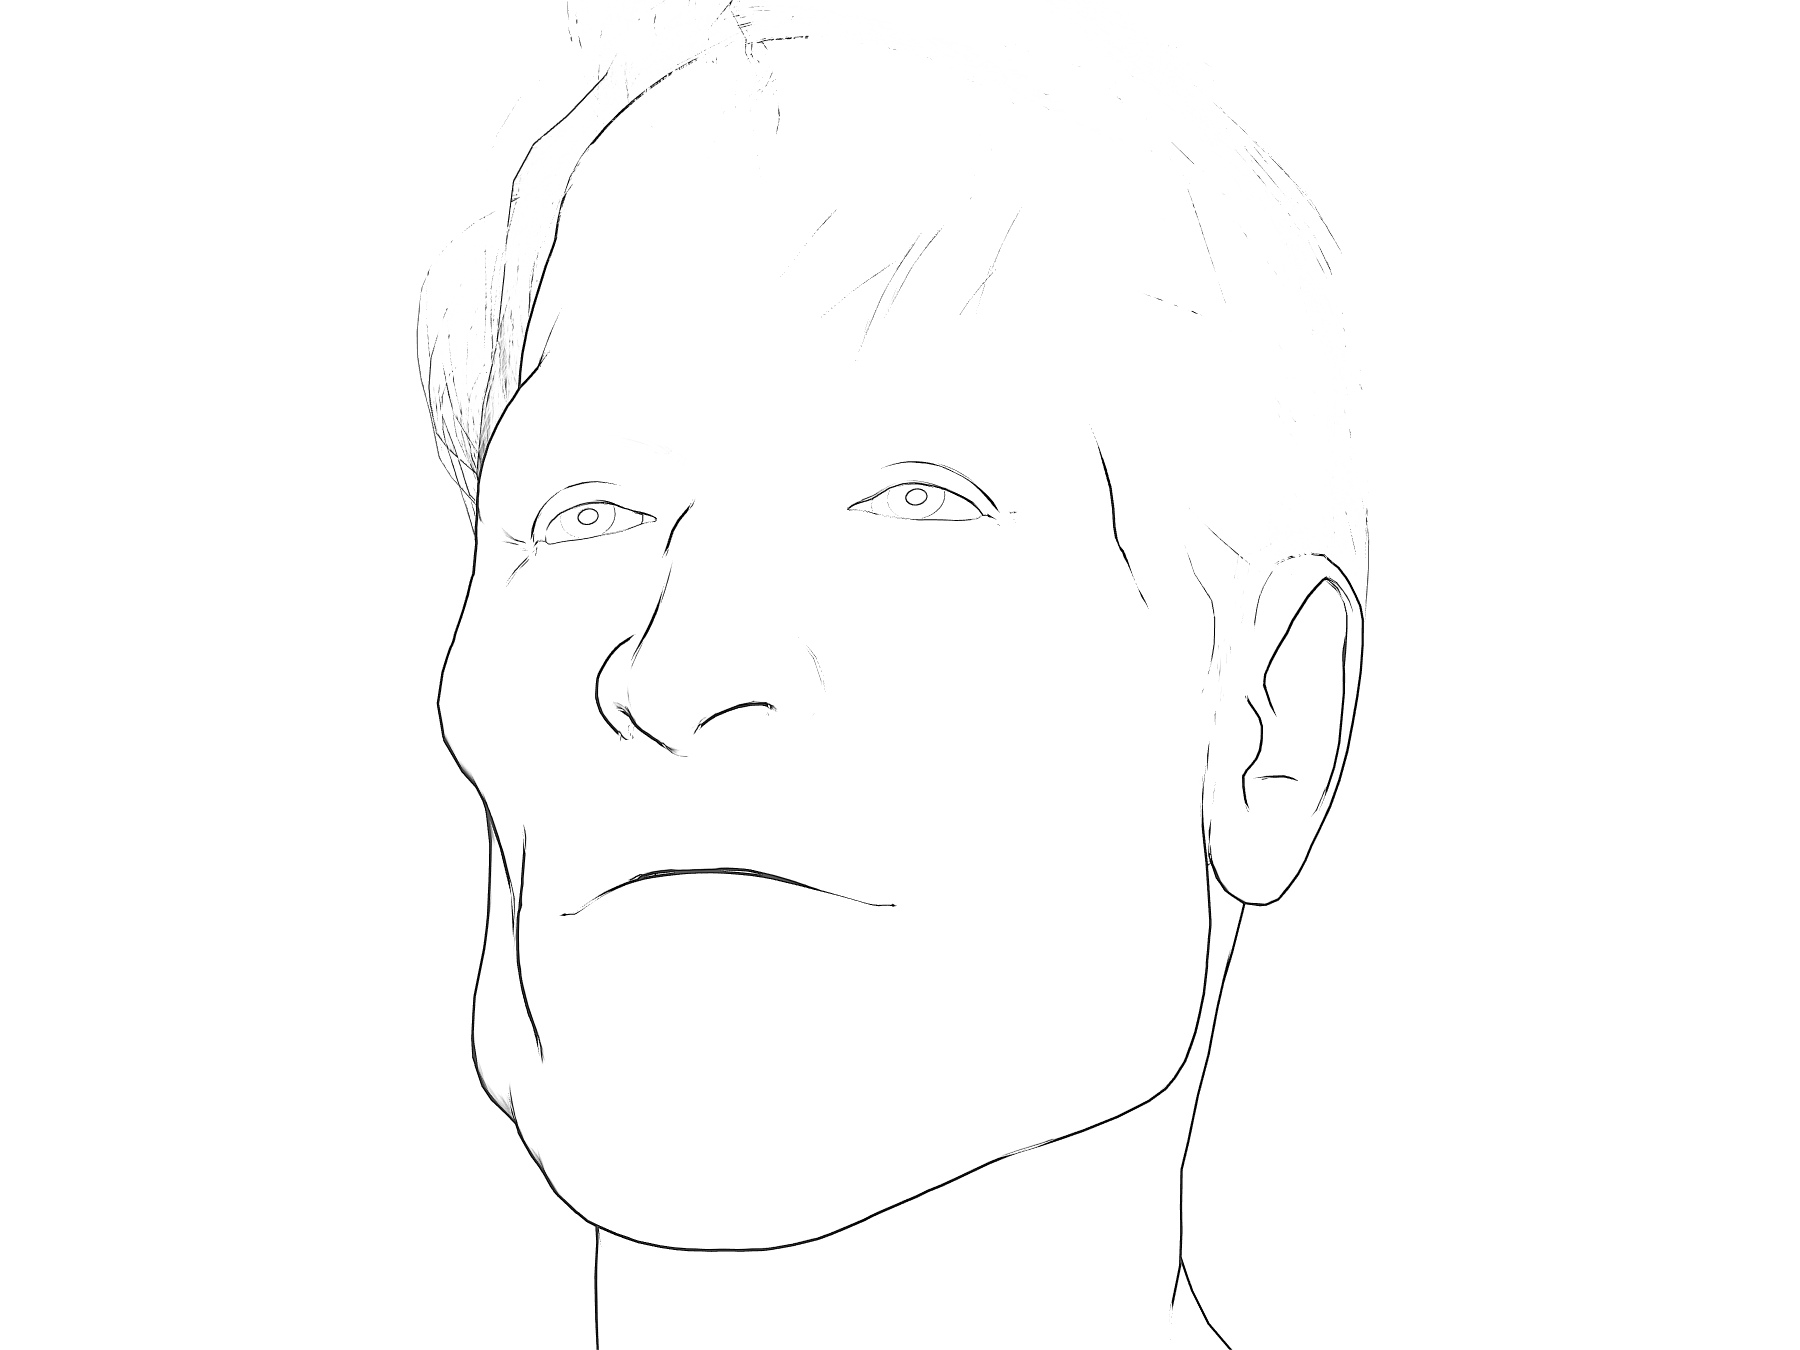
2. SOMETIMES SUCCESSFUL. Make a suitable fast custom-preset for Poser’s SKETCH renderer, one that gives you lineart with a fat charcoal line when run on b&w lineart. A preset that smurshes away most of the gaps and broken chips. Here’s my “2000AD” custom SKETCH preset at work…
We’d still need to dab some white on the nose and draw in some Dan Dare eyebrows, but it’s nearly there. Like I said above, the hair is completely un-optimised for tooning and we’ve smurshed it to black here. Although the black does then lend itself to raking with a wide white ‘rake’ brush.
Alternatively idea 2 could be emulated by running the lineart through a Photoshop filter, G’Mic filter etc, of a type that also smurshes out most of the breaks and gaps. Partly the success of this will be dependent on your comic’s style.
A sub-option for idea 2 it to simply scale down the inking, via the dial on the Comic Book Preview control panel. With thinner lines you have more leeway when bloating them, either by SKETCH rendering into PREVIEW lineart or via a third-party filter.
3. FAILS. You might think there would be some computational solution by now. CorelDraw does have a tool called “Join Curves” for lineart. Apparently Illustrator can also do that. For those who need free software, Inkscape also has a free inkscape-chain-paths plugin which does much the same thing. However, judging by the Inkscape experience it doesn’t work as hoped, in terms of nicely closing small gaps in vectorised lineart.
4. FAILS. Clip Studio has a feature found at Correction Line > Correct line height. This fattens all lines on lineart from which you’ve ‘knocked out’ white. (That latter option has the deeply un-memorable name of Edit -> Convert brightness to opacity, where it should have a dinky little icon showing a white Mickey Mouse glove throwing a knockout punch). Sadly Correction Line just fattens everything. I’m very much a newbie at Clip Studio, but it appears to me that there’s no way to have Clip Studio do a more refined fattening of the lines. For those who need free software, line fattening is also easily done in Paint.NET via the free Overliner plugin.
5. SUCCESS. I’ve yet to get to this point in my experiments, but from what Sixus1 has said I suspect that one takes a Texture Atlas from a figure + clothes, up-scales it to 8k and starts hand-inking ‘along the edges/seams’. The intention being to give the figure a total ‘hand drawn toon’ makeover, which you can then load back onto the figure at 4096. Possibly body and head are each done separately. That’s my guess, based on what I’ve picked up. You can see this partly happening in this Brian Haberlin screenshot from a while ago now. This is one of his hand-inked faceplates seen in Smith Micro webinar, presumably partly designed to work with and mask Poser’s small lineart breaks and chips.
Like I said, I’ve yet to get to experimenting with this ‘intensive makeover’ approach, but from what I’ve heard on webinars and podcasts that seems to be the gist of the approach. And judging by Brian’s marvellous Poser-made comics, the approach can succeed very well. It looks quite labour intensive at the start, and before you start you’d have to be absolutely sure your ‘runtime bashing’ was finished and you’d devised exactly the character you want for your story. Because changing things later could be difficult.
One other trick learned from Brian Haberlin’s webinars is that it’s possible to emulate inking in Poser by zooming right in and selecting a line of polygons, and giving these a black colour. For those who find they have a persistent ‘break’ on a character’s lineart, even from different angles, this may be worth considering.
You have to do this ‘Haberlin approach’ by hand because there’s as yet no market in figures designed like this, or in off-the-shelf makeovers designed to do this for existing figures. Although if you go look at the Gage fan-art Poser figure on the Forender store, then you’ll get an idea of how attractive this approach might be be made for buyers, and how it would play very nicely with Poser’s Comic Book Preview.
X. A future possibility. Software such as Krita, Clip Studio etc can already successfully flood-fill gapped lineart with colour. Presumably it does this by detecting and forming an invisible shape in order to “hold” the paint. This shape could theoretically be repurposed by future plugin makers to run a dark line along the ‘invisible shape’ outline, which would then be imposed to fill gaps in the original lineart. If the result would be pretty or not is anyone’s guess. I suspect it would be a blobby mess, which itself would then need manual cleanup.
Release: EBSynth moves to beta
Posted on
by
 Posted in Automation, Companion software, Freebies, Natural media emulation, Spotted in the News, The Animation Industry
Leave a comment
Posted in Automation, Companion software, Freebies, Natural media emulation, Spotted in the News, The Animation Industry
Leave a comment
EBSynth has moved into beta. 10x faster, and batch auto re-naming of files when you drag-and-drop. Still free.
It’s style transfer for video frames. You first extract a still keyframe from a video, and give it a nice manual artistic paintover. Then you use the resulting painting as a style-source in EBSynth for processing all the other frames. Once done, the whole video clip should have taken on the same painterly style.
Obviously you have to work ‘per sequence’ of the video. For instance, you can’t just take a frame out of an exploding tropical volcano scene, overpaint it, and then also expect the same painted frame to work on the next scene… which may show James Bond in a speedboat racing over the sea.
Thus the way EBSynth works is a bit different than just running an entire video through an automated paint-emulation filter. One of the advantages may be, judging from the test footage, that the resulting ‘art emulated’ video is less flickery, depending on how wild your paintover was.
With a bit of careful work it seems it can also be used to remove or add wrinkles, and thus change age. It’s still at the “interesting tech-demos” and “light-show hippies getting freaky with footage of Terence McKenna” stage, but it’s one of several free and relatively easy style-transfer options worth keeping an eye on. Though it looks like we’re still a long way from “grab a Jack Kirby comics frame, apply the style to my basic lineart”.
There’s an official tutorial here (starts at 4:54, once the introductory guff is out the way).
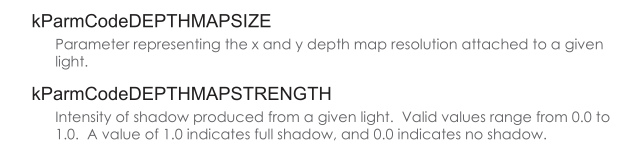
Poser script: Change Shadow Intensity of Selected Lights
There’s a useful new Poser script, “Change Shadow Intensity of Selected Lights”. It doesn’t change the brightness intensity of the lights, only their shadow intensity when rendering…
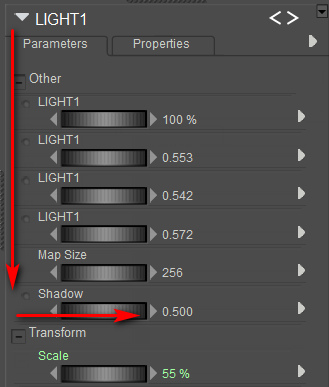
In plain English, it adjusts “how dark or faint the cast shadow is” in the final render. It doesn’t affect the Preview shadows.
To use, copy out the script from the forum and save it as a text file, re-name that from .TXT to .PY and then install as you usually would for a Python script.
Theoretically it should also be possible to hack the script so the user can also input a number that controls the dial located above Shadow, “Map Size”…
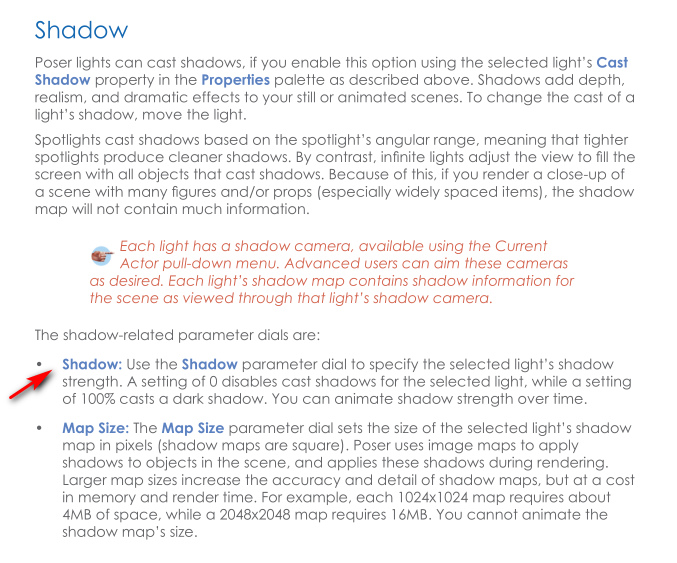
Over on the Preview tab of each Light there’s also a “Preview Shadow Maps Size” dial, and this is independent of the rendering “Shadow Map” dial. “Preview Shadow Maps Size” only affects shadows as seen in Preview.
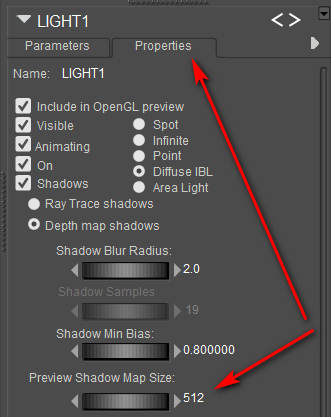
The larger the “Preview Shadow Maps Size”, the better the quality, and lowering light intensity can also help to soften shadow-edges. However, this dial defaults to the lowest value of 512, while Comic Book Preview users would like to have this up at 1024 — so as to get better shadows on Preview renders. You can have it even higher, and if you’ve heard the Brian Haberlin webinars on Poser comics then you’ll know the ideal for Preview shadows is actually 2048 or 4096 and he wishes it could go ever higher than that. Possibly it can, if you have a ninja graphics card but for me it tops out at 4096. But… you should know that Poser will reliably have a fatal crash if it’s over 1024, and you then try a Firefly render from the same scene.
Unfortunately there’s no possible way in Poser 11 to control this particular “Preview Shadow Maps Size” with a Python script. There’s just no parameter ‘hook’ or ‘command’ for doing that. But you can save light presets to the Library which remember their “Preview Shadow Maps Size”, and Comic Book Preview users are probably only using two or three lights anyway, so it’s no great hardship.
Taking a spin Wayback
A gig on Fiverr offers to Download an entire website from the Internet Archive Wayback Machine. I’ve put in a test order for the vanished Runtime DNA Forum, as partly archived at late 2015, and I’ll see what he can provide in a .ZIP for $6. You have to specify the capture date and time, he won’t just get all dates from a URL across several years and then put them into a massive mega-bundle. The Wayback Machine shows 100,000 pages archived across 108 sessions with the RDNA Forum.
While it is possible to do what he’s offering for free, the only options are Linux, command-line, or a couple of subscription/paid Cloud services — yuk. There appears to be no Windows freeware solution as yet that has a graphical UI front-end rather than bare command-lines.
Update: Got an archive with 3,000 forum threads, and many more individual posts, which is pretty good.
Update: Community archive of the old Runtime DNA forums at the Internet Archive.
Release: ZBrush 2021
ZBrush 2021 is shipping. In general it…
* “sculpts more fluidly” and “speed has increased across all sectors”.
Among the new feature list…
* “the ability to open native-format files created by ZBrushCoreMini”. Mini being their cut-down non-commercial version, that’s been made relatively easy-to-use.
* The iMage 3D format. This is a single .GIF or .PNG for website posting “where it will appear as a regular 2D image”. But once this image is “opened in ZBrush [it is] the complete model with all its SubTools and ready to edit.” Nice idea, and presumably done via steganography. This should open up the possibility of easily posting smaller 3D models on blogs, social media etc without the need for third-party file-hosting. Presumably this could also be done in such a way that it also works as a 360 on Facebook?
* Collada (.DAE) import/export. Not sure if this was in already, but the ‘new features’ list makes it look like a new thing.
* Lots of focus on cloth draping and ‘pinned’ cloth sculpting (think: making hats and headwear), along with a set of new Cloth brushes. Also a new way to make chain-mail, hairy canvas, rough denim surfaces by ‘pinning’ a bit of geometry to each polygon.
Images enabled on my new “Technical Search”
My new Technical Search engine now has “image search” enabled.

It’s excellent compared to the regular Google Search, because it is Google Search just constrained to 42 URLs. It’s also a little scary that just 42 sites, forums and pages hold the totality of published community knowledge, bar a few books and manuals on Poser and DAZ. And that so much knowledge has been wiped out, by the un-archived closure of forums/stores at Cornucopia, Runtime DNA etc, and by decay or closure of third-party image hosting sites (which leads to broken images on forums).
You can use the search just like Google. For instance if my blog appears too verbose, knock it out with -www.jurn.link or if you only want Firefly then knock out SuperFly with a -superfly modifier.
Dragonspace
“Dragonspace (Poser props)” added to Freebie downloads, over on the Directory sidebar of this blog. I already recently linked his Logan’s Run fan-art freebies there.

A new CC comic
There’s a new comic under Creative Commons Attribution ShareAlike, from the Czech Academy of Sciences. “When the Earth Quakes” is a 26-page comic designed to teach about earthquakes and seismic waves. It was crowd-funded among interested scientists who just wanted something to help with outreach and education. It’s in English, and the makers are interested in hearing from people who could translate/re-letter it into other languages.

FlowScape is back in the flow
Posted on
by
Posted in 3D Utilities, Companion software, Real-time animation, Spotted in the News
Leave a comment
The development of the $10 FlowScape landscape-creation software is back on track, now that Australia is recovering from lockdown and the kids are back in the schools again. There’s a preview video of the next version of this real-time tool. Lots of new stuff for makers of isometric dungeons (think all those Diablo-like dungeon-crawler videogames) which though fun is presumably mostly for RPG makers. But also, later in the video, we see ‘flocking’ fish shoals underwater, fast auto-growing grass and ground-cover plants that automatically follow the terrain without any ‘painting’ being needed, while auto-culling happens on terrain slopes and hollows. Plus there’ll be a configurable “stick it where you want it” user interface.
Tutorial: Making billboards in Poser
Here’s my revival of a 2010 node-setup for Poser, originally by BagginsBill, and which has seemingly been lost in the 404 mists of the forums. However, it was rescued from oblivion by Infinity10. Infinity had first tried to build his own version in 2010 but, soon after seeing BagginsBill’s better version, built another variant and posted that as a screenshot. This screenshot has survived to 2020, lurking and little-visited in the Renderosity Galleries of all places. Sadly the screenshot lacked vital instructions about how and where to use it.
As you can see, I’ve rebuilt it and tested, and my 2020 screenshot adds guidance. It lets you drop in any square render, and with a few clicks you can mask out the background colour. Not quite as good as iClone, where you just drop a masked .PNG on the stage and it becomes a cutout billboard prop. But what follows is ‘as good as it gets’ in Poser 11.
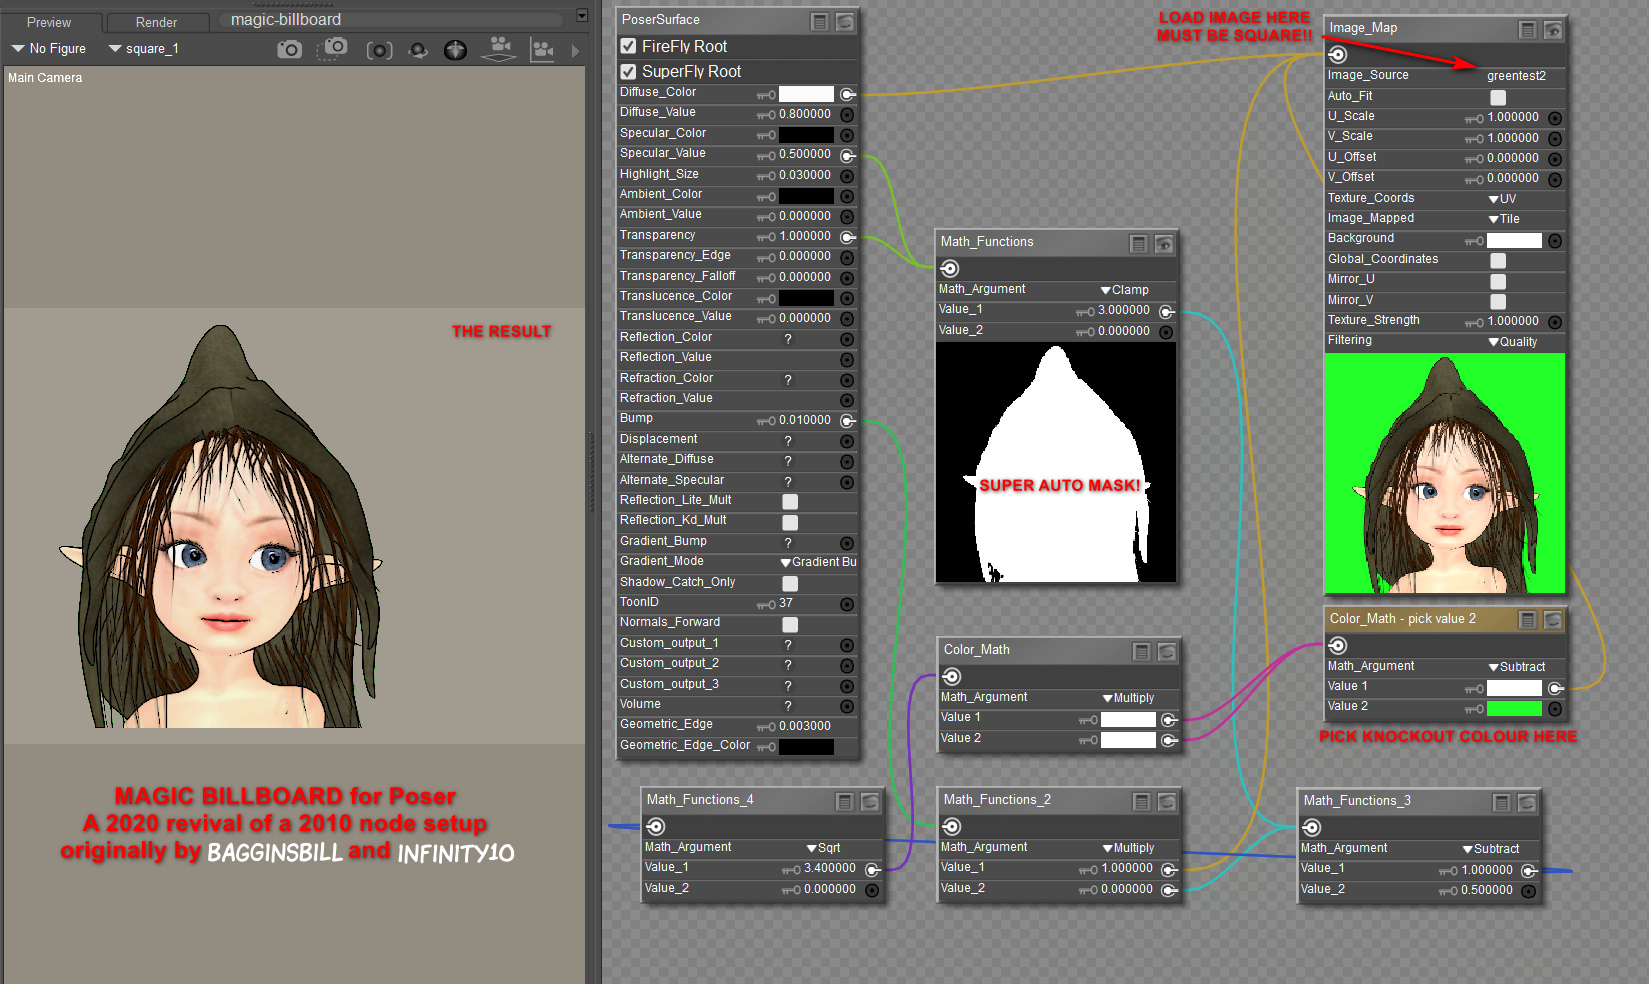
1. You first load a “One Sided Square” to the Poser stage (Library | Poser 11 Content | Primitives | “One Sided Square”). Select it.
2. Now switch to the Material Room. Create the setup exactly as seen here. I have not re-named any nodes, except for the one under the loaded image. This is where you pick the background colour from, and as such it has been slightly re-named to serve as a user prompt.
3. The image to be loaded has to be square, whatever the shape of the item within that square. It appears from my tests that Firefly / Superfly do not play nicely with a re-sized “One Sided Square” prop, when it comes to rendering. Although a square image in the “One Sided Square” can be safely scaled up and down as a %, thus…
The two images used for this demo were 1200px and 1800px.
(Some may also want to slightly increase the Value_2 on the Math node connected to the main BUMP input, and also increase the strength of the BUMP, depending on your prop type).
4. The ideal background for a figure with eye whites is probably a green-screen colour, although bright-blue might also work as long as you have no blue on the figure. You can see on the screenshot where you pick the background colour to “knock out”. Click on the colour chip and you get a little eye-dropper tool and then you hover over the mini-image and pick its background colour.
For trees and plants it’s different. White may be best for green trees without white flowers, snow on branches etc. Or black, depending on how dark the tree-bark is. The process doesn’t work with .PNGs rendered by Poser with an alpha, since there’s no colour for the node setup to “grab” onto and knockout.
5. Ok, you got your node setup to work. Save the working setup as a prop to your Primitives folder, for future re-use and for making and saving variants. I suggest the name “Magic Billboard” which is easy to remember. Having such a magic prop means no need for an alpha channel mask. The chain of maths in the nodes is doing the required masking for you.
The path to the image is embedded in the saved prop, so make sure your called images are somewhere stable on your PC — like a dedicated folder down in your runtime. Move or delete the called image, and… the prop will break.
Rendering:
It’s not perfect in terms of rendering. There’s still a touch of green fringing. But it’s quick and such props are anyway likely to be in the far middle-distance or background.
Poser’s SuperFly and Preview render-engines each give a crisp render from this, and the real-time Preview even retains the mask on saving the render to .PNG. Sketch runs fine on such cutouts, interestingly.
The drawback here is that Firefly renders are noticeably fuzzy with this setup, and a green fringing is very noticeable. As yet I’ve been unable to find an additional node chain to add, which might better de-fringe. Possibly this fringing effect was why such a node setup did not catch on in a big way for Firefly users.
But… now we have Poser 11’s SuperFly, which does not have anywhere near the same fringing problem, though a green fringe is still present on some of the finer isolated hair-strands. I’d thus say this sort of prop is going to be most useful for the background of Superfly pictures where you want many people in you scene and they have eye-whites and white teeth etc. Which means you can’t have the node setup knock out white.
On a test of a tree on a white background, a Clamp (see middle node) setting of 1.0 rather than 3.0 removed most of the white fringing. The same trick did not work on bright green. However, there may be a better, fringe-free way for foliage/trees. Read on…
I also found another, somewhat later BagginsBill node setup from 2014. This allows some cool “Hue” tweaks that instantly make standard green trees into Autumn/Fall coloured, Winter coloured, or (by going to 2.25 or 3.00) into “alien planet” foliage. Here’s my 2020 rebuild of that…

We almost lose some definition on fine twigs with this, but also usefully lose the cutout fringing. The “Hue” tweak also opens up subtle effects that might make trees in a forest look a little different to each other, and also seem to fade out in colour as their ranks recede into the distance.
Regrettably this “no-fringe” node setup only works with white, meaning that it can’t be used with people due to their having eye-whites and teeth. Still, if you want to build a super-lightweight library for a forest, cliffscape, cityscape etc relatively quickly, here’s a way to do that. It could allow you to make a picture in one pass, rendering relatively fast.
Theoretically one could also use this “Magic Billboard” to build a re-usable set of comic billboards, done in the same style as the final comic, to provide quick scale-adjustable backgrounds. One might also “double-stack” for comics effects, for instance by precisely placing hand-drawn hatching line-art billboards (with knocked-out white) on top of Poser’s native real-time line-art. I think I’d rather do that by i) drawing new inked textures directly on character skins, or ii) using layers and brushes in graphics software. But you can see how the Magic Billboard could become a possible help for a comics maker — especially those who don’t want to fiddle around with getting and saving out an alpha-mask every time they need a quick billboard made. Because the node setup is giving you the alpha-mask automatically.
If you do want to take masked layers out to composite in Photoshop, there are various methods for getting a PNG render with a transparency mask, as discussed here. The gist of it is:
SuperFly -> Apply “Holdout” node to the main Surface node. GROUND should be visible.
Firefly -> Options -> Render over “Current BG Shader”. GROUND should be hidden.
Preview -> Mask is automatic. GROUND should be hidden.
Sketch -> Not possible, but you can turn off sketching into the background and only sketch into the figure/prop. To mask the sketch render later, also export a Preview render of the same character/prop in the same position, then use a selection of that as a mask in Photoshop etc. Exact registration of the two renders is usually not possible, due to the slight distorting of edges introduced by the Sketch effect.
Extra: A Renderosity forum answer, by hborre in August 2020, was about how to place renders onto 3D primitives. Which seems to relate to putting images on planes. This might be useful to someone in the future…
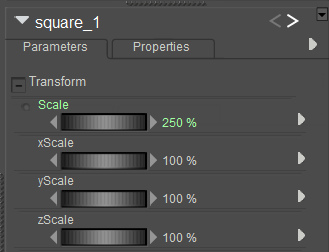
Prop scale and image resolution: Find out your image’s x- and y- pixel resolution first (i.e. 2000 X 1000). In Poser, set the x- and y- scale for your primitive to the same dimension, in this case, 2000% on the X- scale, 1000% on the Y- Scale. Import your image to the primitive. Then, on your overall scale for the primitive, dial in your desired size.