Pixiv & Clip Studio Global Comic Awards 2026, with a submission deadline of 31st March 2026.

Pixiv & Clip Studio Global Comic Awards 2026, with a submission deadline of 31st March 2026.
Following last night’s Poser test of Klein 4B, someone asked ‘Do we need Poser’s real-time Comic Book linework?’ in the source image. Well, here’s a test with the Genesis 3 Madgloom figure and some quickly applied steampunk clothing, rendered in pure iRay in DAZ Studio. As you can see, a relatively dark iRay render of an unoptimized figure doesn’t phase Klein.

I added additional prompting to get the green hatband, green eyes and skin, to thus make Madgloom into a sort of ‘Leaping Leprechaun’ comic-book super-villain. The unwanted invented strap across the waistcoat was later removed with an additional prompt telling Klein to retain the clothing exactly. The fixed seed of ’42’ ensures restyling reproducibility.
So, no. When promoting for a comic-book style at least, that’s what you get. Comic-book. With other styles, the comic-book lines from Poser may matter more in the end result.
I found some time to do a demo sheet for a few of the many restyles that can be prompted for in German’s superb Flux.2 Klein 4b AI model. No LoRAs or Embeddings required. The figure is Nursoda’s Chull, and the quick Bondware Poser render used as the source-image is deliberately very basic, with no attempt to change the grungy fabric or the dark eyes, or to do a fancy full render.
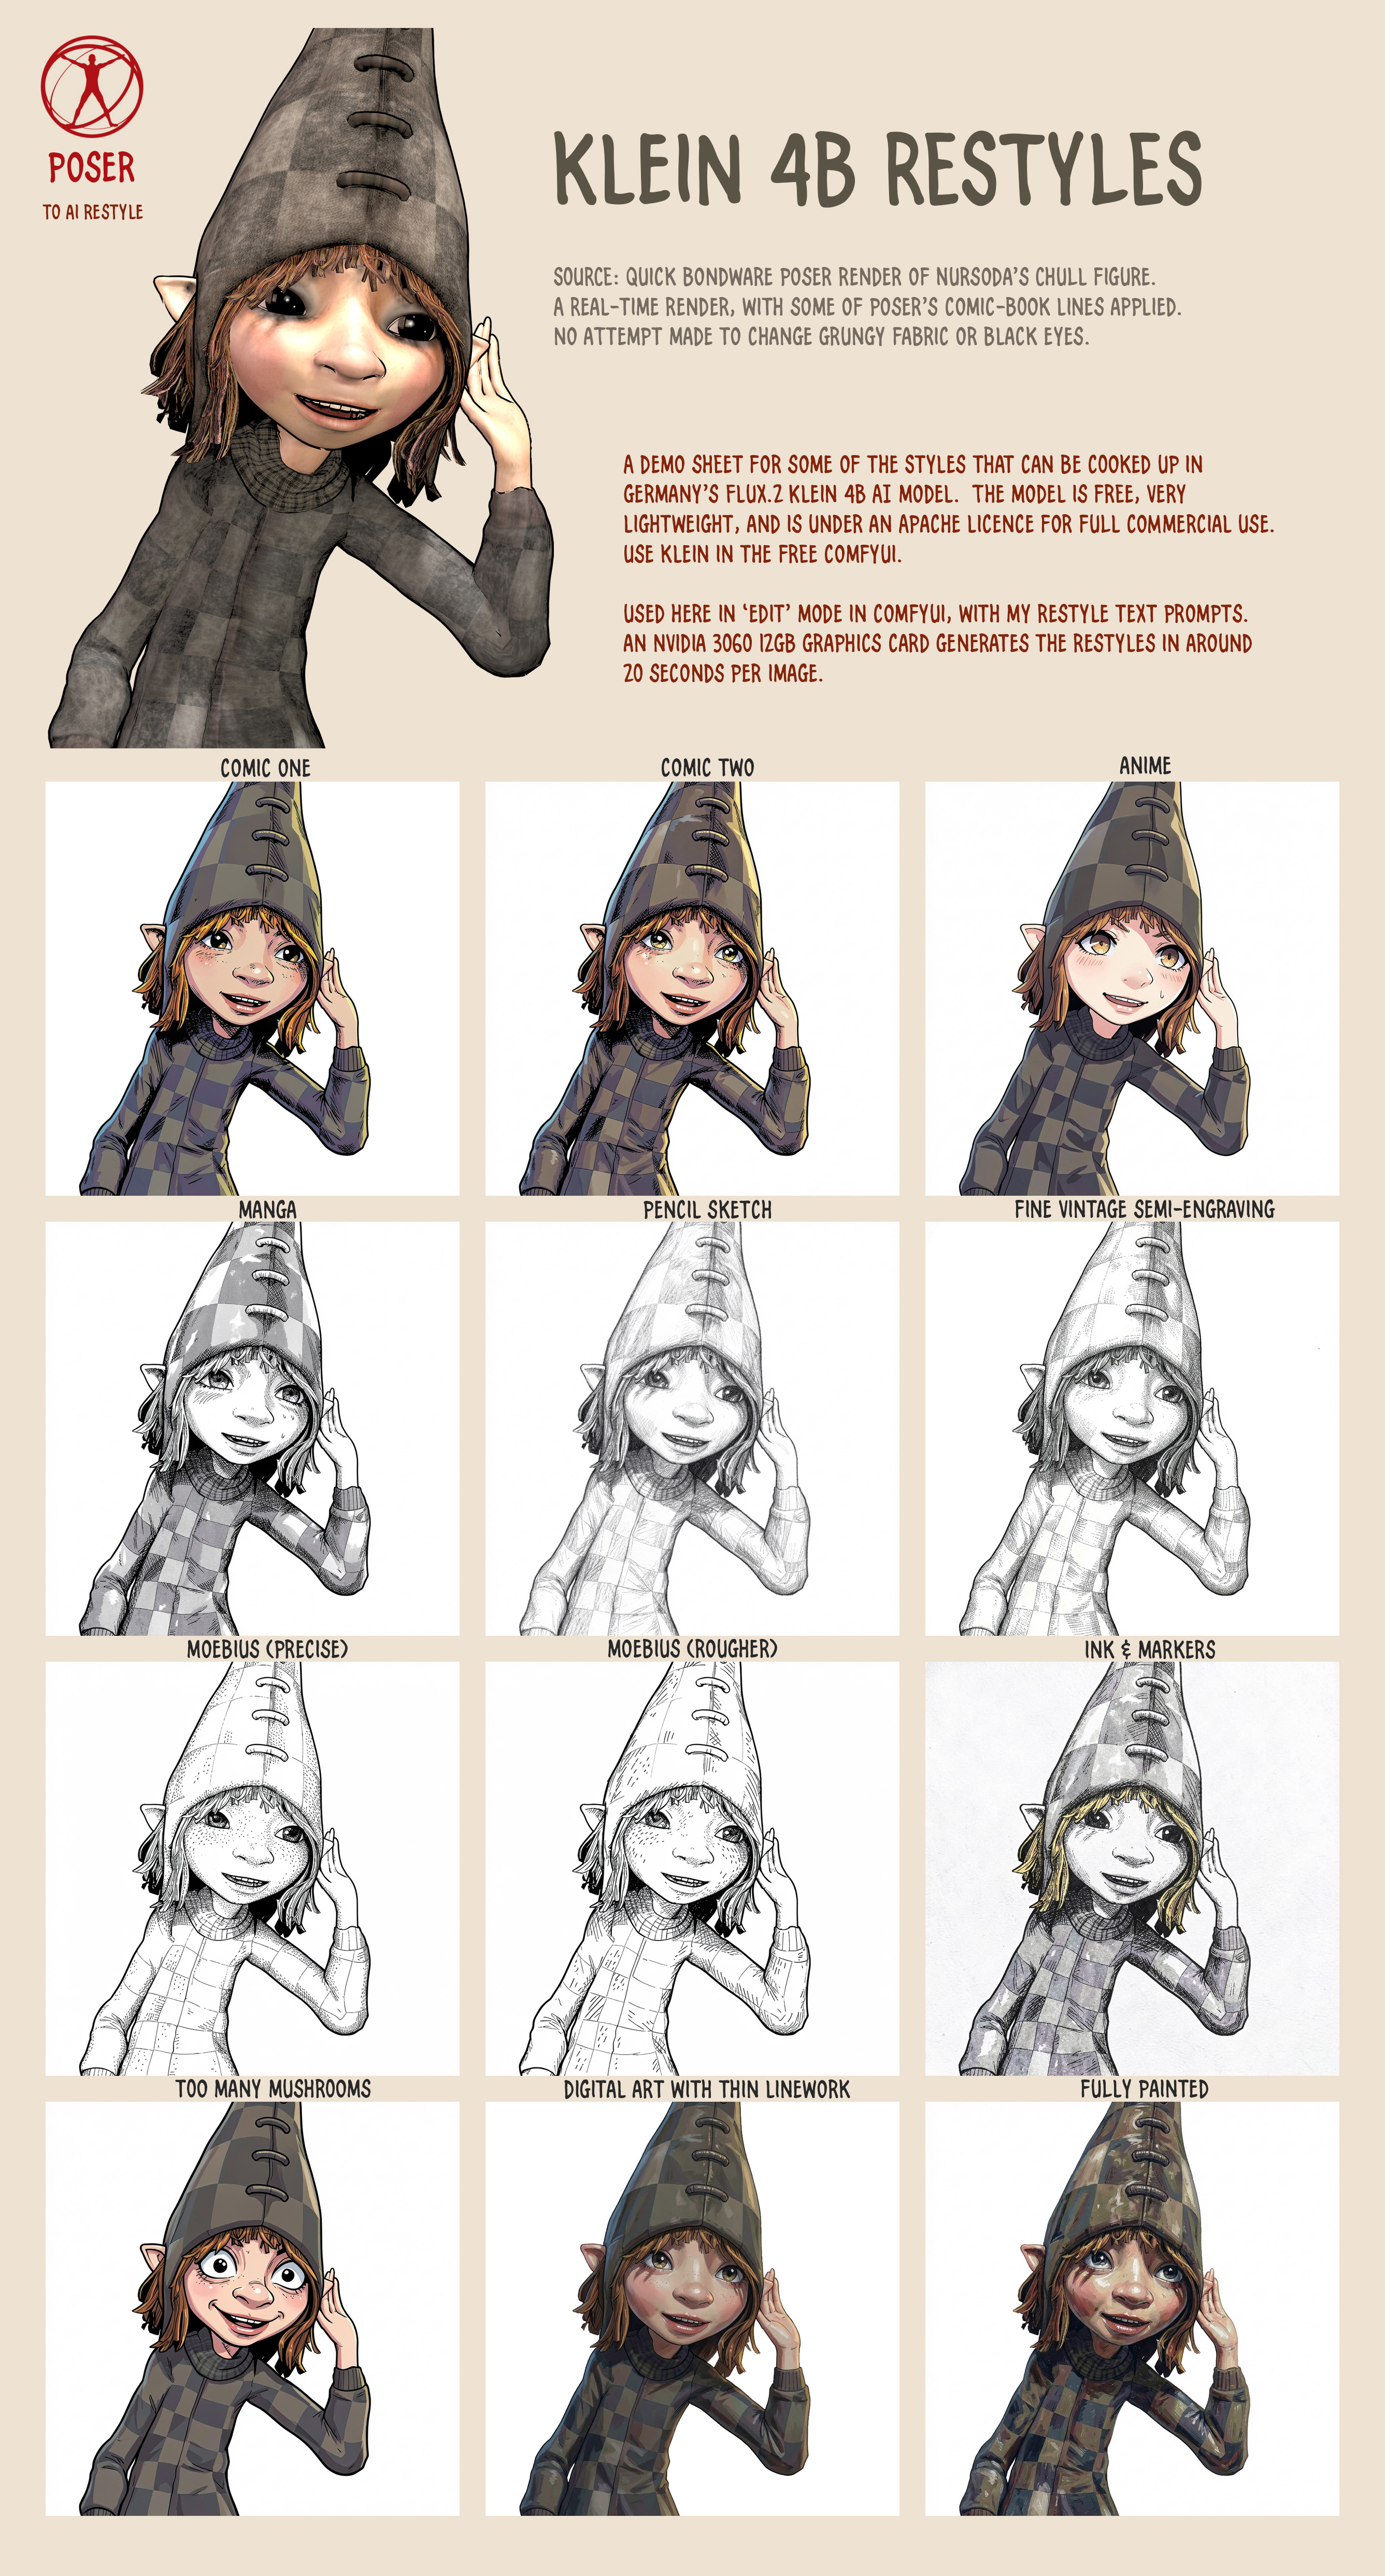
See the full-sized image for the fine detail. I didn’t get around to some of the thicker oil painting or charcoal styles, but it can also do that. Watercolour I don’t like in Klein, it’s too blotchy and splashy.
All generations were made with a static seed of ’42’, for reproducibility.
Another ‘Poser to AI’ style success. A while back I made some Poser renders with Nursoda’s Chull figure, to test with Flux Kontext and style transfer. It was a failure. However we now have Flux2 Klein 4B, made in Germany, which is dual-use as it also has a wonderful Edit mode. There are only a few style LoRAs for 4B, but tonight I dug out my Chull renders and I find that the model is so flexible that one can just prompt for a style and get it consistently.
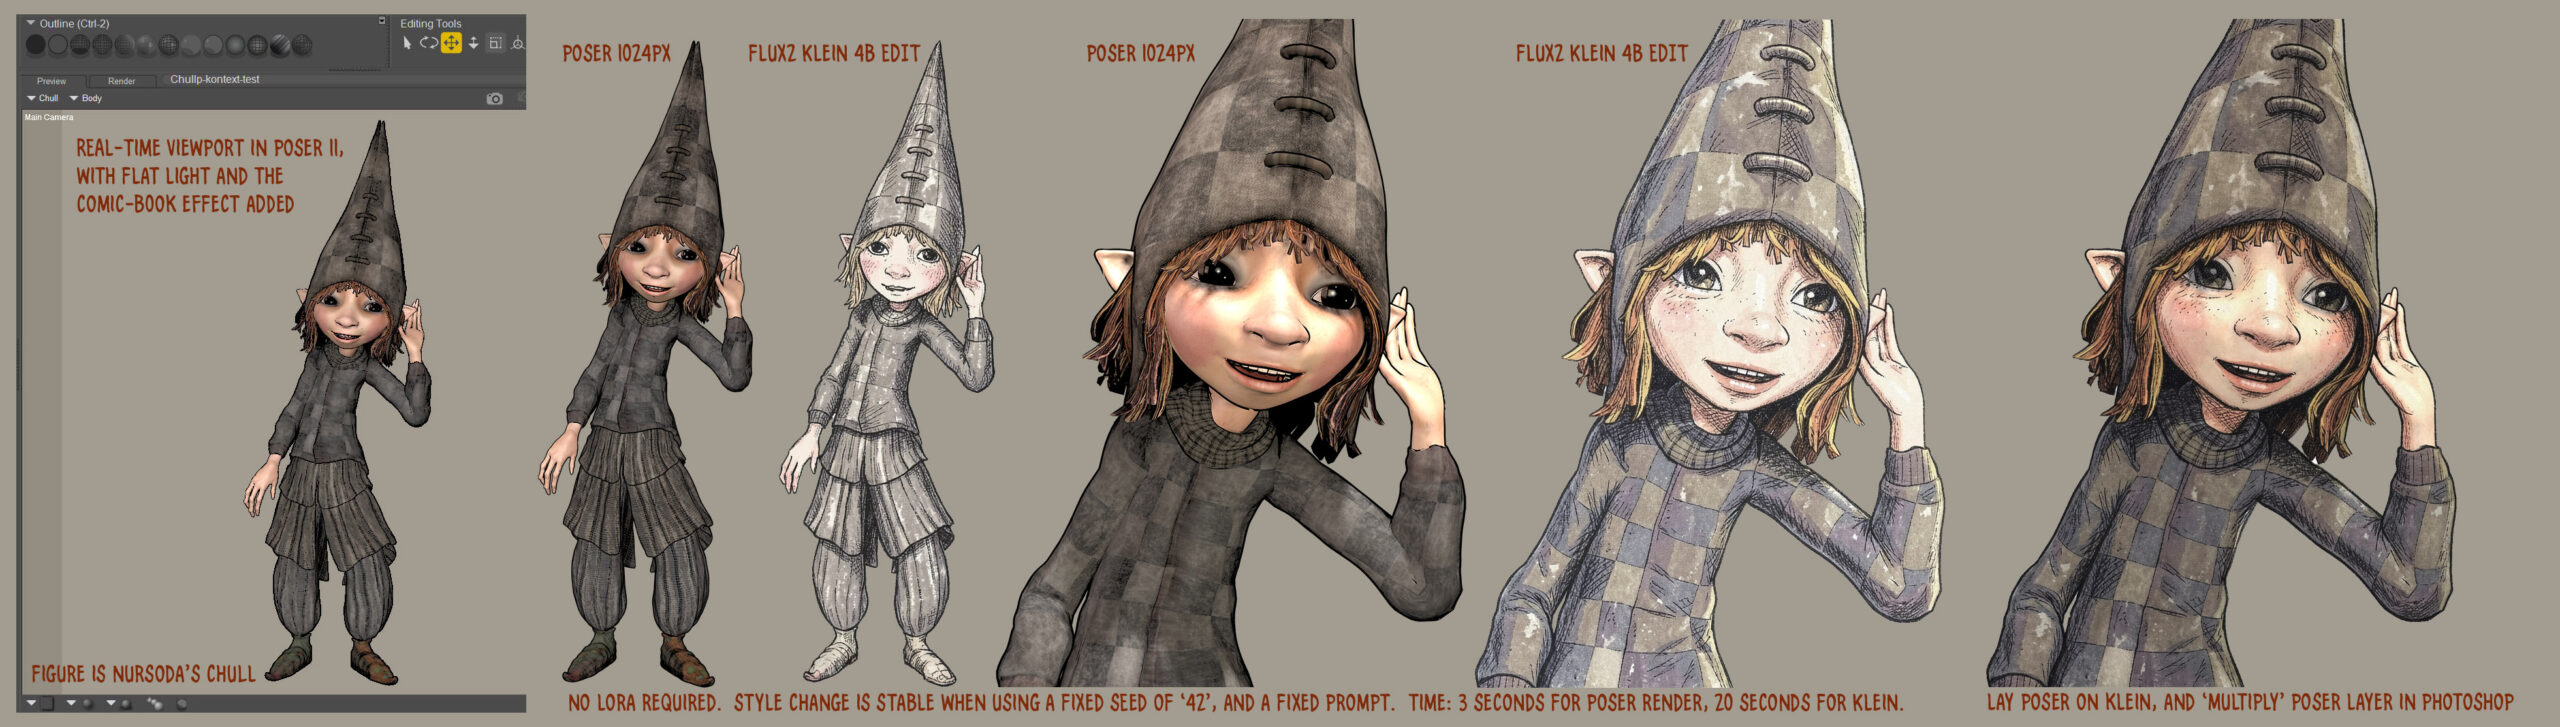
Here we see Chull being given a style makeover by Klein with just a short instructional prompt and a fixed seed. Klein’s Edit mode is working much like an old-school Photoshop filter. The result is a little washed out, but the registration between the original Poser render and the Klein is fairly exact… which means that Photoshop can easily correct that. Just lay the Poser source render on top of the Klein output, and set the ‘Multiply’ layer-blending mode.
The end result is quite appealing. At least when seen at a large size. Like all artwork with very fine lines, it’s not graphic enough to work well at small sizes. Such as in a small comic panel. But for a full-page children’s storybook illustration, it has a lot of appeal.
Problems are that Klein retains the 3D ‘ribbon style’ hair, and that the gaze direction has shifted. Gaze direction was prompted for, asking for it to remain fixed. But in the full-length Klein output we still get the dreaded “must stare at the camera” problem. In the close-up Klein output one of the eye pupils has been squished a little. Possibly Klein doesn’t understand ‘gaze’, though.
Still, not bad for a first proper attempt at a LoRA-less style makeover with Klein.
Pre-release: Clip Studio 5.0 due in March 2026.
CELSYS News brings news of Clip Studio 5.0, the complicated comic-book production software from Japan, which is set for a March 2026 release.
* A new and better 3D hand model, and it seems to be able to scan a photo of your hand and apply it to a 3D figure’s hand.
* “Group 3D models”, a recently integrated tweak.
* “3D head models […] have been added” as a new feature.
Their 3D models are of the basic ‘car-crash dummy’ type, meant as guides for hand-drawing over. Not Poser-like models.
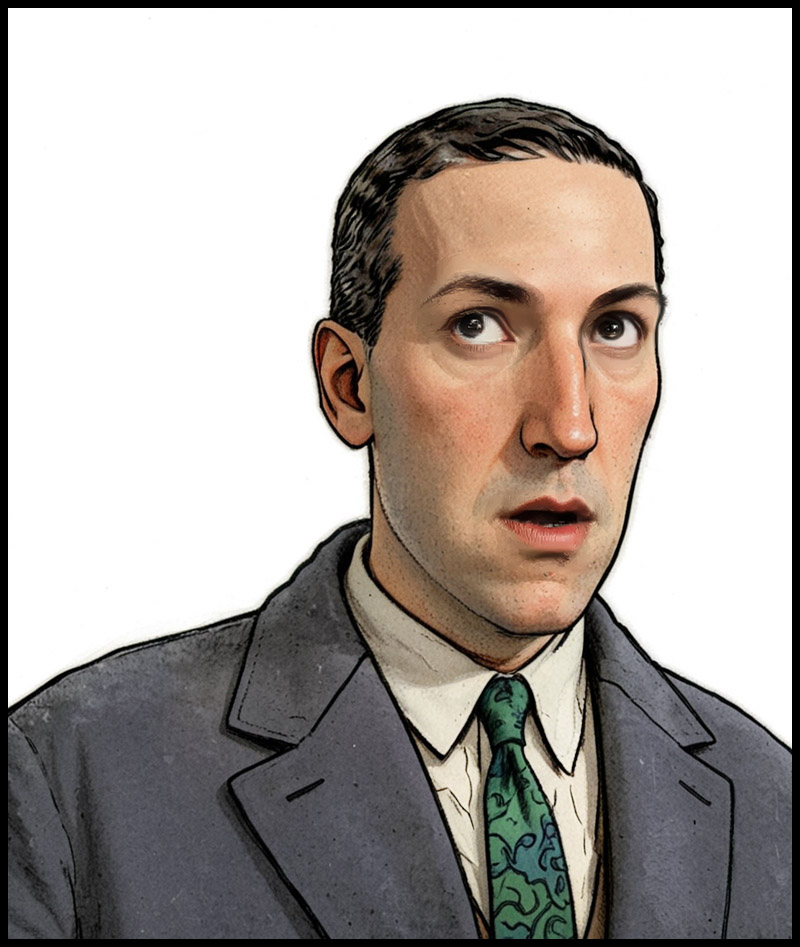
At the end of the summer I was very happy to get the ‘Lovecraft as a Zombie’ result, using a successful combination of Poser and ComfyUI.

That was back at the end of August 2025. But then I hit a seemingly insurmountable problem, re: potentially using the process for comics production. Head and shoulders shots, of the sort likely to appear rather often in a comic, were stubbornly impossible to adjust the eyes on in ComfyUI. Even a combination of a Poser render with the eyes looking away, and robust prompting could not shift the eyes very far. This, I think, was a problem with my otherwise perfect combo of Canny, Img2Img, three LoRAs with a precise mix, and other factors. The workflow was robust with different Poser renders, but on ‘head and shoulders’ renders the eyes could only be forced slightly away from looking at the viewer/camera. It’s the curse of the “must stare at the camera” default built into AI image models, I guess.
But of course the last thing you want in a comic is the characters looking at the reader. So some solution was needed, since prompting was not going to do it. Special LoRAs and Embeddings were no use there either. Good old CrazyTalk 8.x Pro was tried, and (as many readers will recall) it can still do its thing on Windows 11. But it required painstaking manual setup and the results were not ideal. Such as tearing of the eyes when moved strongly to the side or up.
But three months after the zombie breakthrough I’ve made another breakthrough, in the form of a discovery of a free Windows AI portable. The 5Gb self-contained LivePortait instantly moves the eyes and opens the mouth of any portrait. No need to do fiddly setup like you used to have to do with CrazyTalk. You can’t control it live with a mouse, like you could with CrazyTalk, but it’s very simple to operate.

LivePortait for Windows was released about 16 months ago, with not much fanfare. Free, as with all local AI. Download, unzip, double-click run_windows_human.bat and wait a few minutes while it all loads. You are then presented with a user-interface inside your Web browser…

Scroll down to the middle section, “Retargeting and Editing Portraits”. As you can see above, it’s very simple to operate and it’s also very quick with a real-time update in microseconds. Works even on ‘turned’ heads. I’d imagine it can run even on a potato laptop.

Poser – to – SDXL in ComfyUI – to LivePortrait.
One can now start with Poser and more-or-less the character / clothes / hair you want, angle and pose them, and render. No need to worry if the eyes are going to be respected. In Comfy, use the renders as controls and just generate the image. If Comfy has the eyes turn and the prompted expression works, fine. If not, no problem. LivePortrait can likely rescue it.
The only drawback is that the final image output from LivePortrait can only be saved in the vile .WebP format. Which is noticeably poorer quality compared to the input. Soft and blurry, and as such it’s barely adequate for screen comics and definitely not for print comics.
I tried a Gigapixel upscale with sharpen, then composited with the original, erasing to get the new eyes and lips. Just about adequate for a frame of a large digital comics page, but not ideal if your reader has a ‘view frame by frame’ comic-book reader software.
However there may be better ways. One might push the .WebP output through a ComfyUI Img2Img and upscale workflow, but this time with very low denoising. I’ve yet to try that. It might also be worth trying Flux Kontext.
For those with lots of Poser/DAZ animals, note the LivePortrait portable also has an animals mode. Kitten-tastic!
Success with a quick initial setup and test of the new unified Controlnet for Z-Image Turbo, using a Poser render as the source image. My source render here is the Meshbox H.P. Lovecraft figure for Poser, with an M4 ‘shambling zombie’ pose applied, rendered as a basic greyscale + some Comic Book lines, Preview render.

The workflow is ComfyUI. Z-Image Turbo is very responsive, so this prompt could be refined for facial expression and eye-direction. Also, there are no style LoRAs being applied here.
Turns out Z-Image Turbo does know the names of classic Marvel comics artists, but you have to do Jack_Kirby instead of Jack Kirby, or Steve_Ditko etc. Sadly it has no idea who H.P. Lovecraft was, under any variant of the name. Hence the different-looking head.
Very precise adherence to the basics of the source image. A reasonable 26 second render time. Apparently the ideal with this particular Controlnet is to stop it a few steps short of the final image, so that Z-Image has more of a chance to do its magic. That’s not happening here. But I’ll investigate that option at the weekend, so be aware that the above workflow is just a first try and is not optimal.
Z-Image Turbo is local and under a full permissive Apache 2.0 license, which means it can be used commercially and so can the outputs.
I had a nice sub-$10 haul of three Halloween sale items for Poser today, picked from my Wishlist on Renderosity.

After install The Worm is found in runtime Characters under Coflek Gnorg / Worm, and it has a Nest prop in Props. No poses, but it’s easily posed. Dark and grungy materials, unsuited to tooning, but a simple Gamma shift of “2” (seen left), using the built-in Python gamma script, goes a long way towards making it suitable for tooning (seen right)…

1971s’s Halloween Ghost Lantern is a character rather than a prop, though not poseable. Found in the runtime under Characters / Halloween Ghost Lantern. Again, too dark and grungy for tooning, and it turns out that the shroud material is transmapped thus making it unsuitable for lineart. Oh well. Although it can start to look nicely graphic in b&w, kind of like an Aubrey Beardsley illustration…

Zeekenah is found under Character / Creatures / Zeekenah. With Zeekenah’s five poses found under Poses / Creatures / Zeekenah. Fully poseable. The material is not too dark and grungy, and with the right light one can get pure lineart (suitable for layering in Photoshop),

Although a bit of realtime Comic Book lineart and a Halloween light can also look good, as with this realtime Preview render.

I might have used one of them in the Renderosity Halloween contest, but sadly I see the deadline is today. Oh well.
I’ve had time to get back to experimenting with my Poser renders to Stable Diffusion workflow. As you can see, I can now use SDXL and prompting for expressions is possible (even if not present in the Poser render). A Firefly lines-only render is used in the Controlnet, and a very basic Comic Book real-time render is used for the Img2Img. The next big problem to solve is the “stare at the camera” problem. The last thing you want in a comic is the characters looking at the reader.
More progress in my learning ComfyUI for use with Poser renders. It’s not just about plugging in a character LoRA and hoping for the best, I’ve found. Automatic face masking and facefix + a character LoRA can be added to the SDXL workflow.
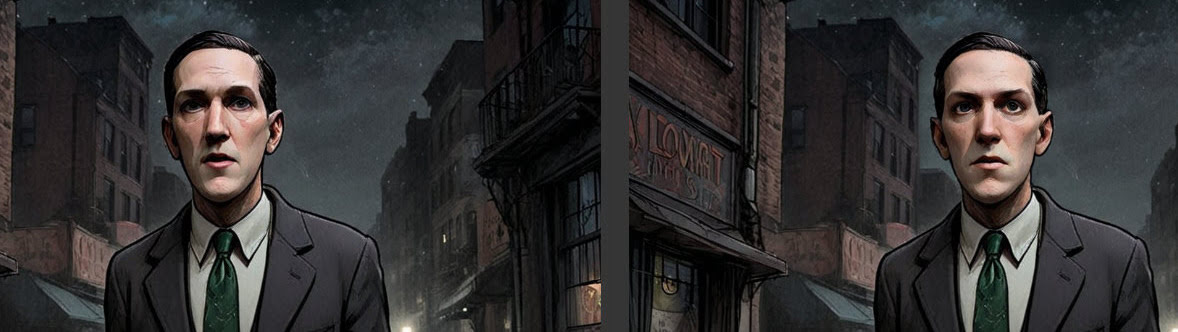
Here we see the ‘before’ and ‘after’ effect on a scene with H.P. Lovecraft in the middle-distance. Before it’s sort of vaguely like H.P. Lovecraft but also more like William Burroughs, and then after it’s much more recognizable as Lovecraft. The face in the picture is automatically identified and masked, then that area is regenerated at a higher size — so that the face can become more refined. And the LoRA tags along with that process, also making the character more recognizable.
Of course the problem is that it only works if the figure is alone. Otherwise every face in the scene gets a makeover. Another reason, I think, to make character cutouts and backgrounds separately and composite them in Photoshop. That said, I haven’t yet learned how to set up a way to manually paint-in a face mask (update, seems to be impossible while the workflow is running – easier just to output before/after images and Photoshop them together later).
Brian Haberlin has a produced a Faster That Light 3D Treasury Edition. 3D here means ‘red-blue glasses’ 3D. It’s actually two new stories from his Faster Then Light sci-fi world, not a collection of the old Faster That Light series converted to stereoscopic 3D.

Presumably Brian’s sophisticated ‘Poser to comic-book’ method is used here as before, but now the Poser 3D models + scenes + a PoserPython script all give the ability to produce a stereoscopic (red and blue glasses) ‘3D view’. Aka ‘stereo anaglyph’.
Basically to get this effect you lower the camera dolly X value to something quite low (0.020) and then make a ‘right eye’ and ‘left eye’ render, then combine in software for making stereo anaglyphs. World of Paul has the details and the free PoserPython scripts.
More fun with ‘Poser to Stable Diffusion’, now that I’ve moved to Windows 11 Superlite and have the AI stuff mostly set up.

This time I can use SDXL rather than SD 1.5. I think regular readers of this blog will recall the previous attempts with the same Poser source, and see quite a difference in the result. I’m using the same test render.
To get this I made a ComfyUI workflow featuring an SDXL turbo model powering Img2Img, plus three LoRAs, and a lineart Controlnet. Not sure the latter is really needed (a relic of the old workflow), provided the colour stays steady from image to image and thus from panel-to-panel and page-to-page in a comic. Or I guess I could go all-in and try four different Controlnets working at once, and see how stable the results are compared to the Poser render.
But this is just a first experiment, and it’s encouraging to get this far immediately.
On the other hand, it’s inventing things like the suit pockets and a waistcoat. Which is annoying since consistency is needed. The reason to use Poser is to have the results be consistent, not full of little differences that either take a lot of postwork to fix, or which are lazily left in and annoy the heck out of the reader. (Update: prompt to “dark 2-piece suit” to get rid of waistocoats)
The result comes in at a healthy 1432px (in about 12 seconds), from a 768px starter Poser render. Meaning that cutout and de-fringing is easier in Photoshop. Here the result is cutout, defringed, and given a Stroke to firm the holding-line. The shadows have also been lifted a little, to give it a more graphic look.
Next step will be to get some more SDXL Controlnets, and output a variety of different Poser renders and then see what combination works the best with this workflow.
Working OpenPose with face and hands, from any image, in ComfyUI. Works with quick real-time renders from Poser.

1. Use your existing ComfyUI or, if new, then try the ComfyUI Windows portable. For the Portable, cut the entire custom_nodes folder and place the more immediately useful individual custom_nodes folders back one-by-one, if ComfyUI fails to load all its UI elements on startup. I found that one of the custom_nodes was stopping the full UI from loading.
2. Into your ComfyUI you install ComfyUI’s ControlNet Auxiliary Preprocessors packages, which come in a big bundle… and one of these is for openpose processing.
3. Into your ComfyUI you also install DWPose as ComfyUI-Dwpose-Tensorrt to speed things up. You’re on Windows and NVIDIA, I assume.
4. Download two required Torch files dw-ll_ucoco_384_bs5.torchscript.pt and yolox_l.onnx. About 500Mb in total, and they’re open on HuggingFace. There are two folders to manually put these in, for me…
C:\ComfyUI_Windows_portable\ComfyUI\custom_nodes\comfyui_controlnet_aux\ckpts\yzd-v\DWPose\
C:\ComfyUI_Windows_portable\ComfyUI\custom_nodes\comfyui_controlnet_aux\ckpts\hr16\DWPose-TorchScript-BatchSize5\
I was told to put the files in the first yzd-v folder and then the workflow gave me a ‘not found, download from Huggingface’ error. However, I then also tried copying the same files to the second hr16 folder and… the Openpose workflow worked.
5. My simple Openpose workflow for Comfy, working. Just drop an image in and ‘Run’. Should take about five seconds to produce an Openpose image.

As you can see, you can switch off face and/or hands if they’re not required.
You then save out this special image, and drop it into a Controlnet workflow which has an openpose model (here for SDXL models) linked to it…

Once downloaded I renamed this openpose model to openpose-sdxl-diffusion_pytorch_model.safetensors so that I know it’s for SDXL. It is copied into C:\ComfyUI_Windows_portable\ComfyUI\models\controlnet\SDXL_controlnet\
On more powerful PCs you can link these two workflows together in the same workflow. But with more basic PCs, it seems best to try to limit how much the workflow is being asked to load all at once.
The resulting suitably-prompted image then conforms to the input Openpose pose. Use a setting of 0.85 to give the Controlnet more wiggle-room than a strict 1.0 setting.
All free. There’s also a paid plugin on Renderosity, which does this for Poser 12 and 13.
I also tried to get depth (aka depthmap) Controlnet working, but with no success at all. I must have downloaded 20 workflows and countless models, custom_nodes and preprocessors, and not a damn one worked. Errors every time. I give up on depth in ComfyUI, and will just work with the working MistoLine lineart and OpenPose Controlnets.
Having made the leap to Windows 11 Superlite, I now have it nailed down and the AI image generators I wanted. I’m working on ComfyUI Portable, which was updated to the latest version for Flux Kontext Dev. I suspect I won’t be going back to InvokeAI much, now that I have Comfy made… comfy. It’s not so daunting once you get the hang of it. Here’s what I now have…
* SDXL:
Can be made blisteringly fast with realvisxlV50_v50LightningBakedvae.safetensors or the amazingly fast/good-quality splashedMixDMD_v5.safetensors. From the latter, four seconds on a 3060 12Gb for this image at this 1280px size. No postwork…

Four seconds! Works with mistoline_rank256.safetensors as the single universal lineart controlnet (not used in the above image). There are two slight disadvantages to the otherwise awesome splashedMixDMD_v5 model. 1) you get no negative prompt — since you have to work at CFG 1.0 and thus the Negative prompt is ignored; and 2) not all SDXL LoRAs appear to work with splashedMixDMD. Still, some nice ones do, such as the comics one you see in action above. I think I have a new favourite go-to for experimenting with style-changing Poser renders with Controlnet. Maybe also OpenPose Controlnet, since there’s at last a good one for SDXL.
Theoretically, since I also have the original vanilla SDXL base model, I could also now train up some LoRAs myself.
Also of note is the SDXLFaetastic_v24.safetensors which is dedicated to western fantasy artwork (painting, lineart, charcoal etc). Perhaps useful as a backup when a LoRA fails to work in a turbo model.
* Illustrious (SDXL):
Illustrious models are supposed to be ‘SDXL for illustration’ but appear to be overwhelmingly anime (ugh), but at least that makes the good ones excellent at poses and action. I’m not hugely impressed by using the more interesting LoRAs with Nova Flat XL v3, the model that I was recommended to try for making ‘flat’ comics images. The model is indeed great for what it’s meant to do, but I didn’t get much from using it with LoRAs such as Ligne Claire (clear line Eurocomics style) or the Moebius style LoRA. But maybe that’s because I haven’t played around with them long enough or got them in a good Illustrious workflow with suitable prompts that shift it away from anime. Or maybe I need another Illustrious base model.
* Flux Kontext Dev:
Somewhat slow, but with the AurelleV2 LoRA it can take a Poser render and generate a very convincing watercolour + lineart which exactly aligns when laid over the top of the starting Poser render. And which keeps the base colours. Good for illustrating children’s storybooks then. It can also do its other ‘I am a Photoshop Wizard’ magic, albeit slowly — such as merging two images and re-posing, removing items including watermarks, removing or changing colour, re-lighting, placing a face into a new environment and position, etc. Useless for auto-colourising greyscale, compared to online services such as Palette and Kolorize.
* WAN 2.1 Text to Video / Single Image:
Yes, I even tried WAN on a humble 3060 12gb card. Working, with two turbo LoRAs running in tandem. 80 seconds for a nice 832 x 480px single frame, with a workflow optimised for single images. Slow, but it can be done and the results are very cohesive and convincing as photography. This success suggests that a 16fps text-to-video at that size would take maybe 2 hours for five seconds, and making a single-image preview first would reassure one about the eventual results.
* WAN 2.1 Image to Video:
Working, with a turbo LoRA. 36 minutes for 5 seconds at 480 x 368px (81 frames at 16fps). Initial tests show it works well and looks good (spaceship entering planetfall from orbit), and it’s feasible in terms of time. So 820 x 480px, with more quality, might at a guess be three hours for six seconds at 16fps? That would be perfectly feasible to run overnight. After a week one would have some 40 seconds of video. And a hefty electric bill in due course, no doubt. Though, Wan 2.2 is due soon and will add a lightweight 5b model with better camera shot-name and camera movement understanding, and may it well also be quicker.
There’s a lot more to explore, such as tiled upscaling, facerestore, character adapters, normal map Controlnets etc. But for now I’m pleased I’ve made the leap to an OS where I can use more than SD 1.5 and SD 2.1 768. I’ll still go back to them in due course, especially now I can use them with turbo workflows. They can also be used in tandem with other types of model, such as Illustrious for coherent action scenes and then try to get the result into photoreal + nice faces with SD 1.5. It’ll also be interesting to see what ‘SD 2.1 768 to Illustrious’ can do with a Syd Mead landscape.
And I got all the above just in time, since CivitAI is to be effectively banned here in the UK, from tomorrow!
I’m downloading the free Flux Context and its various dependencies now, and it looks like it will void all previous local Stable Diffusion attempts at ‘style makeover while keeping the content fixed’. In other words, ‘work like a Photoshop filter’.
But, a super-powered one that also knows how to make precise image edits (e.g ‘work like a Photoshop filter, but add a hat and change nothing else’). It’ll thus be very interesting to see what this new form of local AI can do with some basic real-time Poser renders.
Oh, and I also have a ComfyUI node which outputs a workflow as a Python script, which would seem to offer potential to have Poser grab a just-made render and feed it straight into Flux Kontext. The drawback on that is the render-time (1min+ for Kontext, per 1024px image), which is not so turbo-charged. So, near-instant basic Stable Diffusion style-change methods will likely still have their place.
Watch this space.