The latest free 3D Art magazine (#25) has a lead article with Arthur Dorety, on using Poser Pro 2014 and Vue 11.
Category Archives: 3D Renders
KeyShot 4
Luxion has announced a beta of Keyshot version 4. It’s a simple and stable standalone high-end renderer, that’s very easy to use with characters exported as FBX from DAZ Studio. It’s quite expensive, but if you can get some academic ID there’s an educational version for $95.00.
* updated, cleaner user interface.
* enhancements to material editing.
* new material types that turn any geometry into a local light source.
* enhancements to translucent materials.
* faster real-time rendering performance.
* improved render output.
Tutorial: a DS3 workflow with Light Dome Pro 2 and Mood Master 2
Here’s a quick and easy ten-step workflow tutorial for DAZ Studio 3 users, on how to use a combination of Light Dome Pro 2 and Mood Master 2, to quickly light and then to fog/haze a large-scale outdoors scene. Followed by an easy compositing of the renders in Photoshop, and adding some FX.
Here’s the final picture which this tutorial will work toward…
Please note that LDP2 and MM2 only work in DAZ Studio 3.x.
1. Load and position your large-scale test scene in DAZ Studio 3.x. Here I’ve swiftly thrown together Stonemason’s Urban Sci-fi / Block 39 / Urban Future, pushed one tall building way back in order to try to create a sense of depth, and pointed a 35mm camera at it from the pavement corner. I didn’t apply any special DAZ MATs to the buildings. The “canyon” nature of the scene aimed to give LDP2’s system a good “workout”, in terms of getting the lighting to reach down into the canyon.
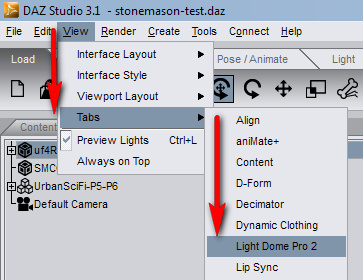
2. Find and load your Light Dome Pro 2 plugin, from DAZ’s “View” menu…
Then open up LDP2’s lights presets window…

3. Now simply double-click on a LDP2 lighting preset, to load its lights into the scene. In the example shown I’ve used the basic sunlight “Sundsvall 25” LDP2 preset. Note that you can go to LDP’s “Move and Scale” tab, and rotate the LDP2 dome so that the sunlight falls where you want it to.
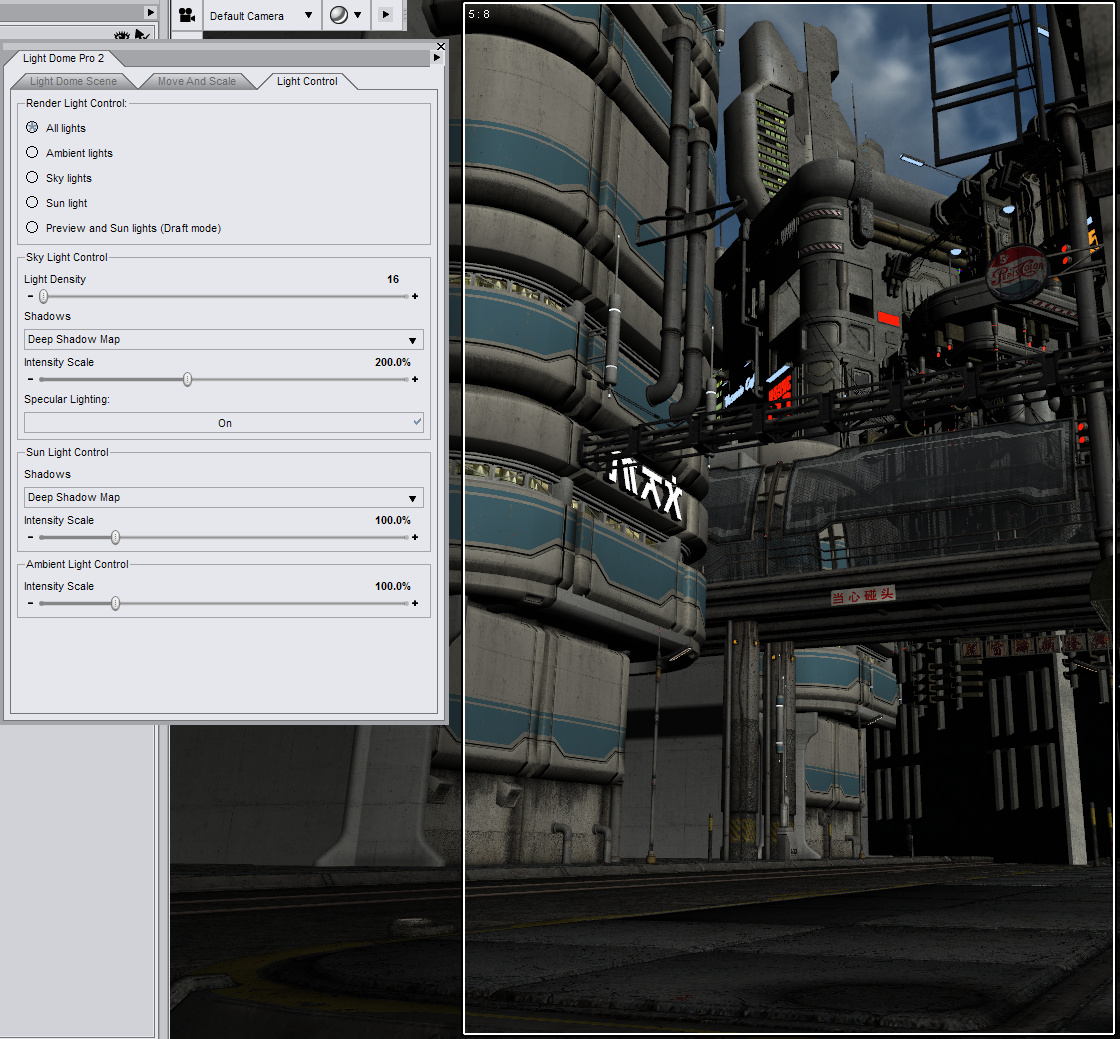
I then switched from “Raytracing” to “Shadow Mapping” for my LDP2 shadows, and lightened the shadows with a 200% slider setting. It doesn’t look too bad, at least in DAZ’s real-time OpenGL preview, although note that this OpenGL image is not at all an accurate preview for your final render…
4. Important! Now save your DAZ Studio scene file [ File | Save | Scene ]. Call it something like “MyScene-Lights”. From now on, do not move the camera.
5. Open your DAZ Studio render settings, and ensure that you’re using DAZ’s native 3Delight renderer. You may want to do a few tiny thumbnail test renders first, say 300px with the default 16 lights.
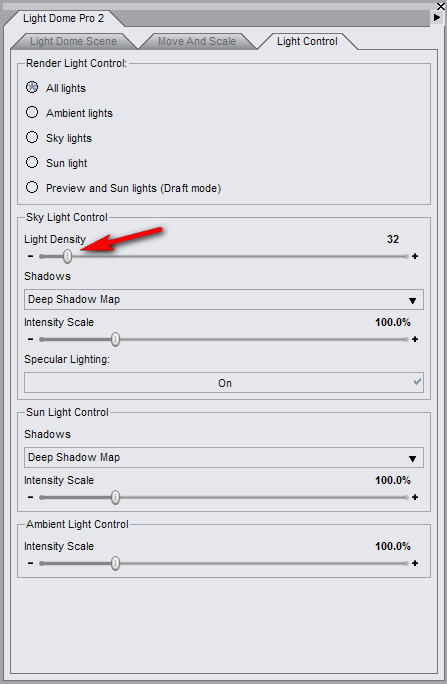
Once you’re happy with the general look, switch over to the “Light Settings” tab again in the LDP2 control-panel. There bump up the Light Intensity from the default “16” to “32”. Doing this doubles your lighting quality (but it’s unwise to go beyond 32, unless you have a very speedy modern rendering PC)…
Then do your full render (1920px is the size I’m using here) to a file called something logical like render1.png.
On starting to render, LDP2 may automatically swop out all the preview lights for its LDP dome lights. This is nothing to worry about. This what this temporary effect looks like…
Here’s my final 1920px render using the above preset and settings, which took 14 minutes (inc. calculating 32 shadow maps) on what’s now a fairly old PC…
Yes those shadows look too dark, but we’re going to be using Photoshop’s Screen blending mode several times later on — which will lighten up those shadows as we blend.
(Of course, you could also get a similar quality ‘global illumination’ render with an external renderer like Reality 2.2 (for DAZ 3 + a PC with an Nvidia graphics card). So feel free to substitute Reality etc as your renderer, at Step 5. But by using the LDP2/MM2 method and DAZ’s native renderer I’m explaining here, we avoid the need to tediously adjust all the scene’s textures to suit Reality.)
6. Now save your scene again — this time using “Save as” [ File | Save As… | Scene ]. Name the new file something logical like “MyScene-MoodMaster”. It’s vital to make a second extra copy like this, since in the next step MoodMaster is about to destroy all the Light Dome Pro 2 lights! So make sure you have two DAZ scene files saved out: “MyScene-Lights” and “MyScene-MoodMaster”.
I then deleted all the LDP2 Pro lights from the Mood Master version of the scene, and applied a very dark light (in this case, DNA Winter_3’s “WN 004”) and then made a basic OpenGL render of it. This gave me a basic “glowing lights only” layer to work with later, in Photoshop…
Another way of doing this type of simple mask might be to use Dreamlight’s Mask Creator for Daz Studio.
7. Without moving the camera at all (very important!) in your scene, apply Mood Master 2. MM2 is not a plugin, so you’ll find it over in your Contents library…
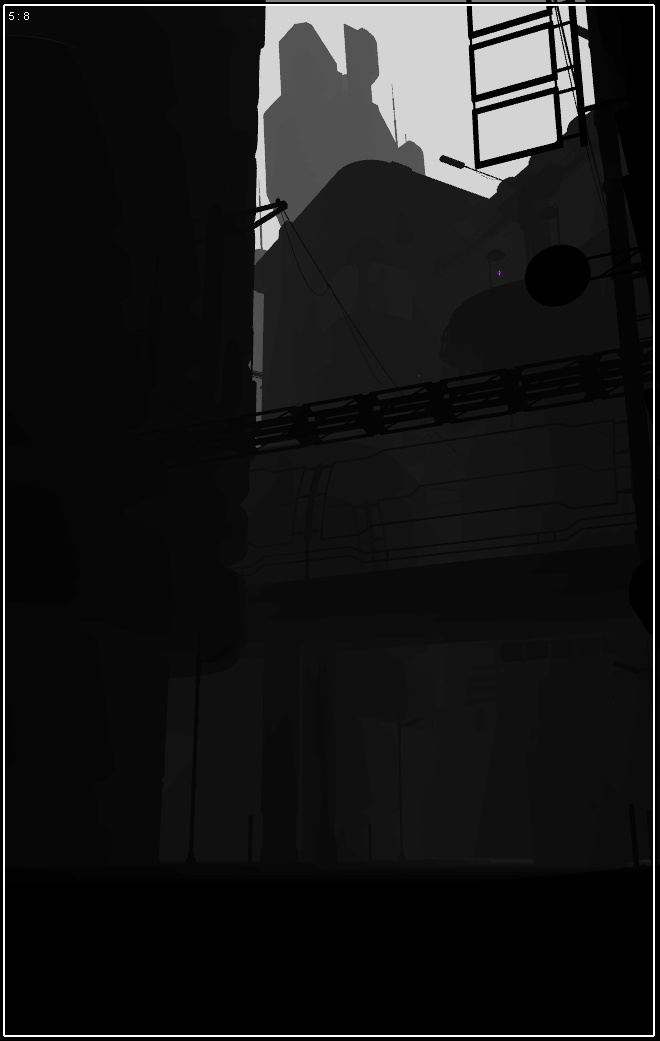
Like LDP2, Mood Master is quite simple to use. Double-click the icon to “Add Mood Master 2” to the scene, then apply the simple “Z Depth” preset. This is what we get…
Now save this as a new render. Be careful not to save over your precious main render! Rendering this “Z Depth” render will be a lot faster than the main render was! For me, this MM2 Z Depth render took 90 seconds.
Now apply and render out any of the other Mood Master settings that you’d like to play around with blending in Photoshop. For this picture I also saved out “Miami Haze and Gradient” and one of the “Rain” presets. Remember that if you use a MM2 “Rain” render, then you’re going to have to create an extra “wet pavement + reflections” layer later in Photoshop.
OK, now we have all our required renders we can close down DAZ Studio…
8. Open up Adobe Photoshop and start a blank document that’s exactly the same size as your renders. Paste in your main base render. Then open the MM2 “Z-Depth” render and paste it over the top of your main render. Blend it [ Layer | Layer Style | Blending Options ] in “Blend Mode” set to Screen at 100%…
Hurrah, you just got a nice but basic Vue-like distance haze on the tower. Now save it out as a starter Photoshop file.
9. Looking good, but we’ve lost all the sky detail. Let’s bring back the sky, but better.
i. Merge the Main and Z-depth layers and name them “Main”.
ii. Create a new blank layer called “Sky”, and copy into it a suitably stormy sky photo. Send this layer backwards, then set its Layer Blend Mode to “Soft Light” at 100%. With a big soft 200px Eraser, remove most of the overlap, leaving just enough to suggest a damp sky that’s roiling above the tower and creeping down over the building edges. Then roughly select the tower itself with lasso, feather 50px and delete the selection — doing this helps retain the original Z-depth haze.
iii. Paste in your Haze render, desaturate it, and then blend it exactly as you did with the Z-Depth layer…
Now we have a nice convincing rainy sky…
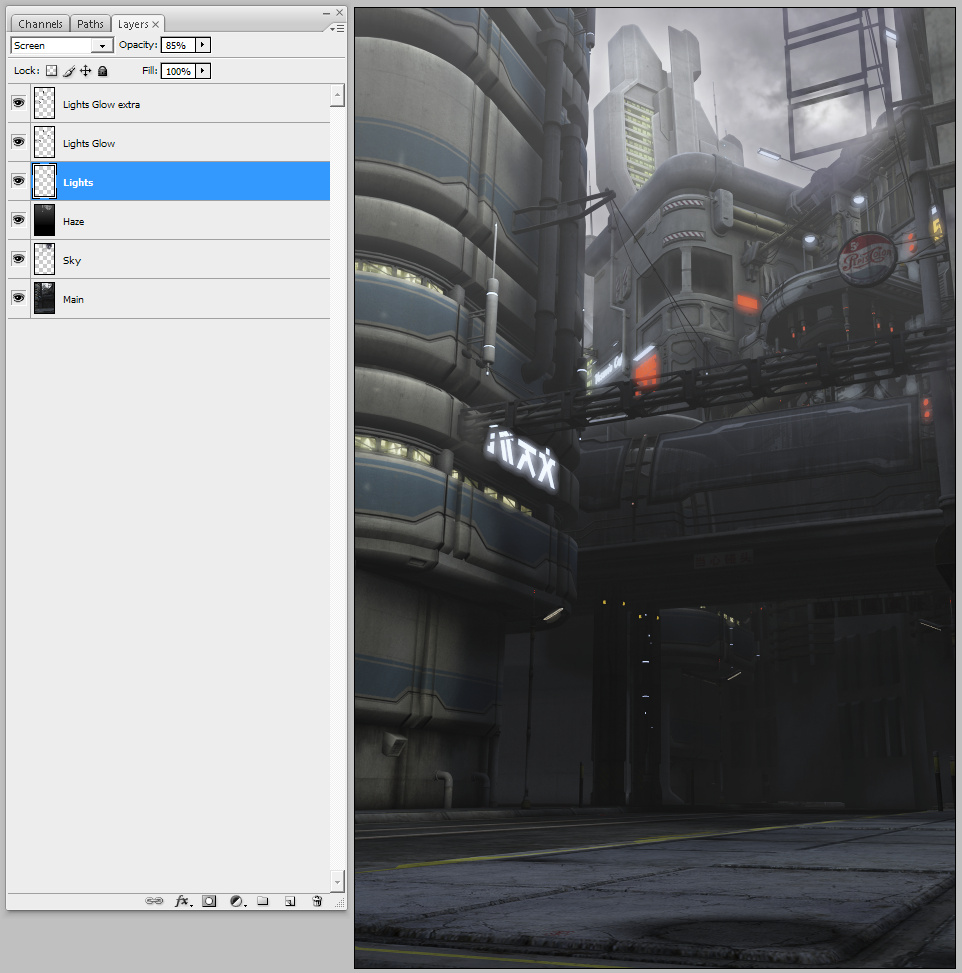
Now paste in your OpenGL lights layer, and blend with our old friend the Screen 100% mode. Then duplicate this blended lights layer and add Gaussian Blur to it at about 6%. This will make the lights look like they’re being diffused into the rain. To remove any unwanted intensification of the Screen mode lightening, then use the Magic Wand on both Lights layers, and erase anything that’s not a light…
10. Now you can continue to play around in Photoshop with the extra MM2 layers you rendered, such as Rain. In the final picture I used the Rain layer twice, once slightly tilted. Then I added a reflections layer to serve as a “wet” pavement, some steam escaping from the manhole cover and two vents, the flower, some rain seepage staining onto the concrete, and another application of the Haze layer (which served to generally lighten the shadows on the main render)…
Then I added the final layer — a DAZ/Poser character which I posed then exported as an OBJ (without its reflection maps). I used Photoshop to match the robot’s colour to the background, and then used a dodge brush on it to correct a few inconsistencies in the lighting.
That’s it!
To summarise the basic workflow:—
Open your DAZ scene, import 3d models, pose, and set the camera view.
Apply Light Dome Pro 2 preset. Adjust Sun, Shadow Density, Light Density.
Save scene file. Render.
Save scene file again, as a new Mood Master copy.
Apply Mood Master 2, and then render out its Z-depth and other renders.
Open Photoshop and blend the Z-depth and Main renders (Screen, 100%)
Blend in other Mood Master layers (Screen, 100%), as you see fit.
Please note that this workflow is best used on large-scale open views/scenes.
Note also that there’s also an LDP2 addon which adds presets for sci-fi and fantasy scenes, Sky Pack: Out Of This World.
Voting now: Renderosity Halloween 2012 Contest
Cast your vote now now, for one of the 148 3D entries for the Renderosity Halloween 2012 Contest…

Tutorial: elevate your cuteness
Vladimir Chopine (GeekAtPlay) has a new free 25-minute video tutorial, on using Poser with Vue and Photoshop/Filterforge to create a painterly final picture…


DeviantArt’s new Dreamup commissioning service
Can you make money with your digital art? The well-known fantasy and sci-fi art website DeviantArt thinks you can, via its new (beta) commercial commissioning service, Dreamup.com. It’s nice to see them set a price threshold, of a decent $200 (about £130) for a finished picture — so there should be no eLance-style “race to the bottom” in pricing, no ‘ten illustrations for $10’ done by slave-style workshops in India or China. Dreamup keeps the cash in secure escrow until project stages are hit. Per-stage payments are available. One of the benefits should be that the artist’s payment arrives very promptly after the work is done, rather than the artist having to wait for months for a seemingly semi-mythical payment that’ll be… “in the mail soon now, dude, really…”

New free Cinema 4D student edition
The traditional 3D software Cinema 4D has released a… “free, fully functional, Student Edition of Cinema 4D”. Specifically, the new version 14. Which potentially saves you about $1,000.
Nice, but it’s actually not quite fully functional. There’s no plugin support in the student version (so presumably Poser Pro 2014 users won’t be able to use their official PoserFusion Poser-CD4 bridge plugin with it), and nor is there networked rendering. Oh, and the software expires after 18 months.
Still, if you were thinking of testing it then the student edition might be an option. The results can look rather pretty. Here’s Fredy3D’s “The Defenders of Bast Prime” from his New Egypt sci-fi series…
Fredy’s pipeline between Poser and Cinema 4D is actually via the $75 commercial plugin InterPoser, rather than PoserFusion.
The Octane renderer has a new blog
The external Octane renderer now has its own blog. I took a close look at using Poser with Octane, back in March 2012, when Octane was still an unstable beta.
3D World reviews Reality 2 for DAZ Studio
3D World magazine deigns to glance at the hobbyist sector for once in a blue moon, with a new review of the Reality 2 plug-in for DAZ Studio. If you have lots of older Poser content in your DAZ, and run your PC with an Nvidia graphics card, then (judging by the review) it looks like you might want to test Reality 2 carefully before buying.
New issue of 3D Art
New issue of the free sci-fi and fantasy art magazine, 3D Art. Issue 20 (Aug 2012) gives us a detailed interview article on…
“the history of Renderosity, the staff behind the website and where it might be going next? Discover more about this remarkable community of digital artists, which has grown tremendously since 1999.”

3DS Max 2013 to export layered Photoshop files
The new 3DS Max 2013 (shipping 12th April 2012) has new features that may make it more interesting than before, for Poser Pro 2014 users using it with the PoserFusion plugin. These include among the features list…
“a new ability to output renderings in a layered PSD [Photoshop] format”
Using Poser with Keyshot
A very cool set of Poser / Keyshot renders by David Constantine…
The workflow is…
1. Export a posed character as a FBX (DAZ) or Collada (Poser) file.
2. Import to Keyshot and stand your character against your chosen background.
3. Apply the background’s matching HDR light.
4. Render.
Keyshot is blindingly quick at rendering, at least with single objects against a 2D background. Keyshot ships with a range of background images that have matching HDR lights. These lights help the objects look as though they belong in the scene (as you can see above).
Sadly Keyshot is aimed at engineers and commercial product-photography people, rather than hobbyists, and so costs $1,000. Which does at least mean it’s blissfully simply to use, and can be fully learned in an hour. This is because it’s designed for those who are unfamiliar with 3D software, and who run screaming from the ludicrous interface complexities of software such as Blender. But the cost of Keyshot will put off many. It’ll cost even more, if you want an add-on HDR Light Studio pipeline (the latest version of this can apparently make a matching HDR from any background that you feed it).
Still… Keyshot is certainly one to consider, if you’re looking for a tax write-off and you want an alternative render engine for still images of Poser figures. Just keep in mind that you’ll need to fix eyes and eyelashes on Poser faces after import, and that Keyshot only ships with one skin material that takes ages to render.
2012 Songbird Remix Contest – winners announced
The winners of the 2012 Songbird Remix Contest have been announced and posted. The contestants used the fabulous SongBird Remix packs for Poser. The winning entry was “Tancho” (Red-crowned Cranes), and can be seen in the entrants gallery…


