
My Python scripts for Poser 11 page on this blog has been checked by hand, and its links and information fixed and updated.
Monthly Archives: July 2020
Links Directory checked, fixed and updated
I’ve gone through the sidebar Directory on this blog, by hand. The whole list has been checked and repaired if needed. About a dozen links have now been sent to Archive.org, mostly old freebies pages, where you may or may not also find the freebie .ZIPs you’re looking for. The trick there is to start with an early date, and keep clicking through the dates until you find a capture in which the .ZIP files were also saved. As for the rest of my Directory, there should be no dead links for a while yet.
I’ve also updated some link descriptions on the Directory (e.g. the Smith Micro Poser forums are now “Official (Old)” while the Renderosity ones are “Official (New)” and fixed some versioning (e.g. “Reality 2.0” now “Reality (Open Source)”). If business names have changed these have also been swopped over.
My new Poser/DAZ Technical Search engine has also had another ten URLs indexed. It’s pretty fab and nearly 100% comprehensive now, enabling robust Google searches uncluttered by scams, spam and irrelevant results for Maya, Lightwave, Adobe etc, or forums for more general Python scripting. Sadly the old Runtime DNA forums don’t appear to have been archived online to be indexed, although Archive.org has bits of them hidden away.
Next on the list is to check and update the Web links on the Poser 11 scripts page.
Got MotionArtist 1.3
I’m pleased to have bagged MotionArtist 1.3, at some 65% off. It’s Smith Micro’s motion-comics production software with HTML5 output, which was left relatively polished at 1.3 (2016) but which has not been further developed.
It requires Poser Pro 2014 (not 11) to interface with, for importing Poser’s great range of 3D content. This even enables you to drag and drop a .PZ3 scene into the MotionArtist canvas. Apparently MotionArtist can also import from the older Anime Studio 9 and 10 (not Debut), and import layered .PSD files, and vectors(?). Though the latter forum-claim on vectors is not documented in the manual. Anime Studio 11 has a date on it that suggests it may well work, but that’s just a guess. I assume it would work, and probably also Moho 12 (the renamed Anime Studio 12) when that was still under Smith Micro ownership. Then…
“When you update the [MotionArtist] assets in the creation application [i.e. Anime Studio], they will automatically update in Motion Artist.”
Which means you can work with placeholders, initially. I’ve no idea if it could also interface with the sister-software Manga Studio (now Clip Studio).
Anyway, the trick to getting such a hefty discount on the software is to hang around eBay for the search terms “motionartist” and “motion artist”, waiting for these to reveal a sealed retail DVD copy at a bargain price. There seems to be a couple of sellers with a warehouse stacked high with such DVDs, but they just repeat-list them at crazy-high prices. I guess they looked at the Renderosity page, where it used to be sold for $50, then thought “hrurh, unawailable software, haz sum rarity value… sell fer £70!” I doubt they get many sales. But occasionally a sealed copy pops up at far less than the $40 that Smith Micro currently charge. The software never goes to a discount at the Smith Micro store these days, even on Black Friday.
Anyway, my sealed DVD of v.1.0 arrived and its in-box serial-number was accepted at Smith Micro. The download of the latest free 1.3 update was then 150Mb. The only problem was that the download from Fastspring was extremely slow, and is probably best done overnight. Fastspring live up to their name by offering a nice fast checkout, without need for membership sign-up… but a fast download it is not.
I’m not especially interested in making actual motion-comics with MotionArtist, partly because they can and do induce motion-sickness. But…
* the ‘infinite canvas’ idea seems interesting [find it via: Director View, click-drag Magnifying Glass/Pan], perhaps useful simply for flexible planning of comics pages and devising comics page-layouts;
* it can produce another kind of toon render from Poser, and even tries to do automated hatch shading on 3D (though not very well);
* it looks like it can do “the Ken Burns effect” (slow pans and zooms) and in HTML5, as an alternative to Slideshow Studio and YouTube. While adding a cool parallax depth-effect too. But can the output for that retain the quality needed for 1920px viewing of vintage photography, while also providing a reasonable final file-size?
* it can do interactivity. Regrettably I don’t think MotionArtist has any basic and-or-if ‘game logic’ built in, and thus can’t be made into a sophisticated point-and-click 2.5D game with inventory, crafting, fiendish puzzles etc. However the HTML5 export can have clickable hotspots and labels leading to a new scene or frame, which is something. What you can’t seem to do is export to a single interactive magazine-like flipbook file, other than by taking the HTML5 to an .EXE with other software, which is not ideal.

This feature suggests that a small “choose your own story” walking adventure-story could be possible, with careful planning of the loops and arcs. Something along the lines of the simple Zork “you are standing at a crossroads, which of three roads do you choose?” type. Or a Japanese-style ‘visual novel’ where the game element is all in the story-choices. Though there would be no “save game” feature other than browser bookmarking. Still, a bit of third-party javascript on each chapter-start page might do that in a style fitted to the game.
All of which definitely makes it worth the £10, in my view.
Assisted Graphics Intelligence
So, what are we going to call all this semi-automated, generative, and AI-assisted graphics production? My vote would be for Assisted Graphics Intelligence, or AGI for short. To be pronounced Ag-eee, as when the name ‘Agnes’ is fondly shortened to a more familiar ‘Agee’. AGI also evokes both ‘AI’ and ‘agile’, and has a hint of magic and magi about it.
Some ideas on quick-sketch ‘explainer videos’ with Poser
Posted on
by
 Posted in Companion software, Natural media emulation, Poser, The Animation Industry, Tutorials
Leave a comment
Posted in Companion software, Natural media emulation, Poser, The Animation Industry, Tutorials
Leave a comment
You remember those “whiteboard animation” videos, in which a hand super-quickly drew a sketch, words get laid down, while there’s a voiceover? They were the ‘hot new thing’ circa 2014, and generally now go by the name of “explainer videos”.

Production of them is now a Cloud or tightly Cloud-locked subscription thing, and there appears to be no desktop-only software worth having for making them quickly and easily. The leading $40+ a month names are Sparkol VideoScribe Pro and Easy Sketch Pro, among others. There’s obviously a lot of money in such services, and the Web is very intensively astro-turfed with page after page of spam and misleading marketing on such things. It’s almost impossible to find reliable information. Anyway, they exist, and the market leader VideoScribe has impressive capabilities, yet is fairly simple to use.
Their lustre has faded, as a media form. ‘Explainer videos’ were very hot in 2015-16 as we came out of the Great Recession, but they became over-used for mundane purposes — often purchased off the shelf for $20 from quickie providers in the back-streets of India, via Fivver. Such indifferent use has turned them into the humdrum Powerpoint slides of 2020. Meaning a superficially fancy presentation of fuzzy or half-baked ideas, done in a manner that’s then difficult to question or challenge. Thus making the format one that people now wince at, when they see it hove into view in a business meeting, teachers’ meeting or in a marketing context.
But that doesn’t have to be the case, and with a good story to tell and some creative flair they still have a place in education, especially for children and in lower-level work training. That set me wondering about how one would get a Poser line-art render to animate as if it was being drawn line-by-line by a human hand. Being able to output such a thing might be an attractive feature for Poser 12.
The basic method is fairly simple. Lineart as a vector .SVG is just a bunch of vector paths, usually laid down by hand in a certain order. A good .SVG keeps note of the order in which the ink lines were laid down, and apparently it then embeds this information in the file. Javascript can then be run on each vector line to “dash” it. Make these dashes long enough, then cycle through them with a bit of maths so that the dashes appear to “slide along the line”, and that’s the basic way you can give the illusion of lines being revealed. That, apparently, is how the trick is done.
As first I wondered if Smith Micro’s MotionArtist could do this sort of “reveal a drawing effect”. Nope, seems not. Reallusion’s Cartoon Animator? Nope. You’d think that such a sales-worthy feature would be a natural one to add, but it’s not.
What about the vector tools? Surely there’s an Inkscape plugin? Nope. Clip Studio? Nope, seems not. Paint.NET? Nope.
Then I thought about Poser’s ability to output a Corel Painter script, for playback in Painter. But my in-depth look at that nearly forgotten Poser feature shows… that it does not actually lay down “strokes and lines”, whatever the end result may appear to be. Like I said above, a lot of this stuff is in the realm of “smoke and mirrors”, in terms of how it’s actually done vs. what it actually looks like.
But could a Python script in Poser go through a figure and selectively turn off the Geometric Edge line, stepping through the body parts according to a set “feet to head” list, and saving to each step to a movie-frame as it went along? That would give a certain effect, but it might look a little weird in terms of not looking “hand drawn” when played back. For instance, the long leg lines would be drawn in “all at once”. One would have to also have the script generate shaped white geometry at certain co-ordinates (placed in front of the leg) to prevent the complete line from being seen all at once. It’s a very complicated possibility, for someone with a few weeks to spare and ninja Python coding skillz, but it doesn’t seem likely to happen.
Perhaps then what’s needed is for Poser 12 to whip up some maths that saves Comic Book Preview edge-inking lineart to SVG, and have that SVG embed pseudo “pen stroke” information based on mesh names. For instance, tell the SVG that: this set of ink line come from the head mesh | therefore when drawing = reveal main head outline first | then eyes, nose, mouth | then neck | then reveal hair and hat lines. Or: this leg line is a long line from the leg mesh | therefore drawn it bit by bit | first to that on one side of the leg and then the other. It would probably still not look convincing.
The other way might be an AI that “knows” about the order of head, hands feet, eyes, etc. It would look at any vectorised Poser lineart and identify the body parts and it then “knows” the order in which a human would draw them, and how. It then saves a new SVG with that drawing information embedded it it. Clip Studio already has AI pose recognition, which transfers the pose from a photo to a 3d figure, so it’s not going to be impossible in future. It’s probably the future of this sort of thing, but it’s still some way off.
Alternatively, if you like the Poser Comic Book inking/rendering style and want to keep it, the best option can be simply to import your lineart to VideoScribe. It will actually automatically vectorize and you then choose the reveal style…

The bottom-left one is the best. It might appear that VideoScribe is preparing to draw ugly blodgy lines over your lovely lineart, but that is not the case. What it’s showing is where your lines will be revealed, not drawn.
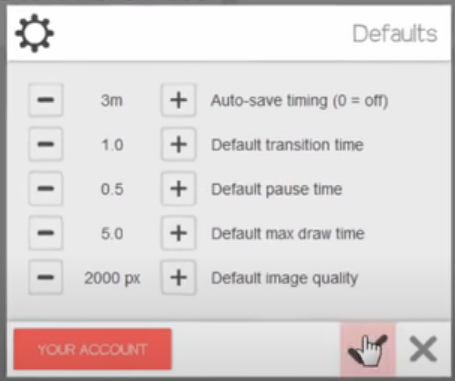
What appeared to work best for this import was a 600px PNG with a plain background. On playback the hand and pen darts about all over, since there is no “order of laid-down lines” to follow, but if you set the draw time to sub 5-seconds then the flickeriness is not going to be too wearing on the audience (though a few may be on the floor having a flicker-induced epileptic fit). It’s also possible to remove the ‘drawing hand’ or just use a pen-nib instead. For reveal times, the best VideoScribe scene/video settings are said to be…
Another possibility is that you vectorise in Inkscape, set a new top layer, then quickly paint over it with a brush in an approximation of hand sketching. You then make these drawn lines fat enough to cover the lower drawing, and set the top layer to have an opacity of zero. When brought into VideoScribe, you can apparently tell the reveal “hand” to follow only the lines on the top layer, thus cunningly revealing the already-done layer beneath. That would given you a more realistic “drawing by hand” effect, on playback. Like I said, it’s all “smoke and mirrors” in this corner of graphics-world.
Freebie: Ronk and roll
Ronk Aednik, Nursoda’s free add-on pack for his new Ronk figure. Commercial use.

Millennium Cat animations packs
Two unique animation packs for DAZ’s Millennium Cat are currently discounted by 55% at Renderosity. Both packs have a .ZIP of Poser .CR2s and a .ZIP of AniBlocks for DAZ Studio.
Animations for Millennium Cat for Poser and DAZ. Video demo.

There’s also more dramatic animations (prance, a jump up, an arch back and arch back and walk away) as Animations and aniBlocks for Millennium Cat 2. Meaning the second such pack, not that there was a version 2 of Millennium Cat.

Even if you don’t want to do animations, there are effectively hundred of static poses to be had here, currently for just $9 for the two packs.
Lots more animated animal pack-demos at AnnieMation’s YourTube channel.
The latter pack is also stated to be “Also compatible with DAZ House Cat with dForce Hair”. I wonder if the first is also? I’ll have to test that, and also see what else can take these animations.
It appears that DAZ have removed the original Millennium Cat from sale in favour of the DAZ House Cat, but I see that the Millennium Cat LE is still listed as being in the 3D Starter Pack. LE offered the same cat but without so many morphs embedded. Many will however already have the original Millennium Cat in the runtimes. While now somewhat superseded for close-ups by the DAZ House Cat and the Hivewire House Cat, Millennium Cat is still useful for artist reference, painterly Sketch renders and Poser Comic Book renders, and it can of course also take Poser dynamic fur and has two Look At My Hair presets. Incidentally, this LAMH presets link also has presets for House Mouse, Squirrel, Lyne’s Fox, an Arctic Rabbit for Lyne’s Domestic Rabbits, Silverkey’s Giraffe and others. All free.

MilCat with LAMH preset, 3Delight render.
A new search-engine
During my recent PoserPython script hacking and bodging I felt the need for a unified search box of the relevant core websites and forums. As such there’s now a new Technical search page on this blog. It’s early days with 20 sites indexed, and in due course I want to add a few more smaller Python sites. But it’s fairly good already. It’s not meant for finding goodies to buy, but rather for finding helpful technical information without spam, scams or sellers of snakes.

Skin and eyes-only render from Poser
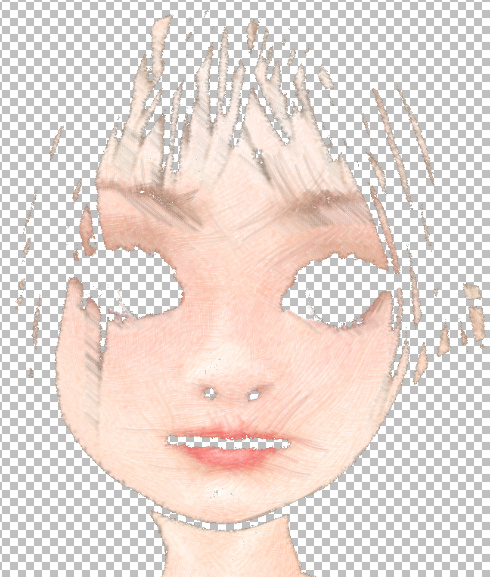
Following on from my recent “How to extract skin and eyes for colour blending” post, I think I’ve now successfully cracked the ‘skin and eyes-only render’ problem for Poser 11. The extreme use-case is: how is your graphics software going to select just the skin on this render, by colour, without complex fiddling around in Poser with setting Toon_IDs for each material, setting up a Firefly render and masking?

Instead of trying to render just the skin from Poser, which does not seem possible in a form partly masked by clothes and hair, there’s another option. I instead have Poser render everything except the skin as black or dark grey.

To do this my Python script scampers through the Poser scene in a few seconds and looks for hair, props, conforming clothing. For anything that isn’t the figure itself. For what it finds, the script sets the diffuse colour nodes to black. A preview render is then made. As this is obviously a destructive script, after running the script the user is prompted to revert the scene to the last saved state.
The resulting real-time Preview render then has skin that can be easily selected and masked in a graphics programme, even if in the original scene the figure had red hair and was wearing a red outfit. Which would have confused the heck out of the software’s skintone selection process.
In PhotoLine (which I now prefer to Photoshop) an Action can automate the ‘Channel to Selection’ process and in a microsecond it has whisked out the skintones and eyewhites to their own layer…

Her eyes have also been selected, but that was because they were a soft skin-like hazel colour to match the outfit. This layer can then be used to restore colour to the skin after a render has been run through several filters and plugins to make it look hand-painted.
Photo.Net can also extract the skintones, using the Color to Alpha v2.2 plugin. Which is probably better if you need fine control over the eye-white selection. It’s very likely Photoshop also has such selection capabilities in its newer subscription version, though readers will have to discover those elsewhere.
Your (only) choice for a third-party Photoshop plugin appears to be Imagenomic Portraiture 3, which has automask of skintones, but which doesn’t return a selection mask (it all happens inside the plugin). It also fails on dramatically-lit pictures such as this…

The advantage of a scripted Poser render is that even if you have a dramatically lit ‘sunset forest’ scene like this, you’re still going to get a relatively easy mask. Because you’d just tweak the colour in the script from black to bright green, and render against a bright green plain background (hide all other elements). The masking out of the bright green should then be very easy, leaving only the skin and eyes.
How to extract skin and eyes for colour blending
Posted on
by
Posted in Automation, Companion software, Natural media emulation, Poser, Tutorials
Leave a comment
Ideally Poser 12 would have the ability to render only those parts of the skin and eye materials that are visible to the camera, and nothing else in the scene. And to do so in a real-time Preview render.
However I don’t think this is possible, due to the limitations of the current Preview and Firefly engines. I can’t find any script “to render just materials X and Y, as visible to the camera”.
Why would one need to do this?
In post-work a render may be filtered through a Photoshop plugin to get an artistic effect (see below), and the colours will thus shift or wash out. The general colour and contrast shift may be pleasing, but the skin and eyes may then look “off”. Skin can look yellow and jaundiced, and eye-whites less than white. By laying in a render-pass layer containing only skin and eyes, the correct colours can be restored — the layer is blended using a Colour or Saturation blend-mode.
There are several possible workaround solutions to get something like such a useful ‘skin and eyes only’ render.
1. Create a Python script to temporarily hide hair and clothes and props from the Poser figure, auto-remove any Comic Book inking lines, auto-render to Preview, then have the screen restore all visibility. It can be done, and I now have such a script working. The results are not ideal when you’re pasting over a picture which has hair and collars, and where the eyes have become better than what you’re pasting in. But a few dabs with an eraser can just about blend in the new layer. It’s not ideal, but it’s the best in-Poser option and is quick and mostly automatic.
All we want from this is the colour, blended as a layer in Colour blending-mode
2. Extract skin with the free paint.NET graphics software and its rather nice Color to Alpha v2.2 plugin. Imperfect, and may need a wide Gaussian Blur to fill holes and soften raggedy edges. Might be good if you don’t need precision or eyes. Update: it’s capable of far neater work. More useful if your graphics software can ’round trip’ to Paint.NET and back, such as you can do in PhotoLine.
Set the skin tone, and the skin is extracted while the rest is sent to transparency. Adjustable via sliders. This example was run on a Poser Sketch render, and its’s not the extraction that’s caused the artistic effect.
3. Render each and every figure / hair / hat / prop in the Poser scene separately and then assemble them in the graphics software as aligned masking layers. Again, I now have a Python script to do this in Poser. But in practice it’s not viable, since hats, helmets and hair etc don’t mask. Meaning that you see the back of them, when there’s no head in them. If you only have scenes full of bald and hat-less monsters and robots, you’re fine. Otherwise, not so much. That said, it’s quite possible that some makers of comics and storybooks will want to manually draw on the hair afterwards, along with brows and mouth-lines.
4. In the Materials room set a bright green colour (it’s found under ‘Math’, perversely) as the Firefly auxiliary render ‘option one’, repeat for all the fiddly bits of skin and eyes you want masked. Render in Firefly with the ‘option one’ Auxiliary switch thrown, save to .PSD. Select colour, extract, use as a mask. Fiddly, slow, and clunky as hell. Best avoided.
New Kitbash 3D packs
I see that Kitbash 3D have recently produced three appealing new themed packs: Props: Secret Labs; Vehicles: Spaceships; and the big Heavy Metal world-building kit.
Freebie: Dody for Aiko 3
There’s a quality new free Aiko 3 character. Dody Character Preset For Aiko 3. This requires the Aiko 3 base figure, which most people will have in their runtime, and also the Aiko 3 Morphs and Maps pack (also found in various Aiko 3 bundles and Anime bundles). Also its dependent, Capsces’s Kioki morphs and faces pack for Aiko 3. If you have all those, you’re set.
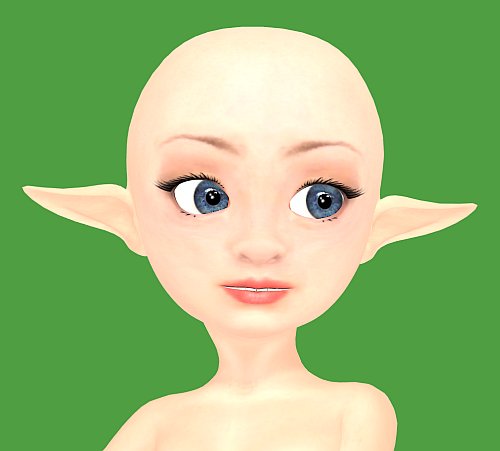
Once installed this is what you do in Poser…
1) Figure | CDI Koiki (not Aiko 3!) | load.
2) Poses | CDI Koiki | and inject head and then body into the CDI Koiki figure. (You thought you just loaded Koiki in Step 1? Nope, think again…)
3) Then go find Dody under Poses | Ethin. Inject the Head first, then Body.
4) Select body, apply an Aiko skin MAT of your choice.
5) Head dials | ‘OpenMouth’ slightly, so you get an inked line in Poser’s Comic Book mode under flat lighting.
Looking good already in Poser’s real-time comic book inks…

Nursoda’s Kali hair fits well, with just a little scaling. But it does not toon well. Nursoda’s Fehn Hat proved to be better, but is difficult to position. Nursoda’s Anceata hat/hair combo was the best and needed only minimal fitting for a ‘Brian Froud look’.

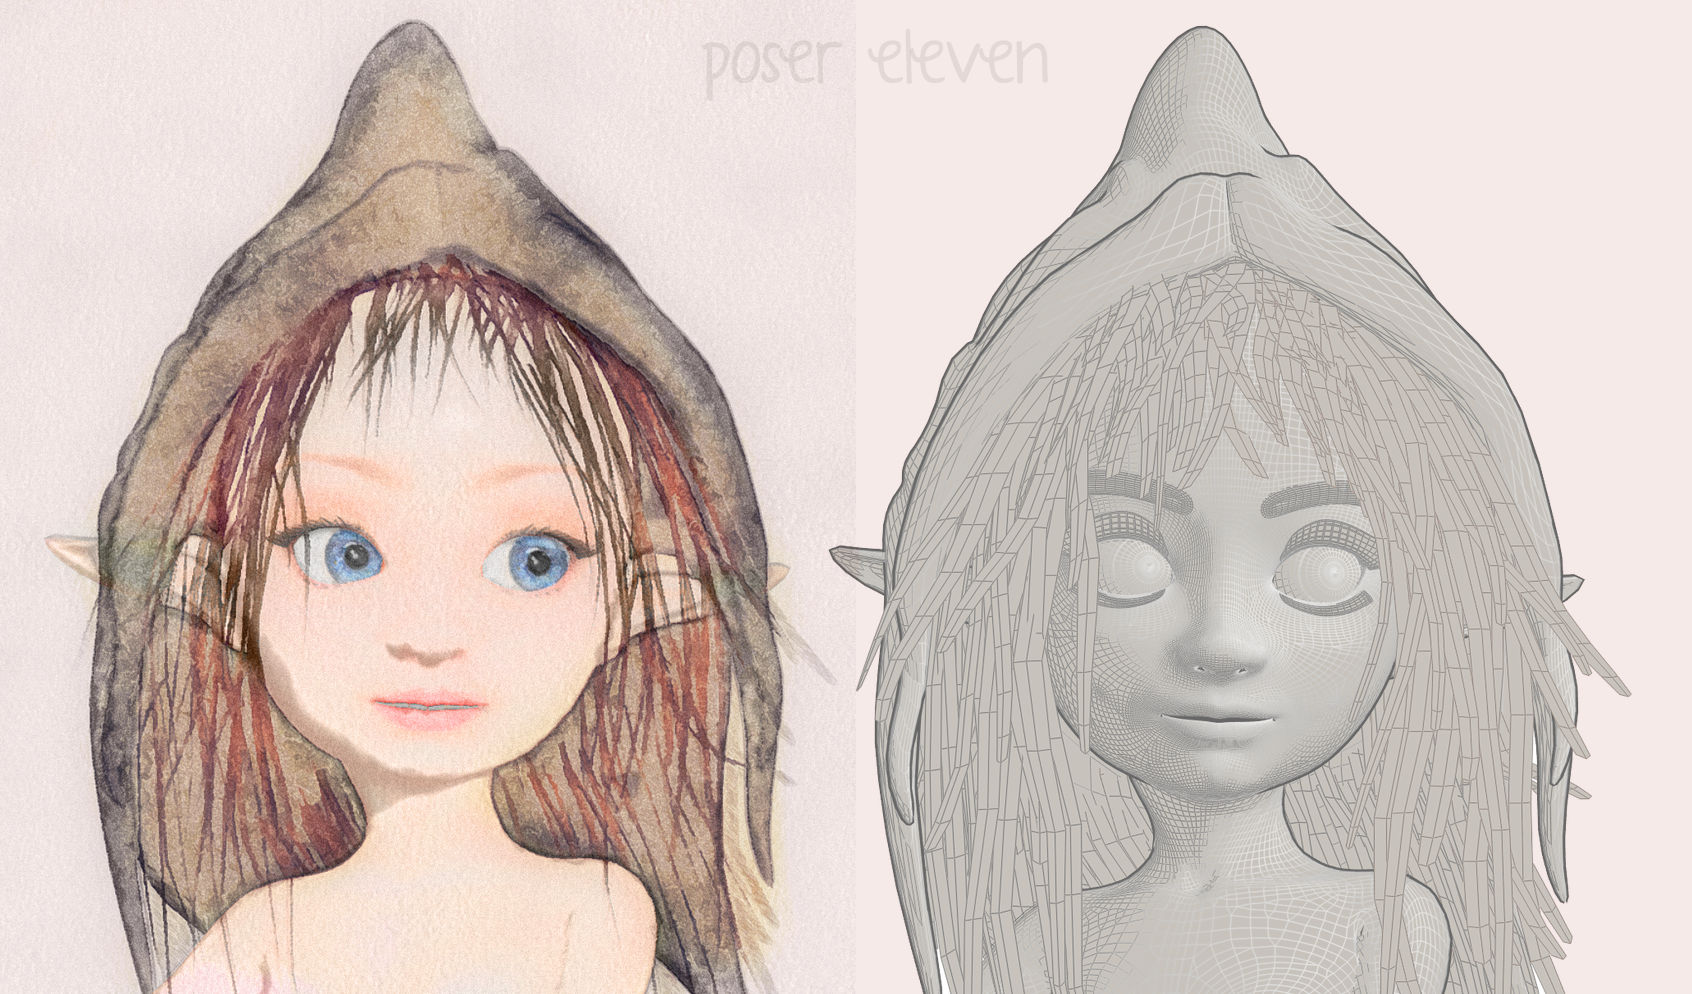
A storybook combo, combining a saturated Sketch render from Poser using my custom Incredulize! preset, and an inks-only Comic Book render from Poser that was faded out to look like pencil…

Total render time for both renders at 1800px, about 20 seconds.
Yes, I know, “this is 3d, so where are the shadows?” They can be put in too (and there’s an ugly spodgy one on her neck already, ouch), but they weren’t for this quick demo. She probably also needs a more mud-rolled and rain-dropped skin MAT to be a convincing forest spirit.
Poser: how to toggle all scene lights when making Preview renders
Selecting GROUND in a Poser scene is a handy trick that does not, in every single instance, make the guide-wires of Lights invisible in a scene. I’ve seen instances where spotlights don’t toggle off when GROUND is selected.
Why would we want to toggle the lights? Well, when working with lights the last-selected light leaves ‘guide wires’ showing in PREVIEW, and these will mess up a comic-book render. This picture of a live scene in OpenGL shows the problem…

If one were to render this in real-time, the picture would have the light’s ‘guide wires’ arrows and circle on it. Easy to miss, easy to forget until it’s too late and you’re dropping it into a panel on a comics page.
Willyb53’s free Light Toggle script can be hacked to do this for us. Willy’s script was set up to turn all the scene lights off and on, but a few simple tweaks keeps them shining while only their guide-wires are turned off in the scene. To do this we simply open his script with Notepad++ and change it to read…
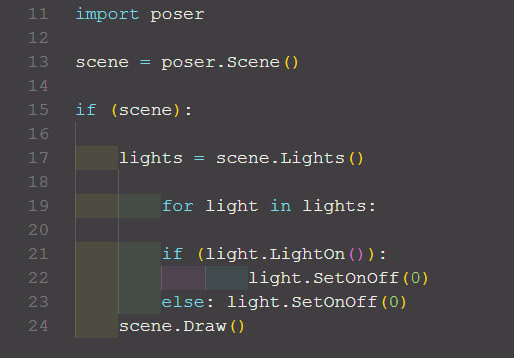
… then save, rename Toggle_Visibility_All_Lights.py and place the new script wherever you keep your Python scripts. Mine are in…
C:\Program Files\Smith Micro\Poser 11\Runtime\Python\poserScripts\ScriptsMenu\FavoriteScripts
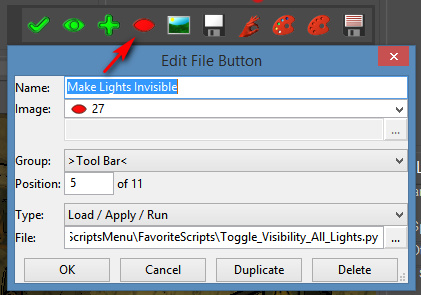
You can then iconise the new script using Dimension3D’s $10 eXtended Access. This runs fine so long as you have the AVFix for it, and I load it at every Poser startup. Attached to a meaningful icon (here a red closed eye), the new script then becomes one-click and it can be handily positioned near the Poser lights control panel.

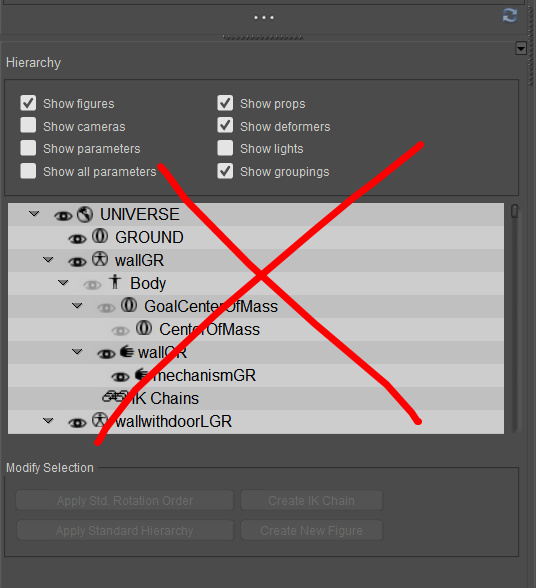
If you have the neat and attractive Scene Toy addon for Poser, and if all you mostly use the Hierarchy Editor for is to click on GROUND to get rid of the guide-wires, then this script lets you hide that window and reclaim a little more screen space in the Poser UI. “Begone, ‘o great space-wasting panel of grey ugliness”…
Finally, the other thing to keep in mind, re: lights and Preview renders, is that OpenGL is limited to eight lights in a scene. This is an OpenGL limitation, not a Poser limitation. In practice, that “eight lights limit” may be even less, because your PCs’ hardware may not be able to support that many interacting lights and their shadows. For working in Comic Book Preview mode it’s probably best to try to stay at three or four lights in a scene. Sketch only supports three, in terms of having the strokes follow the light directions.