New on GitHub, Chaos and Cats, a new freely-released university-level course in the foundational maths-led theory of computer graphics, motion, 3D models, etc.


New on GitHub, Chaos and Cats, a new freely-released university-level course in the foundational maths-led theory of computer graphics, motion, 3D models, etc.
A quick tutorial for those new to DAZ Studio and wresting with lighting, aiming for a nice image to take into a Stable Diffusion model. Solution: Don’t add preset lights at all! Auto-headlamp, and then adjust Exposure and Shutter Speed to get a nicely-balanced and real-time viewport. This provides a good evenly-lit starting render, better than Smooth Shaded.
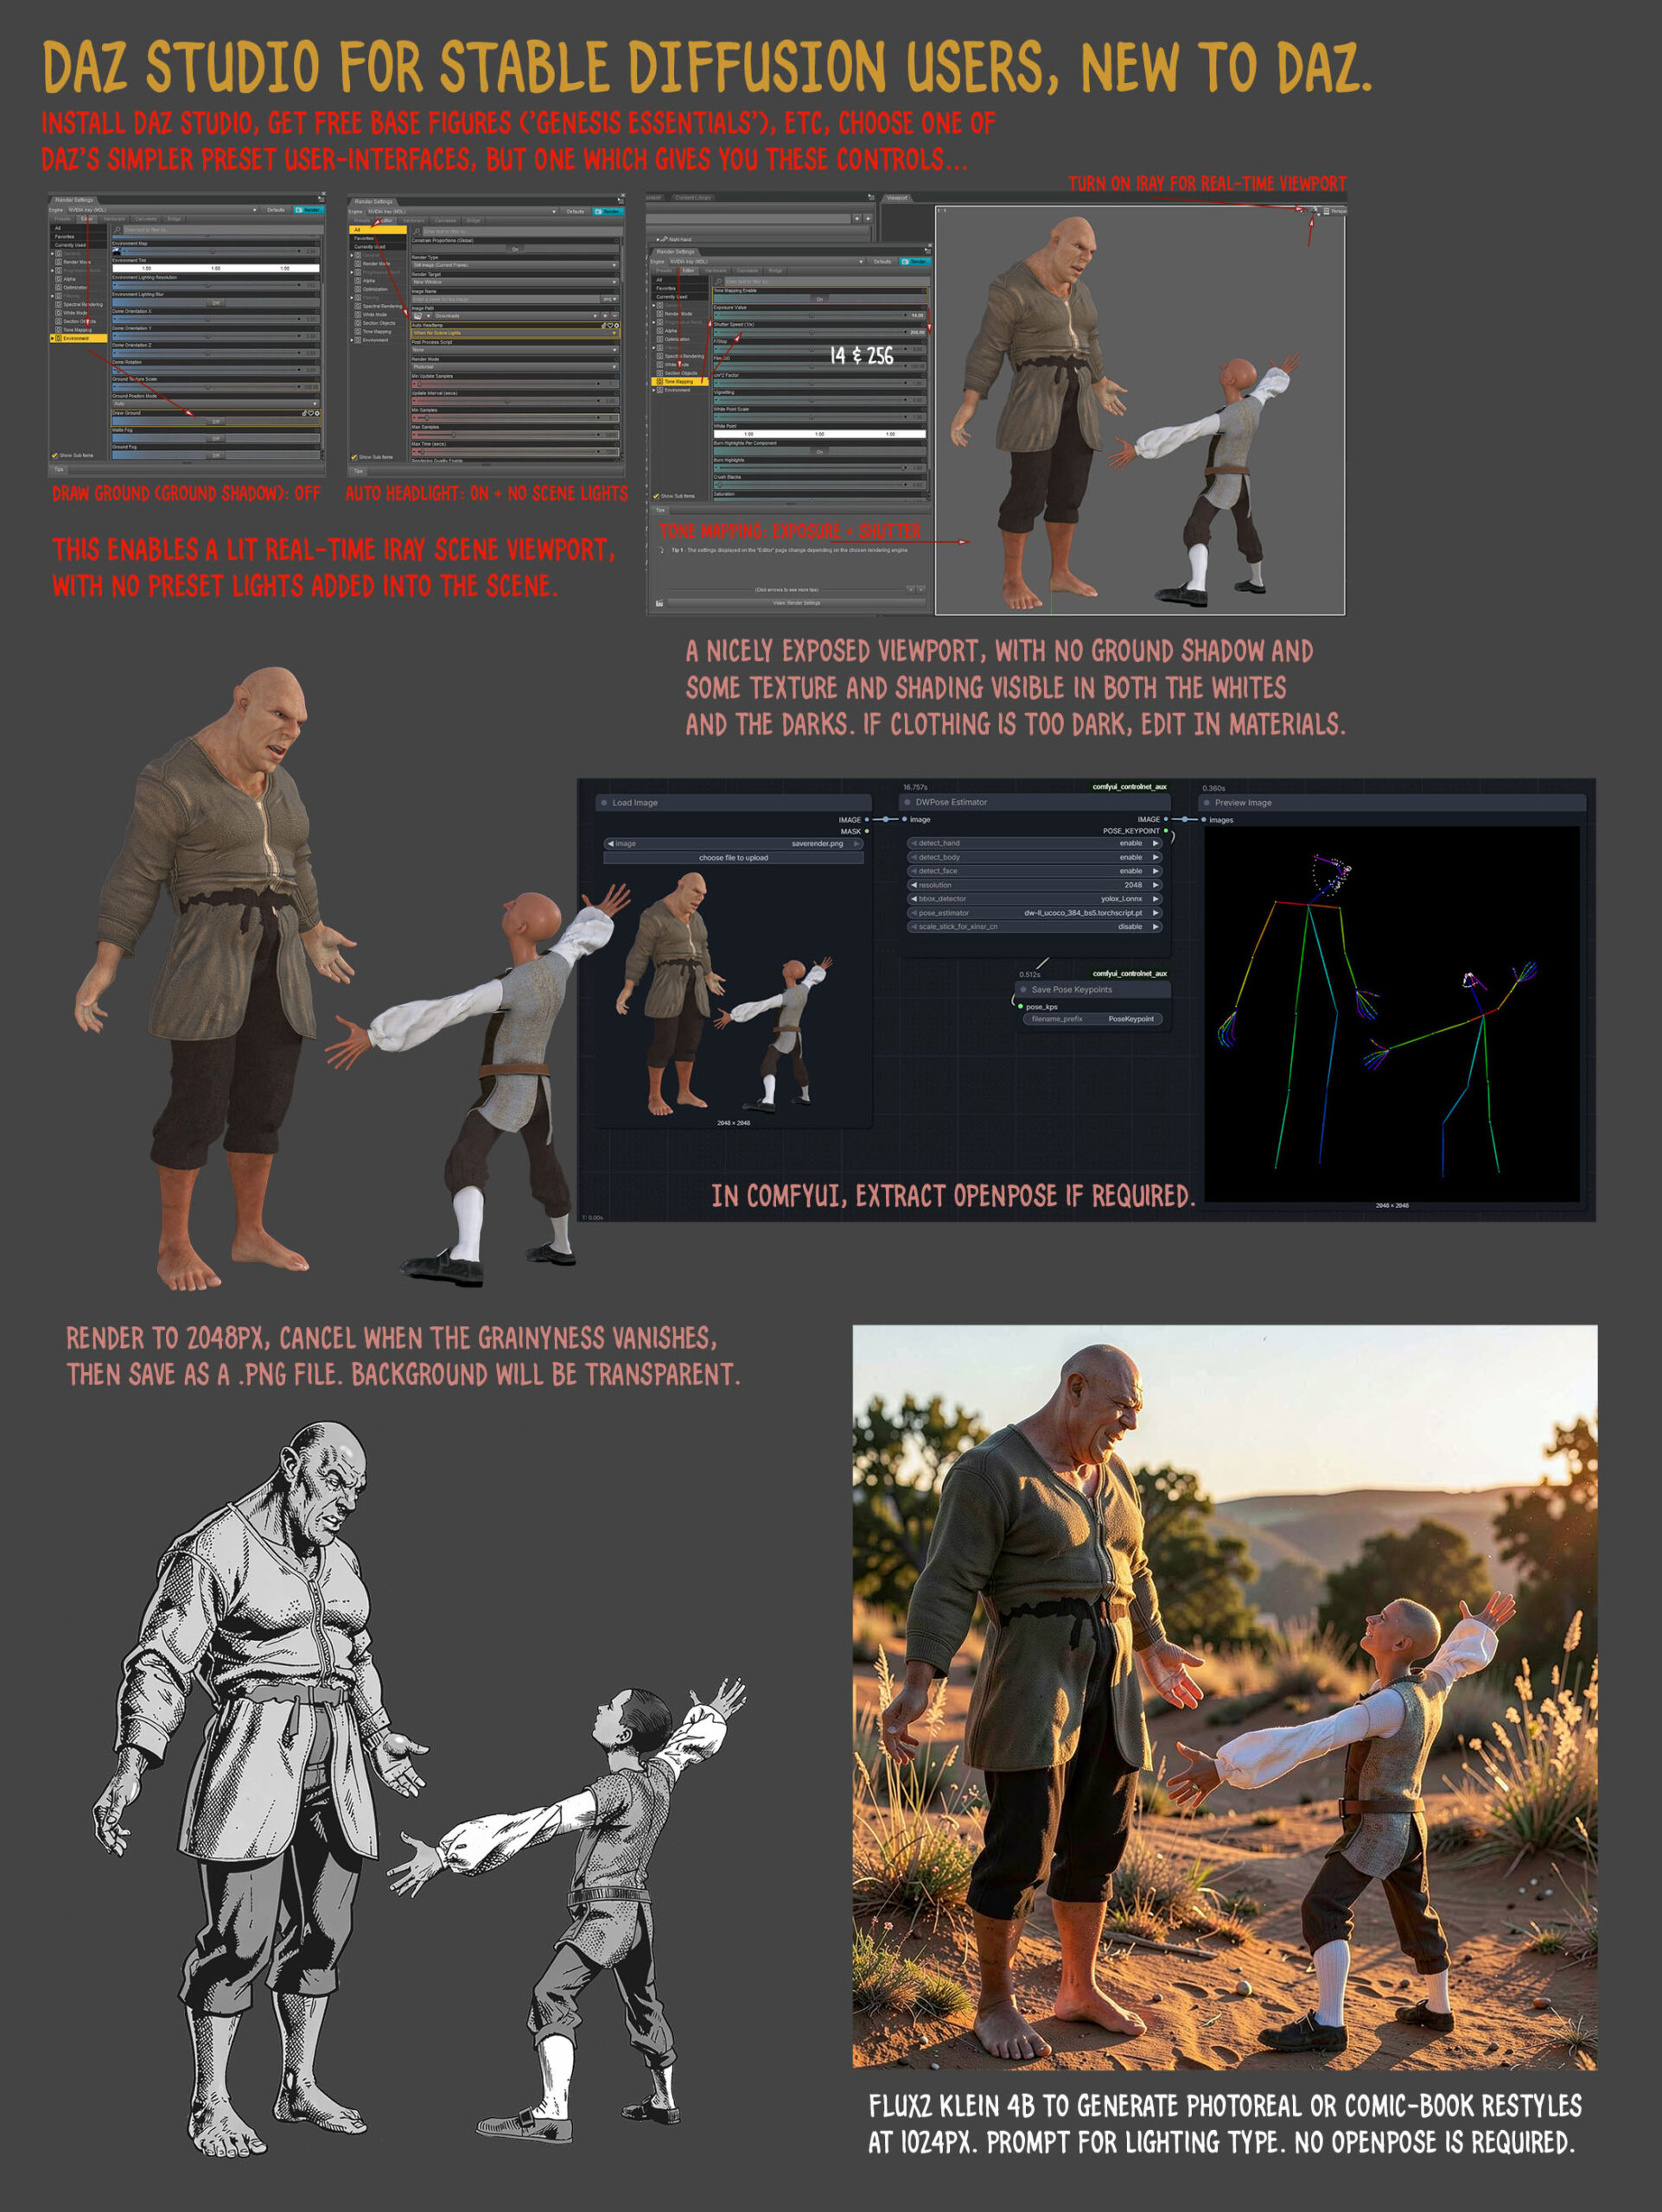
Things change here (expressions, head-angle, hair added), but it’s possible to prompt to get more of a 1:1 match. Thus enabling re-colouring with the DAZ render in Photoshop, for consistent colouring in comics.
I found some time to do a demo sheet for a few of the many restyles that can be prompted for in German’s superb Flux.2 Klein 4b AI model. No LoRAs or Embeddings required. The figure is Nursoda’s Chull, and the quick Bondware Poser render used as the source-image is deliberately very basic, with no attempt to change the grungy fabric or the dark eyes, or to do a fancy full render.
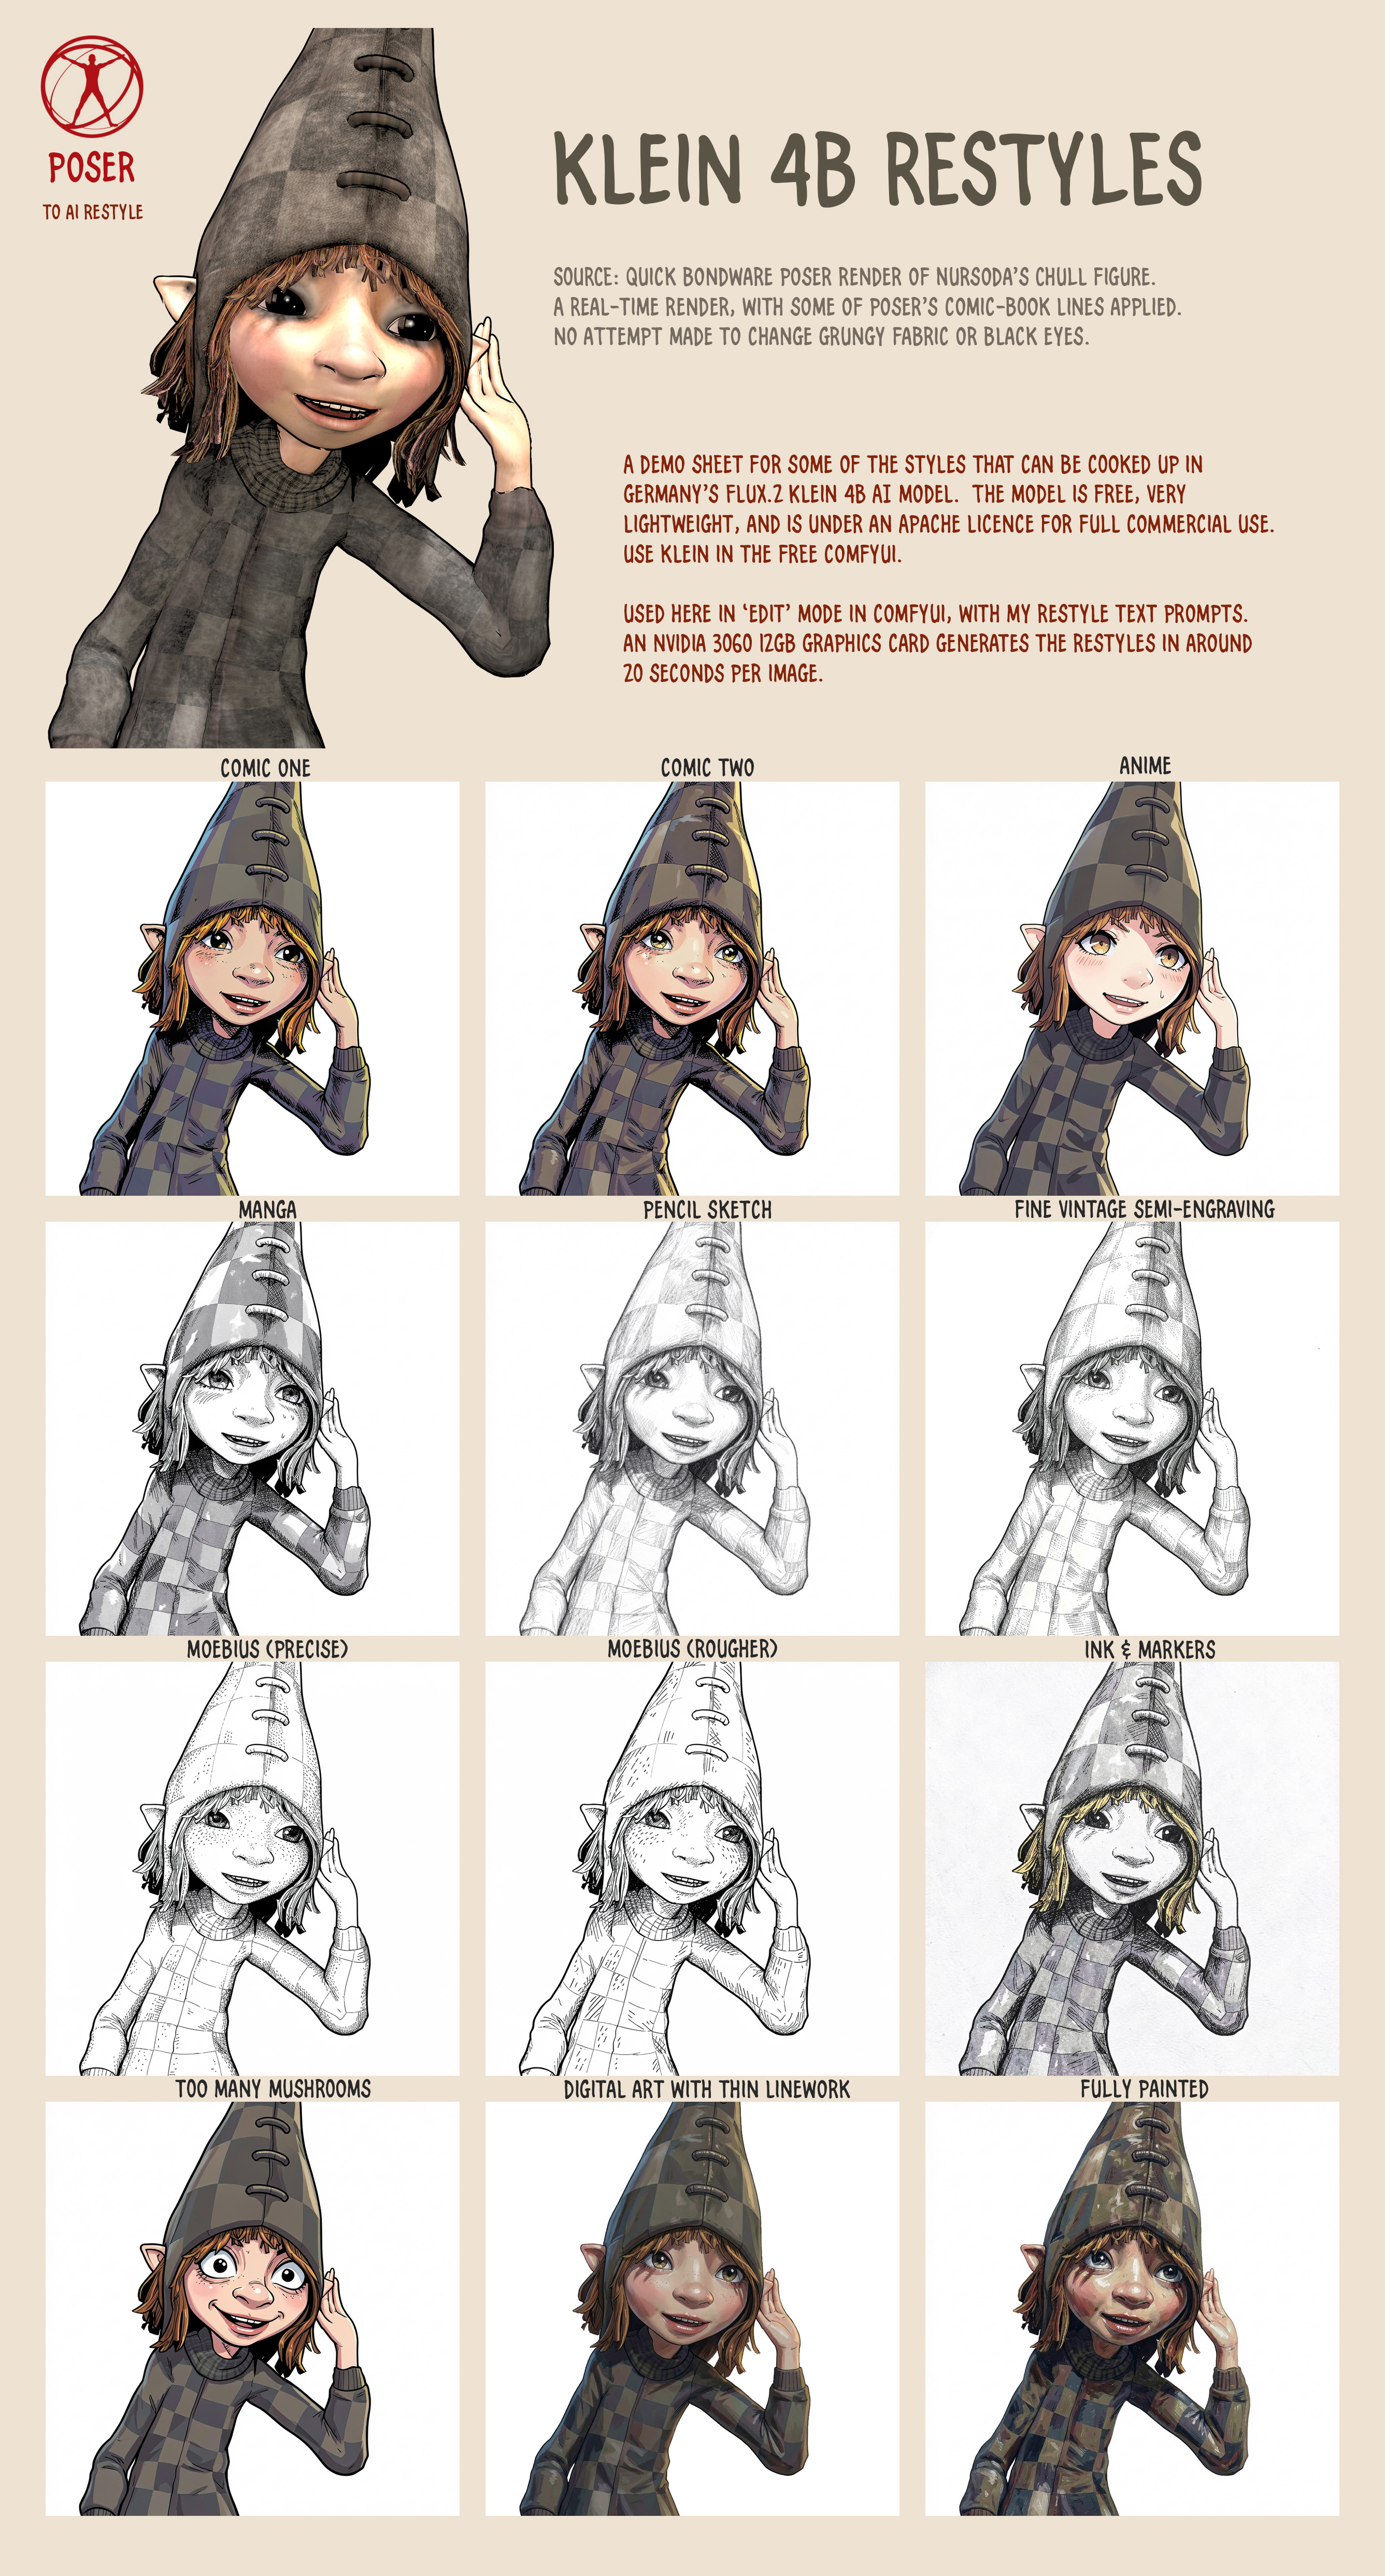
See the full-sized image for the fine detail. I didn’t get around to some of the thicker oil painting or charcoal styles, but it can also do that. Watercolour I don’t like in Klein, it’s too blotchy and splashy.
All generations were made with a static seed of ’42’, for reproducibility.
Qwen3 TSS has been released, and it allows local ‘prompt to custom character’ voices. This adds a whole new dimension to local text-to-speech (TTS). It’s also a pleasingly small model at around 5Gb total (if you already have many TTS Python requirements), so is very feasible for those with older graphics cards and slower Internet connections. It has an Apache 2.0 license, so is fully open-source and available for commercial use. All the below requirements are free, as is the way with local AI.
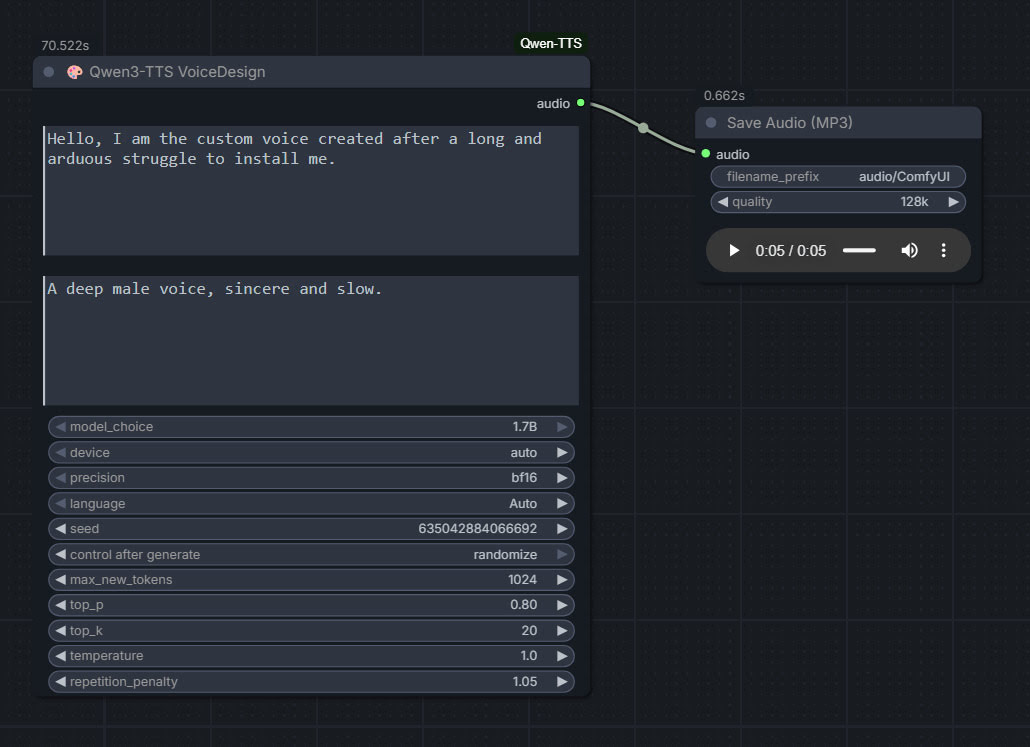
As you can see, you can describe your exact voice and the audio generated conforms to the description. Voices can be described with great detail, far more than shown above, and their modulation over time also (e.g. “rising excitement”). There are obvious uses here for unusual character voices for animation, games, audio drama, vocal additions to audio soundscapes, etc.
Tested and working, after a lot of work. Here’s how to manually install for ComfyUI portable:
1. In ..\ComfyUI\models\ create the new local folders ..\ComfyUI\models\qwen-tts\Qwen3-TTS-12Hz-1.7B-VoiceDesign\ and its subfolder ..\speech_tokenizer\
2. Download the required models Hugging Space at Qwen3-TTS-12Hz-1.7B-VoiceDesign and speech_tokenizer.
Put the downloaded files into their locally pre-prepared folder and sub-folder.
3. Now get FlybirdXX’s ComfyUI-Qwen-TTS custom nodes to run these models. Windows Start button, CMD, cd into the ComfyUI custom nodes directory, then…
git clone https://github.com/flybirdxx/ComfyUI-Qwen-TTS
4. Install the requirements for the new custom nodes. Start, CMD, cd to the ComfyUI embedded Python directory, then…
C:\ComfyUI_portable\python_standalone\python.exe -s -m pip install -r C:\ComfyUI_portable\ComfyUI\custom_nodes\ComfyUI-Qwen-TTS\requirements.txt
(Replace ComfyUI_portable with whatever your local path is).
There should be no conflicts, as yesterday’s patch for these custom nodes fixed the official Qwen TTS demanding transformers==4.57.3 which could have killed Nunchaku (which requires a lower version).
5. These Custom Nodes require a download of SoX which is an .EXE installer. Sox is a venerable freeware sound-exchange code library, kind of like ImageMagik… but for sound. After install you must add it to your Windows PATH. Thanks to Promethean Dante for the fix here…
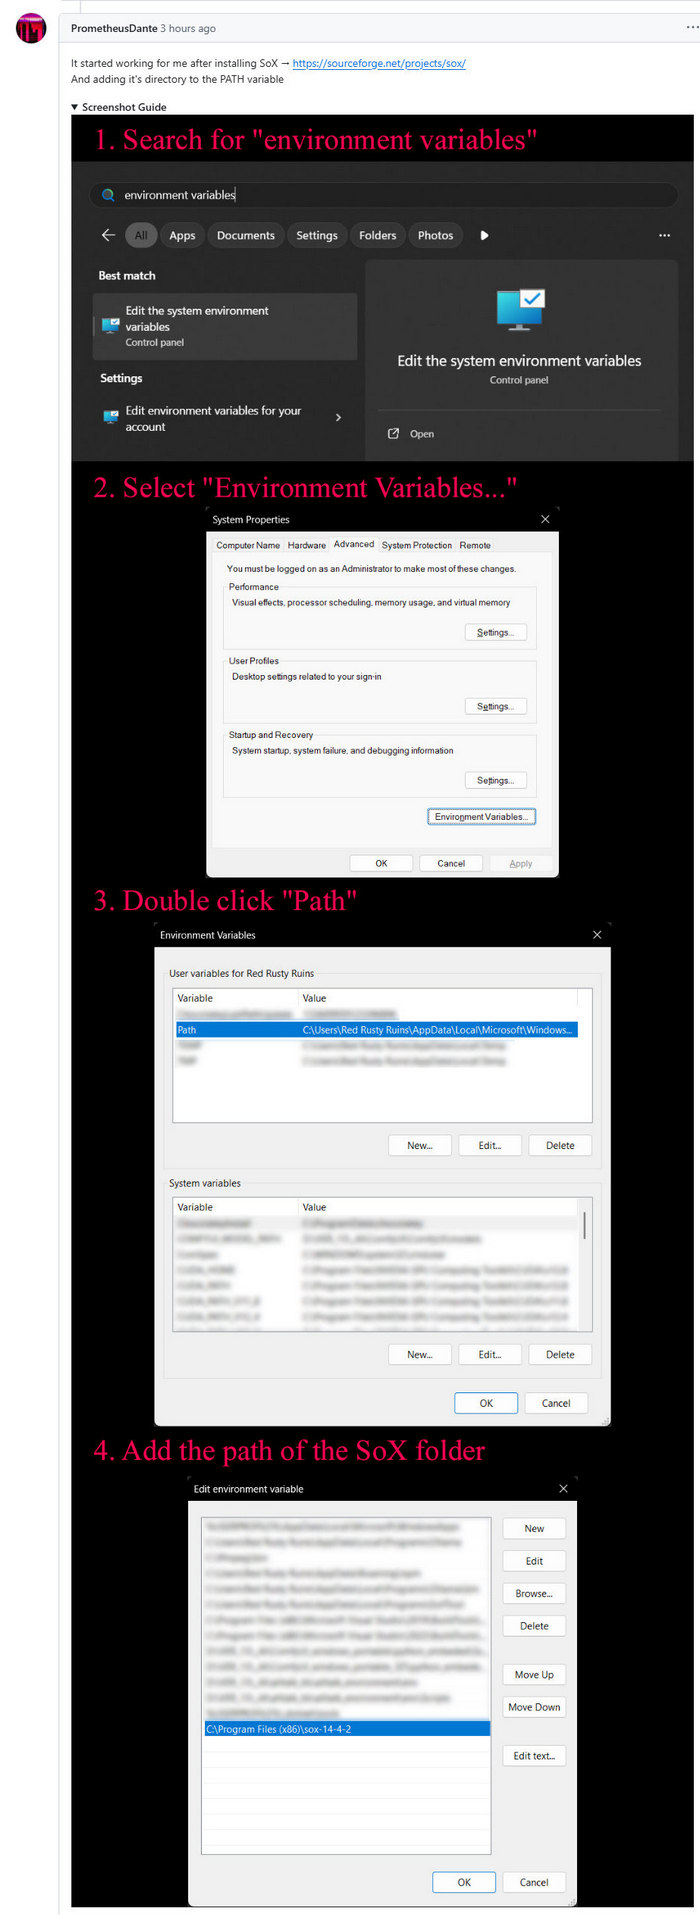
Looking at the node code it seems SOX is only needed if you try to generate on CPU rather than GPU, but the lack of it prevents the nodes from loading in ComfyUI. It seems you need both the Python sox module installed (it installed along with the requirements.txt – see above), and its Windows framework via the .EXE installer.
6. Start ComfyUI, and set up a simple workflow thus with the new nodes…
Time: 70 seconds for a five second clip, on a 3060 12Gb card. Reasonable, not super-turbo but workable.
The basic requirements of Qwen3 TTS are compatible with a ComfyUI portable install — Python 3.8 or higher, PyTorch 2.0 or higher, so the above custom node set won’t bjork your PyTorch by trying to upgrade it. Beware others similar custom nodes for Qwen3 TTS in ComfyUI that will try to upgrade Pytorch to 2.9 (not good, for a portable Comfy).
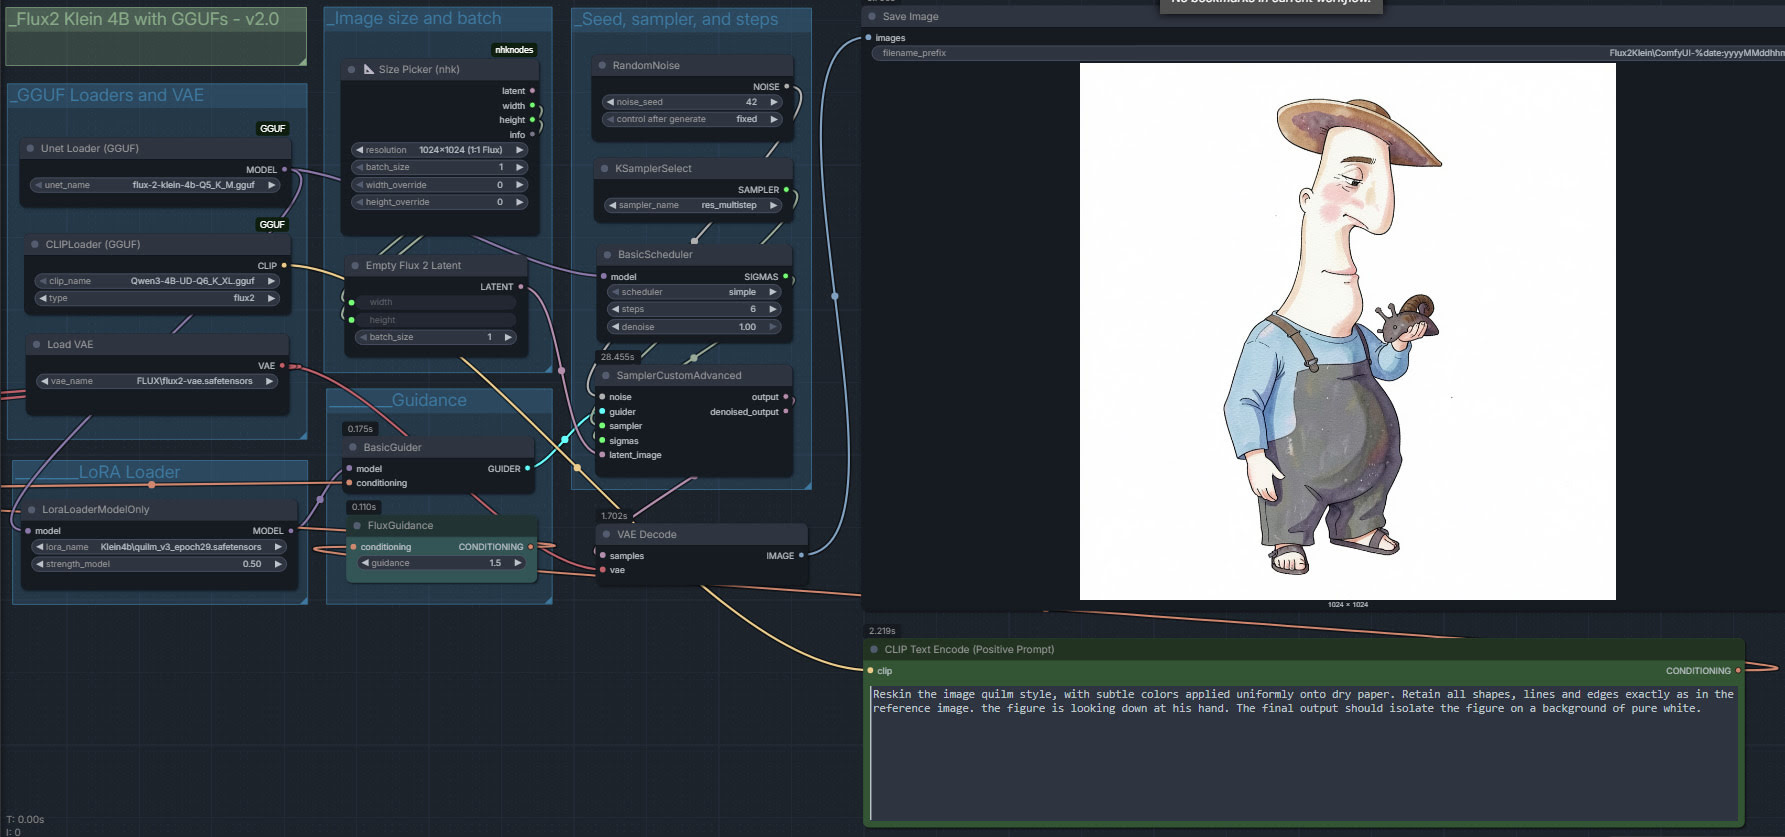
My first proper test with the new Flux2 Klien 4B and the first LoRA. Whoopee. Which, as it happens, is a nice one that works well. Quilm v3, available at CivitAI. Here we use Klien as an Edit model, rather than as an image generator. Think of it as a super-duper Img2Img mode than can follow instructions. And do so quite quickly, even on an entry-level 3060 12Gb graphics-card.
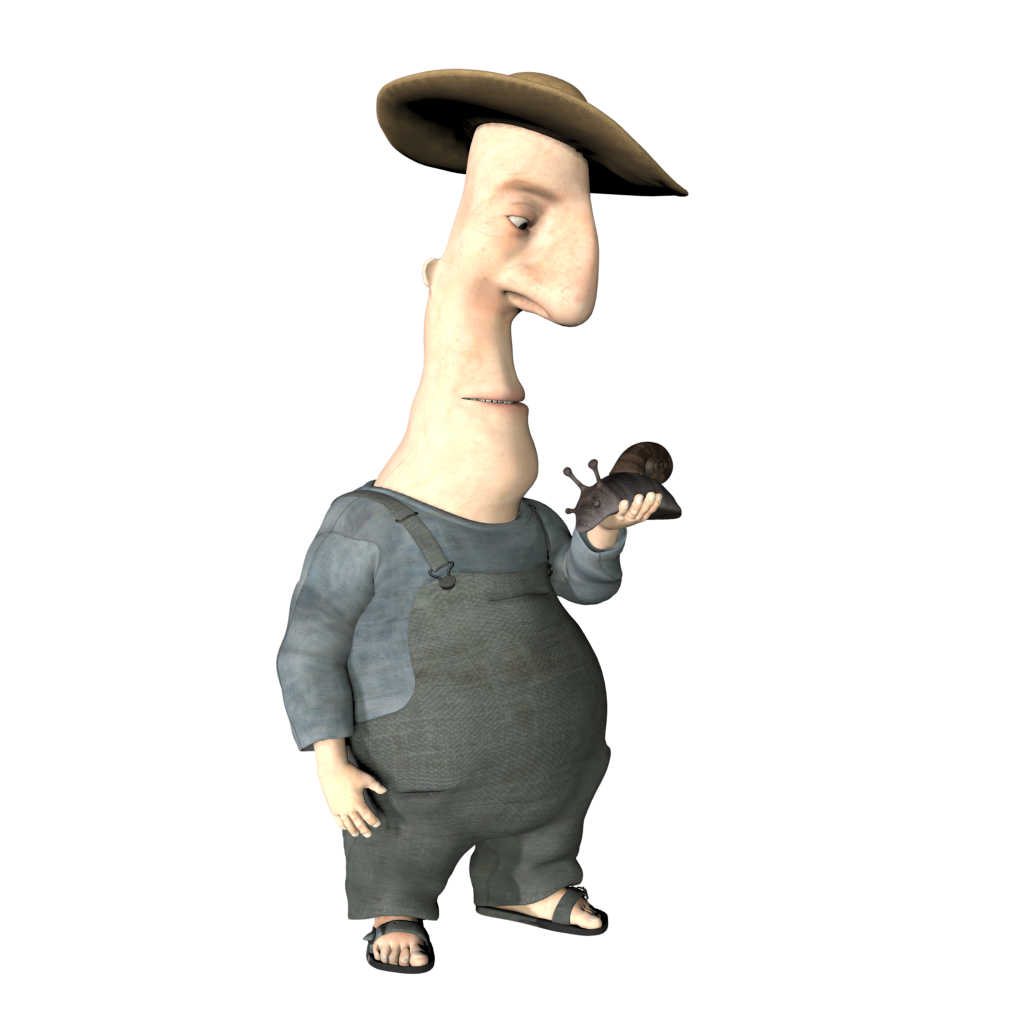
1. Start with a basic and rather unpromising Poser render (the snail is too dark, for instance). The Poser character is Ronk by Nursoda. Drop the render in the Edit mode reference-image slot in your ComfyUI workflow.
2. Prompt.
Reskin the image quilm style, with subtle colors applied uniformly onto dry paper. Retain all shapes, lines and edges exactly as in the reference image. the figure is looking down at his hand. The final output should isolate the figure on a background of pure white.
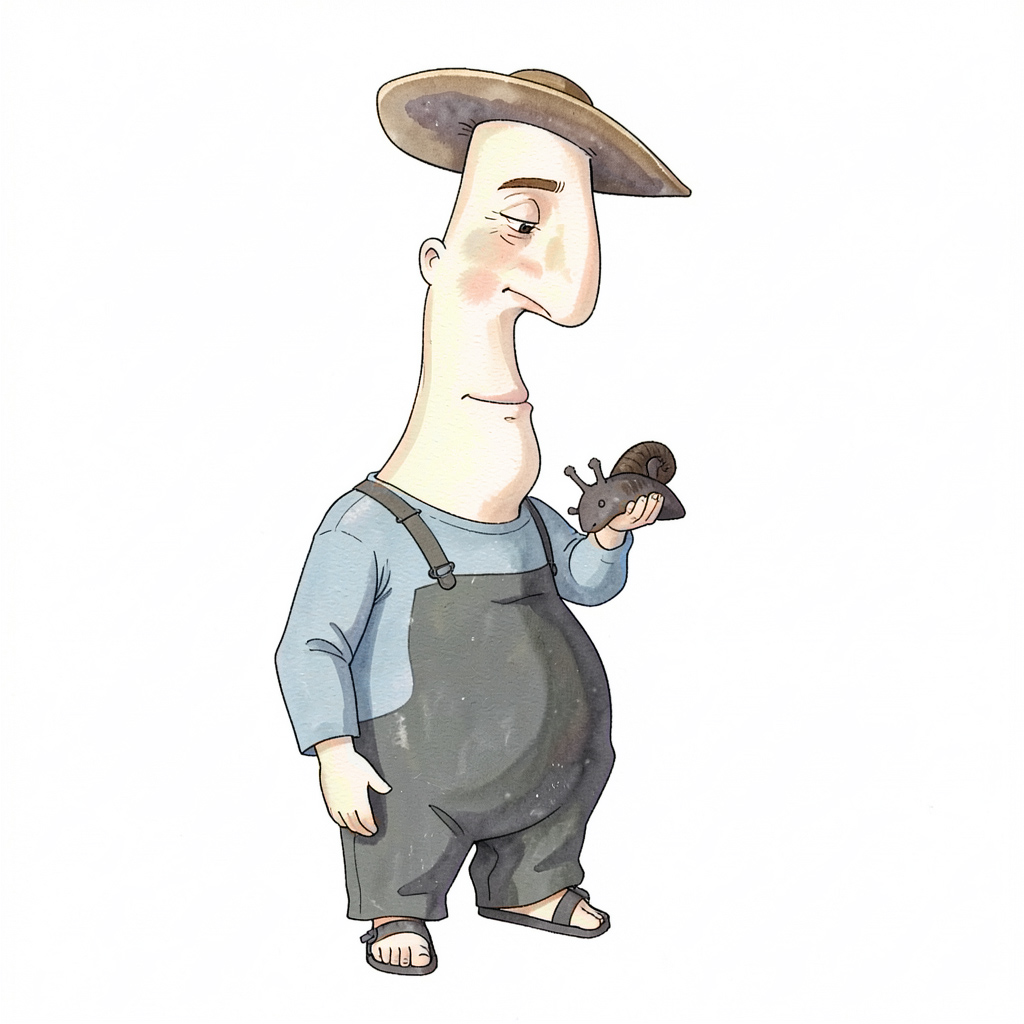
4. The result is not a 100% fit, but very near and good enough for a colour blend mode in Photoshop. Such a blend is vital to stabilise the colours, important for sequential storytelling such as a comic-book or children’s storybook.

Nice, and the eye is changed by the LoRA in a pleasing way that adds emotion. But the skin is washed out and near-white, the hat shadow is verging on purple, the cheek splashes are too pink, etc.
5. To fix these colour problems, use Photoshop. Copy the original Poser render and “paste in place”, as a new layer sitting on top of the ComfyUI output. Not a 100% perfect fit, but good enough for a Colour blend mode of the layer at 60% to work, thus quickly ensuring a more uniform colour for storytelling purposes.
Note that one can’t use watercolour in the prompt, as Klein has its own and horribly splashy ideas about what watercolour should look like. The other problem is the figure has acquired three fingers on one hand. This ‘crab hand’ glitch is apparently is a function of the workflow. Here I use res_multistep and simple, but I’m told setting Euler Ancestral and beta57 gives better hands. Anyway, it’ll do as a moderately successful first proper test.
Klein 4B runs locally and is under a permissive Apache license, so commercial use is fine.
Update: Hah! The second LoRA released for 4B is also very useful, Flat Color – Style.
Update: Just tested Euler + beta57, and it does indeed fix a hand which had three fingers. As Reddit had suggested. Exactly the same workflow + fixed seed, so it must be beta57. Also usefully appears to fix the colour saturation problem.
ComfyUI now has Chatterbox Turbo support, in the form of the latest ComfyUI_Fill-ChatterBox custom nodes, aka FL ChatterBox. Made by Fillip Isgro of the USA. With his nodes, note that manual install of the models is possible if required.
The new Chatterbox Turbo offers free fast quality text-to-speech, and happily runs on lower-end PCs. Turbo also newly supports tags for certain vocal noises, and for speech styles…
[chuckle] [clear throat] [cough] [gasp] [laugh] [shush] [sigh] [sniff]
[advertisement] [angry] [crying] [dramatic] [fear] [happy] [narration] [sarcastic] [surprised] [whispering]
It doesn’t support SAPI5 SSML tags.
With Turbo it takes me approx. 60 seconds generation for 30 seconds of speech, on an NVIDIA 3060 12Gb. The limit seems to be 30 seconds, and if you do more than that the audio may skip at the end.
Install and use:
1. Do the usual keyboard bashing to install a ComfyUI Custom Node on Windows. CMD, GIT clone, and then install the Python requirements (to the ComfyUI Portable Python install, if that’s in use).
2. The Turbo models are found here for manual download: https://huggingface.co/ResembleAI/chatterbox-turbo/tree/main and you need to download all three of the large files, as well as the smaller ones.
3. Then copy all the downloaded models and associated files to the Windows folder ..\ComfyUI\models\chatterbox\chatterbox_turbo which is where ComfyUI_Fill-ChatterBox expects to find them.
4. Get ComfyUI_Fill-ChatterBox’s sample .JSON workflow from here and load it in ComfyUI. You’ll see you have a new node for running Turbo, offering much the same adjustable parameters as the regular Chatterbox.

My batch workflow is supported, which also enables pausing via two bits of freeware…
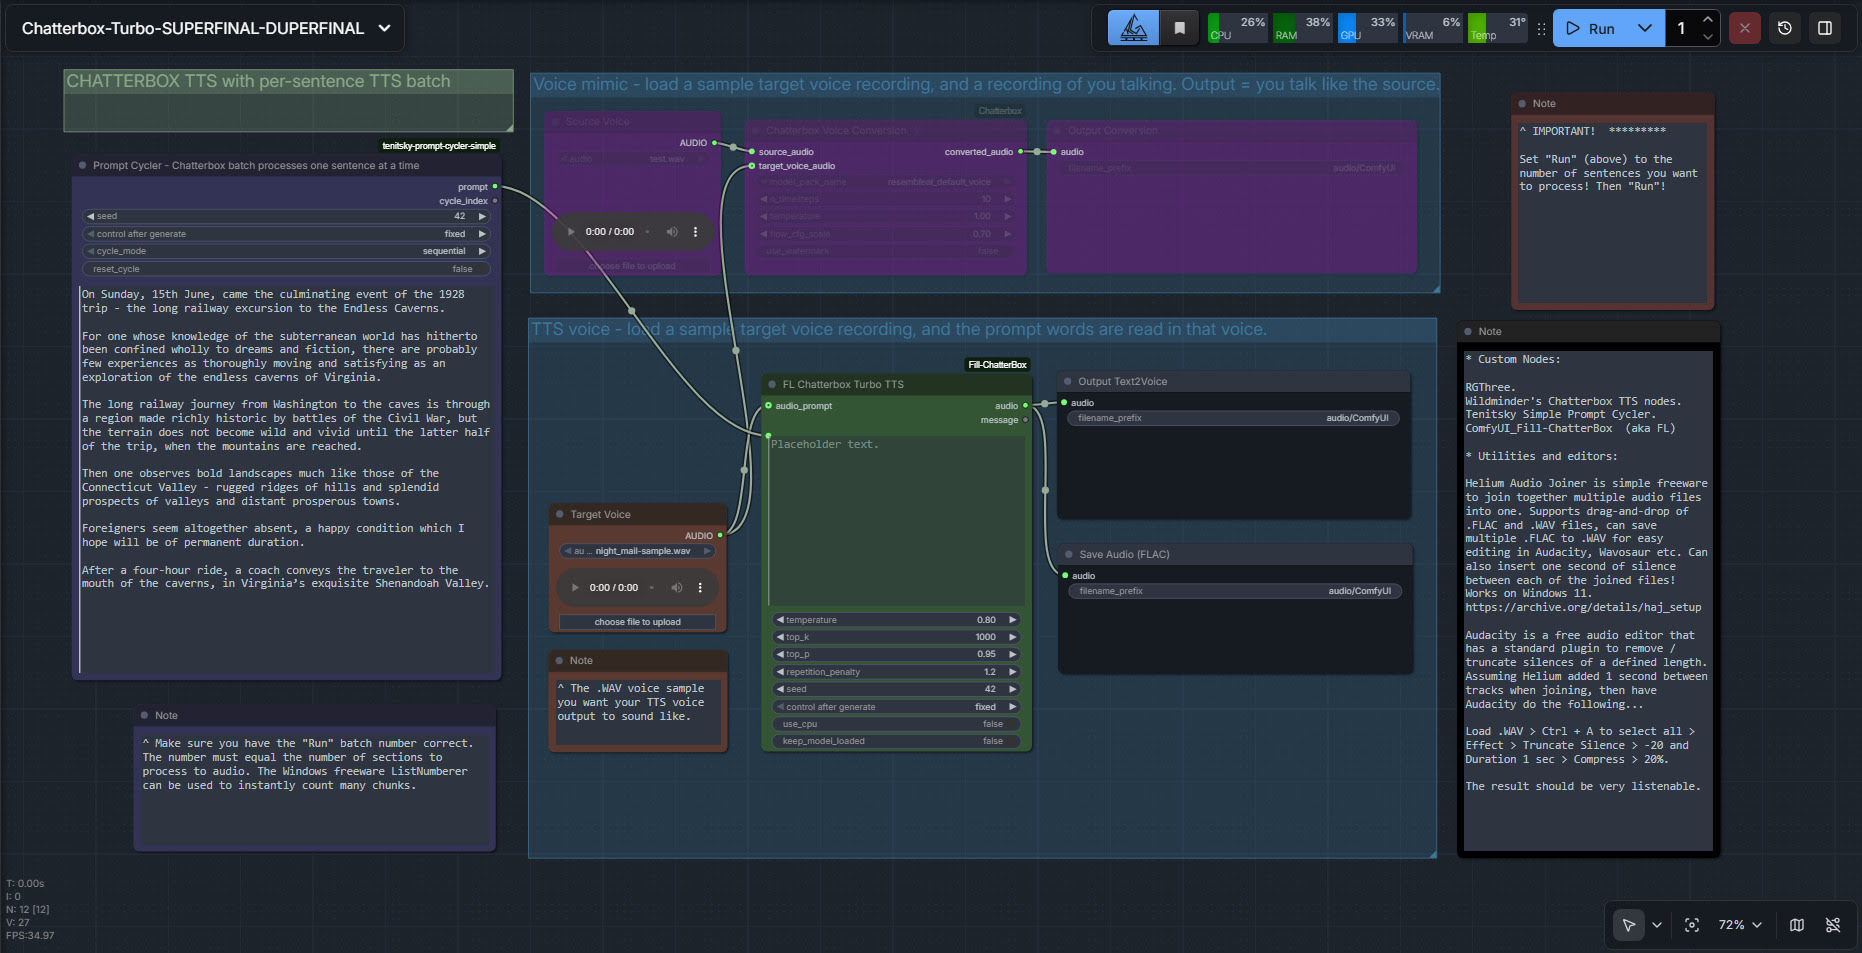
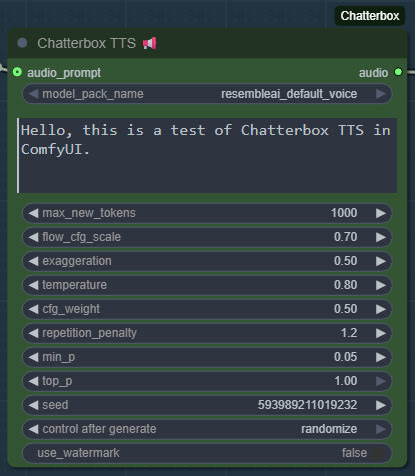
I finally got Chatterbox text-to-speech working in ComfyUI, which may be of interest to animators and other MyClone readers needing audio voices. It’s one of a half-dozen local equivalents to ElevenLabs voices. Chatterbox seems the best all-round local option for audio output that’s keyed to a reference .WAV, and also for voice cloning. At least in English. It’s reasonably fast, quite tolerant of less-than-perfect input audio, runs on 12Gb of VRAM, and produces accurate output of longer than 30-seconds in a reasonable time.
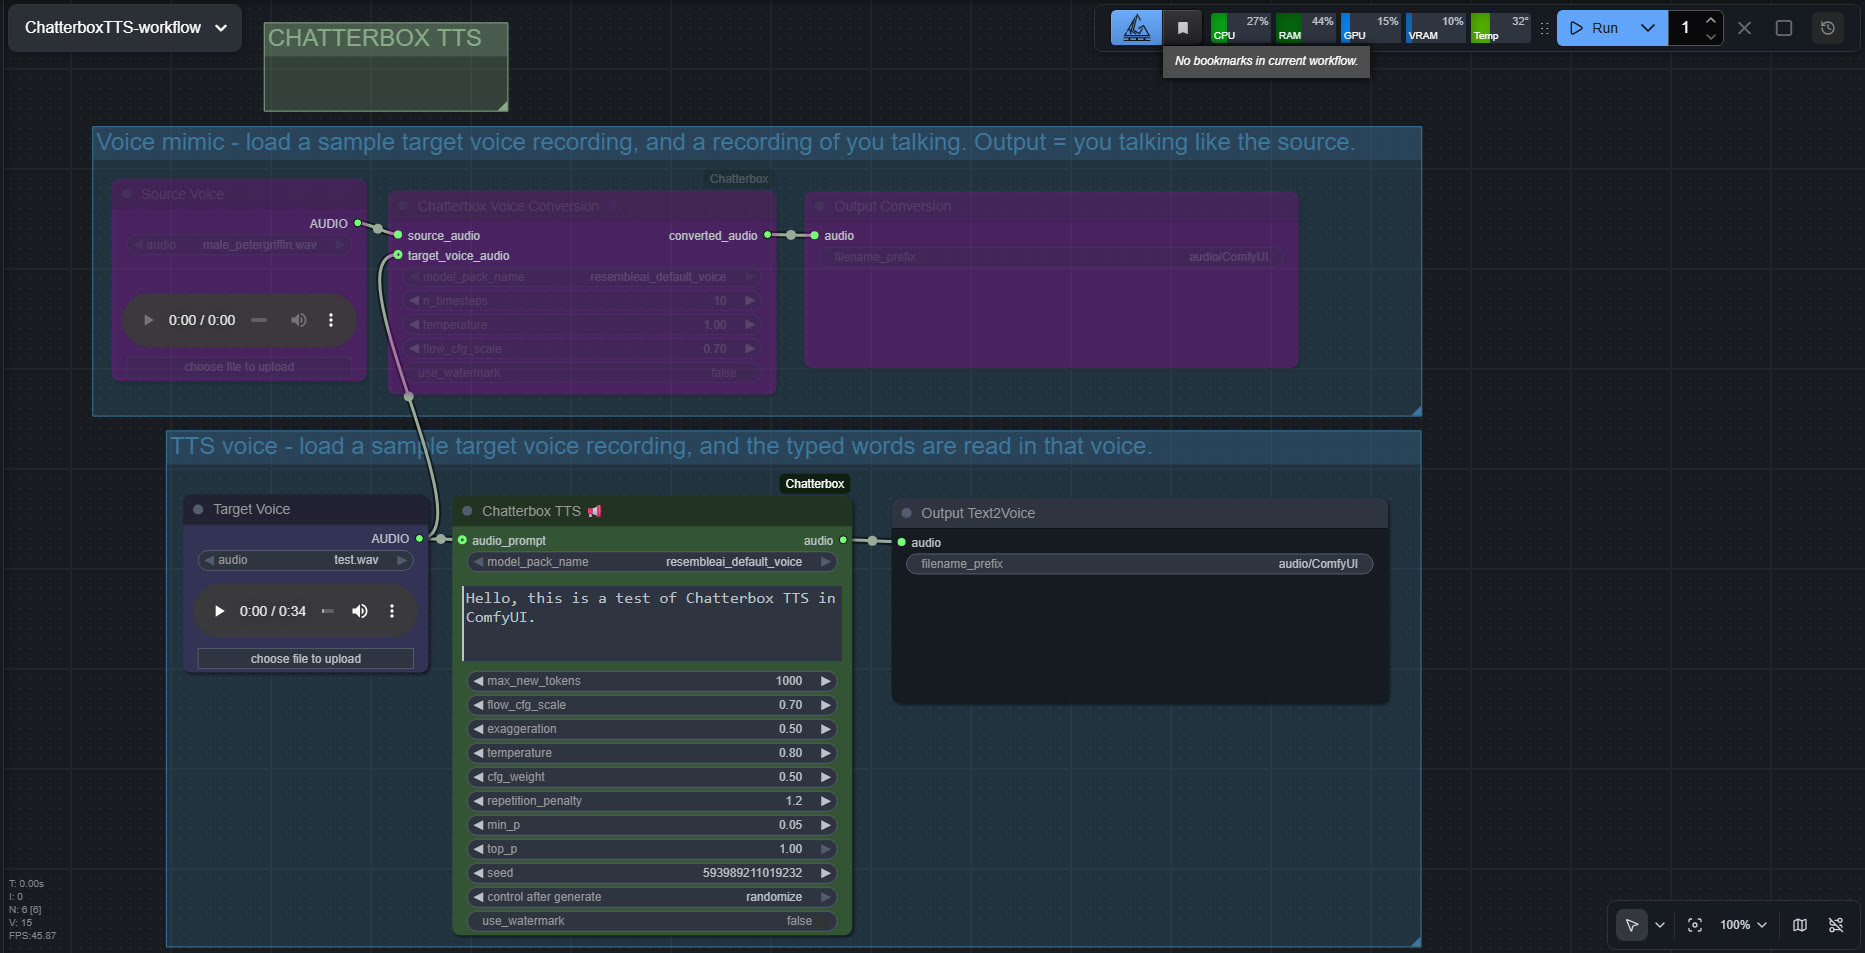
The huge drawback is that the TTS side of it (see image above, of the ‘two-workflows in one’ workflow) lacks any pause-control between sentences or paragraphs, which will be an immediate deal-breaker for many who are used to the fine-grained control offer by SAPI5 TTS. The voice mimic side keeps pauses, and incidentally works far faster than the TTS side.
There’s a Chatterbox portable, but it failed with errors. Install via pip install chatterbox-tts also fails miserably due to requiring antique versions of pkuseg and numpy, incompatible with Python 3.12.
But it is possible. So… assuming you want to try it… to install in ComfyUI on Windows, first you’d get the latest ComfyUI. Ideally one of the portables. Then install in it the newer Wildminder ComfyUI Chatterbox custom nodes rather than older Chatterbox nodes…
Then get the Chatterbox’s nodes many Python dependencies installed, via the Windows CMD window, thus…
C:\ComfyUI_Windows_portable\python_standalone\python.exe -s -m pip install -r C:\ComfyUI_Windows_portable\ComfyUI\custom_nodes\ComfyUI-Chatterbox\requirements.txt
This command string ensures it’s the ComfyUI Python that’s installed to, not your regular Python. Note that pip needs to be able to get though your firewall and access the Internet, to fetch the requirements. You may need to do this twice, if the first time doesn’t get the required Python module ‘Perth’.
These newer ComfyUI custom nodes, unlike older ones are… “No longer limited to 40 seconds” of audio generation. Nice. Though, for a 30 seconds+ length, you will need to have have enough VRAM — 12Gb may not be enough.
Note that Wildminder’s nodes need the .safetensors models rather than the old .pt models. I tried all the custom nodes that instead use the .pt format, and installed their models and requirements, but they all failed in some way and thus didn’t work. Wildminder’s Chatterbox nodes are the only ones which work for me.
So, for Wildminder’s Chatterbox nodes you then need the correct models to work with, manually downloaded locally and requiring around 3.5Gb of space…
Cangjie5_TC.json
conds.pt (possible not needed, but it’s small)
grapheme_mtl_merged_expanded_v1.json
mtl_tokenizer.json
s3gen.safetensors
t3_cfg.safetensors
tokenizer.json
ve.safetensors
For manual local installation in the ComfyUI portable, the above models and support-files go in…
C:\ComfyUI_Windows_portable\ComfyUI\models\tts\chatterbox\resembleai_default_voice\
You should then be able to have ComfyUI run one of the simple workflows that download alongside the Wildminder ComfyUI Chatterbox nodes…
Note that this node-set does not support the new faster Chatterbox Turbo, and at present it seems there isn’t ComfyUI node support for Turbo. Turbo was only released a few days ago, though, so give it time. Turbo lacks the “exaggeration” slider which can add expressiveness, and is apparently limited to 300 characters (about 40 words)… but has tags to add vocals such as [cough] [laugh] etc and apparently supports the [pause:05s] tag for pauses. [Update: I was misinformed about the pause tag, it doesn’t seem to be respected in Turbo].
I assume Chatterbox will not work on Windows 7, due to the limitations on CUDA and PyTorch versions in 7.
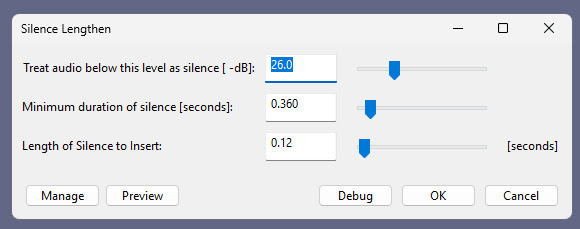
Update: I am left with two problems. Batch processing of a longer text, called ‘chunking’ by audiophiles. And the problem of inserting longer silences between sentences, the default not being long enough even with a low CFG setting. As for silences, the free Lengthen Silences plugin for Audacity can detect silence pauses of a certain length (e.g. between sentences) in your mono spoken-audio file, and then it automatically inserts longer pauses to your specified length. The mono version of the plugin works in Audacity 2.4.2 on Windows 11.
For simply auto-deleting pure silences, Wavosaur is easier.
Update 2: Chunking and silence removal solved…

Update 3: [pause:1.0s] functionality added, December 2025.
TurnipMania has hacked Wildminder’s tts.py file to add pause support in the format [pause:0.5s]. https://github.com/TurnipMania/ComfyUI-Chatterbox/blob/a9f38604c7be2cd2077c69486e168b0f4d995749/src/chatterbox/tts.py Backup the old file found in ..\ComfyUI\custom_nodes\ComfyUI-Chatterbox\src\chatterbox\ and replace it with the new one. Tested and working.
Update 4: Turbo now supported in ComfyUI.
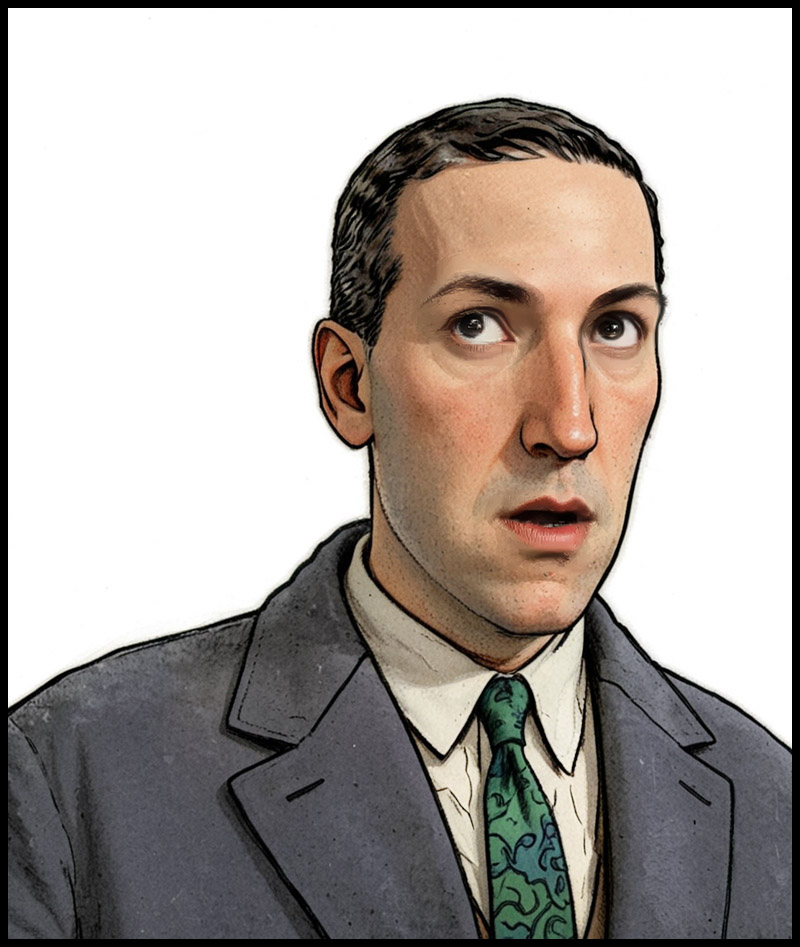
At the end of the summer I was very happy to get the ‘Lovecraft as a Zombie’ result, using a successful combination of Poser and ComfyUI.

That was back at the end of August 2025. But then I hit a seemingly insurmountable problem, re: potentially using the process for comics production. Head and shoulders shots, of the sort likely to appear rather often in a comic, were stubbornly impossible to adjust the eyes on in ComfyUI. Even a combination of a Poser render with the eyes looking away, and robust prompting could not shift the eyes very far. This, I think, was a problem with my otherwise perfect combo of Canny, Img2Img, three LoRAs with a precise mix, and other factors. The workflow was robust with different Poser renders, but on ‘head and shoulders’ renders the eyes could only be forced slightly away from looking at the viewer/camera. It’s the curse of the “must stare at the camera” default built into AI image models, I guess.
But of course the last thing you want in a comic is the characters looking at the reader. So some solution was needed, since prompting was not going to do it. Special LoRAs and Embeddings were no use there either. Good old CrazyTalk 8.x Pro was tried, and (as many readers will recall) it can still do its thing on Windows 11. But it required painstaking manual setup and the results were not ideal. Such as tearing of the eyes when moved strongly to the side or up.
But three months after the zombie breakthrough I’ve made another breakthrough, in the form of a discovery of a free Windows AI portable. The 5Gb self-contained LivePortait instantly moves the eyes and opens the mouth of any portrait. No need to do fiddly setup like you used to have to do with CrazyTalk. You can’t control it live with a mouse, like you could with CrazyTalk, but it’s very simple to operate.

LivePortait for Windows was released about 16 months ago, with not much fanfare. Free, as with all local AI. Download, unzip, double-click run_windows_human.bat and wait a few minutes while it all loads. You are then presented with a user-interface inside your Web browser…

Scroll down to the middle section, “Retargeting and Editing Portraits”. As you can see above, it’s very simple to operate and it’s also very quick with a real-time update in microseconds. Works even on ‘turned’ heads. I’d imagine it can run even on a potato laptop.

Poser – to – SDXL in ComfyUI – to LivePortrait.
One can now start with Poser and more-or-less the character / clothes / hair you want, angle and pose them, and render. No need to worry if the eyes are going to be respected. In Comfy, use the renders as controls and just generate the image. If Comfy has the eyes turn and the prompted expression works, fine. If not, no problem. LivePortrait can likely rescue it.
The only drawback is that the final image output from LivePortrait can only be saved in the vile .WebP format. Which is noticeably poorer quality compared to the input. Soft and blurry, and as such it’s barely adequate for screen comics and definitely not for print comics.
I tried a Gigapixel upscale with sharpen, then composited with the original, erasing to get the new eyes and lips. Just about adequate for a frame of a large digital comics page, but not ideal if your reader has a ‘view frame by frame’ comic-book reader software.
However there may be better ways. One might push the .WebP output through a ComfyUI Img2Img and upscale workflow, but this time with very low denoising. I’ve yet to try that. It might also be worth trying Flux Kontext.
For those with lots of Poser/DAZ animals, note the LivePortrait portable also has an animals mode. Kitten-tastic!
Stable Audio 1.0 is a free “prompt to sound-fx” generator, based on an ingestion of the well-tagged sound FX files at the huge public-domain Freesound website. As such it produces royalty-free sound FX clips, of up to 47 seconds in length. Here it is, working in ComfyUI portable.
Workflow:
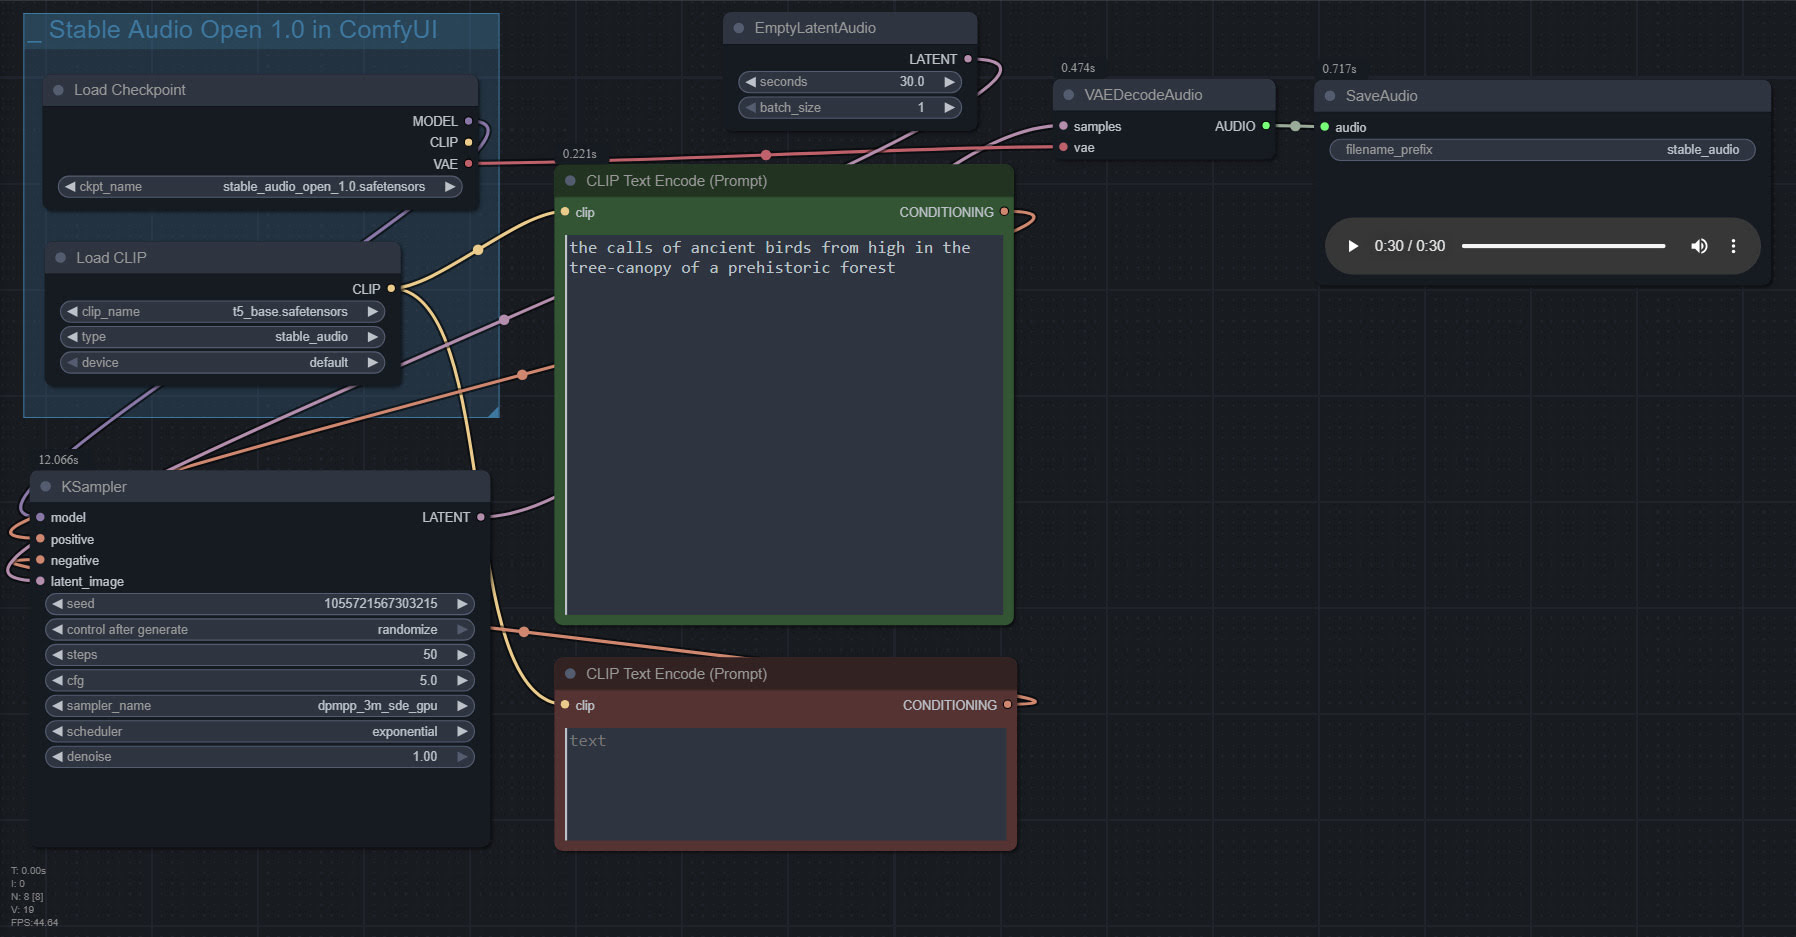
1. Copy the 4.7Gb model.safetensors from the Archive.org standalone’s ..\Stable-audio-open-1.0-webui-portable-win\stable-audio-tools\models folder. The standalone’s .torrent file is the easiest and most hassle-free / re-startable way to get this huge file. Then you put it in ../ComfyUI/models/checkpoints and after that you rename it as stable_audio_open_1.0.safetensors
2. Download the 800Mb Google T5 encoder model.safetensors file from HuggingFace, rename it t5_base.safetensors and copy that into ../ComfyUI/models/text_encoders/
That’s all you need. Just set up the workflow as seen above, and you’re ready to generate. All the other guff in the Archive.org Stable Audio portable is now taken care of by ComfyUI. ComfyUI audio generation also feels faster than the standalone.
In the above workflow, setting “batch” higher than “1” seems not to work.
I found it is possible to multitrack/mix more than one FX, via the prompt rather than nodes…
A balanced mix between a good field recording of a man walking through dry leaves in winter, and a recording of small birds calling plaintively in the surrounding Canadian boreal forest.
Update: This simple batch workflow works for batching different prompts and/or getting multiples ‘takes’ of the same prompt…

At last, I have simple easy and fast inpainting in ComfyUI. No inpaint model or inpaint nodes required. Just inpaint with any SD 1.5 model.
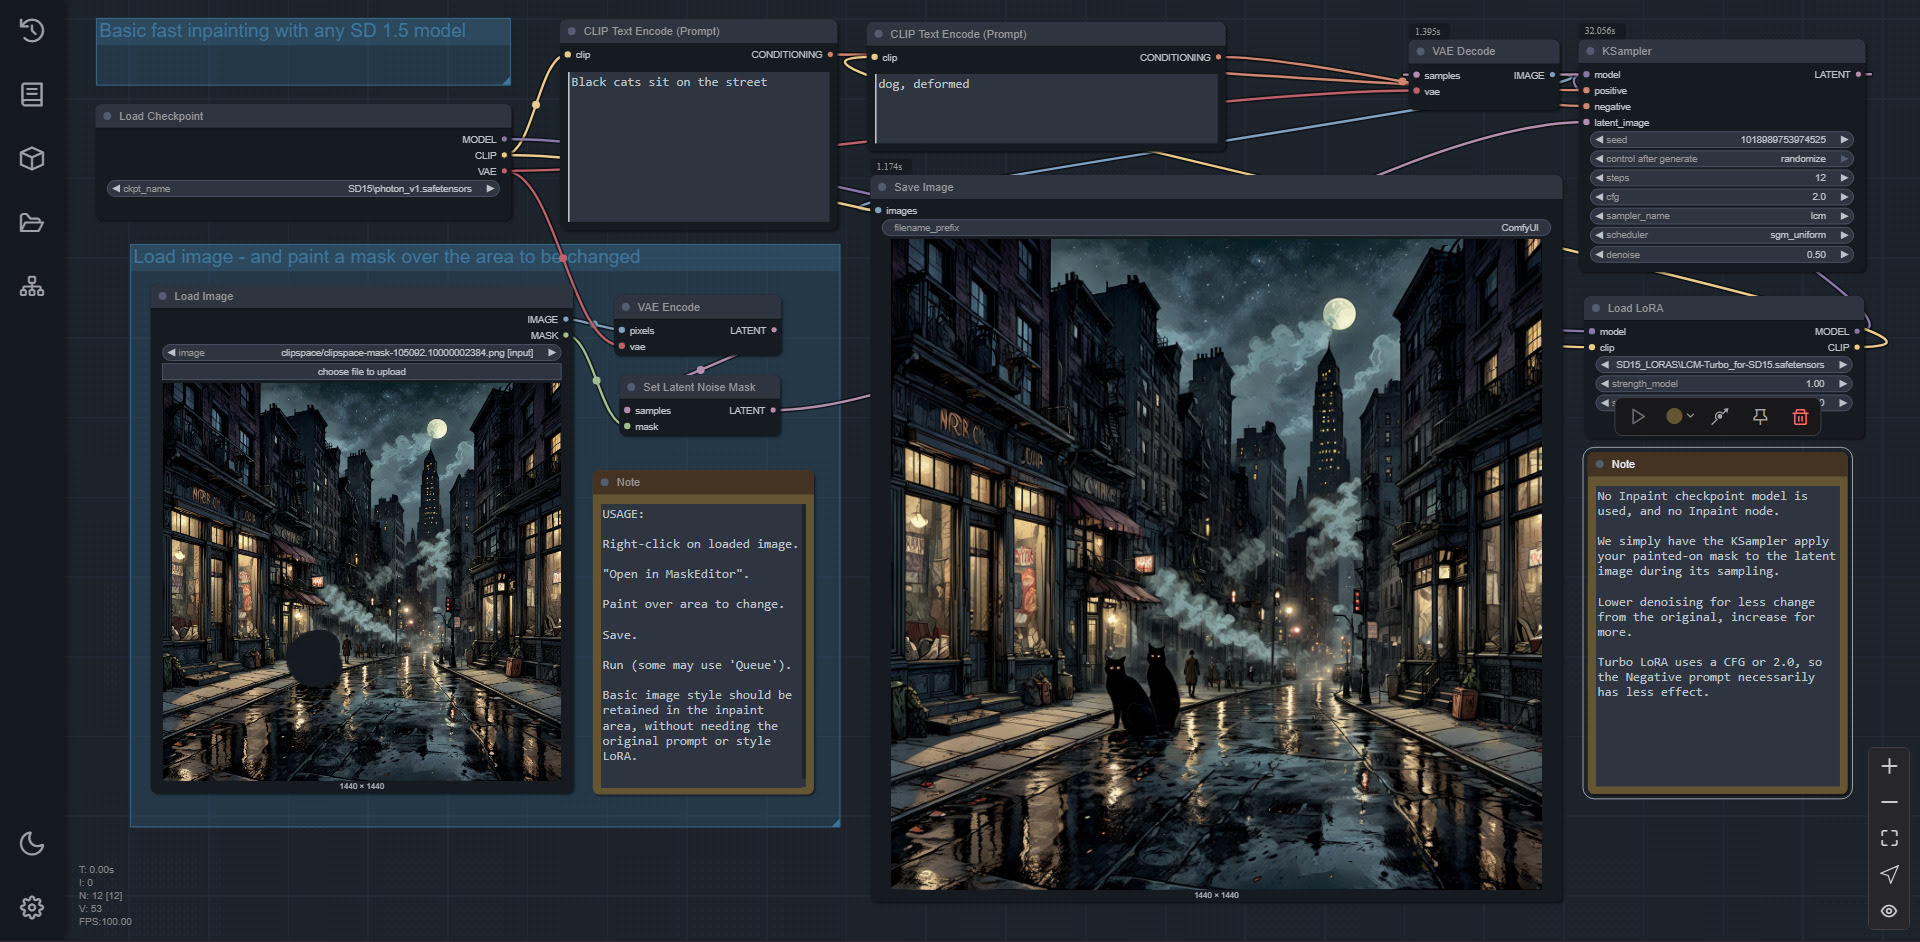
All native Comfy nodes. Why do they have to make it so damn complicated, in other workflows? It’s really not, it turns out.
So, the last reason to use InvokeAI, over ComfyUI, is gone. Invoke deleted.
I’ve had time to get back to experimenting with my Poser renders to Stable Diffusion workflow. As you can see, I can now use SDXL and prompting for expressions is possible (even if not present in the Poser render). A Firefly lines-only render is used in the Controlnet, and a very basic Comic Book real-time render is used for the Img2Img. The next big problem to solve is the “stare at the camera” problem. The last thing you want in a comic is the characters looking at the reader.
Working OpenPose with face and hands, from any image, in ComfyUI. Works with quick real-time renders from Poser.

1. Use your existing ComfyUI or, if new, then try the ComfyUI Windows portable. For the Portable, cut the entire custom_nodes folder and place the more immediately useful individual custom_nodes folders back one-by-one, if ComfyUI fails to load all its UI elements on startup. I found that one of the custom_nodes was stopping the full UI from loading.
2. Into your ComfyUI you install ComfyUI’s ControlNet Auxiliary Preprocessors packages, which come in a big bundle… and one of these is for openpose processing.
3. Into your ComfyUI you also install DWPose as ComfyUI-Dwpose-Tensorrt to speed things up. You’re on Windows and NVIDIA, I assume.
4. Download two required Torch files dw-ll_ucoco_384_bs5.torchscript.pt and yolox_l.onnx. About 500Mb in total, and they’re open on HuggingFace. There are two folders to manually put these in, for me…
C:\ComfyUI_Windows_portable\ComfyUI\custom_nodes\comfyui_controlnet_aux\ckpts\yzd-v\DWPose\
C:\ComfyUI_Windows_portable\ComfyUI\custom_nodes\comfyui_controlnet_aux\ckpts\hr16\DWPose-TorchScript-BatchSize5\
I was told to put the files in the first yzd-v folder and then the workflow gave me a ‘not found, download from Huggingface’ error. However, I then also tried copying the same files to the second hr16 folder and… the Openpose workflow worked.
5. My simple Openpose workflow for Comfy, working. Just drop an image in and ‘Run’. Should take about five seconds to produce an Openpose image.

As you can see, you can switch off face and/or hands if they’re not required.
You then save out this special image, and drop it into a Controlnet workflow which has an openpose model (here for SDXL models) linked to it…

Once downloaded I renamed this openpose model to openpose-sdxl-diffusion_pytorch_model.safetensors so that I know it’s for SDXL. It is copied into C:\ComfyUI_Windows_portable\ComfyUI\models\controlnet\SDXL_controlnet\
On more powerful PCs you can link these two workflows together in the same workflow. But with more basic PCs, it seems best to try to limit how much the workflow is being asked to load all at once.
The resulting suitably-prompted image then conforms to the input Openpose pose. Use a setting of 0.85 to give the Controlnet more wiggle-room than a strict 1.0 setting.
All free. There’s also a paid plugin on Renderosity, which does this for Poser 12 and 13.
I also tried to get depth (aka depthmap) Controlnet working, but with no success at all. I must have downloaded 20 workflows and countless models, custom_nodes and preprocessors, and not a damn one worked. Errors every time. I give up on depth in ComfyUI, and will just work with the working MistoLine lineart and OpenPose Controlnets.
Could Flux Kontext Dev handle a backdrop as well as a character, thus bypassing the need to composite later? To find out I threw together a basic garden around Nursoda’s Ronk figure and his snail. Obviously, one would spend a lot more time constructing a garden that was destined to appear in many scenes in a storybook or comic. But this is just for a workflow demo.

Pretty ugly from Poser (Comic Book mode lineart and a bright light preset helps it along, but like all 3D it’s desperate to go ‘dark and grungy’). Yet Kontext handles it nicely. Note the new word at the start of the prompt, ‘Filter …’

The problem is then the garish day-glo nature of the colouring on the new image. But because we have 1:1 registration with the Poser source-image, we can easily lay the colours back in by using it as a colour blending layer in Photoshop. Here that’s been done. Then just a little of the Kontext colour has been brought back in. The layer was then flattened and auto-contrast applied, then desaturated slightly to take account of the colour-boost caused by the auto-contrast. The final result…

And since it’s come from Poser, we can have easy-select masks galore via a clown pass / toonID render, should any further postwork be needed. And if a holding-line around the character, or a blurring or fading of the background, is needed… then Poser can also supply the masks needed.
A quick Poser experiment with the new Flux Kontext Dev. Nursoda’s Ronk and his snail, in Poser. Render to real-time Preview at 2048px, with high texture quality and a little Comic-Book applied. Lay this Poser render on white in Photoshop, reduce to 1024px and use this as the seed image.

The prompt gives a pencil and watercolour effect, but does not cause the layer-registration to shift. It remains an exact 1:1 match, despite the style change. In other words, Kontext can act exactly like a Photoshop filter would. Takes about 70 seconds on a 3060 12Gb graphics-card, at 1024px. This speed is comparable with intensive Photoshop filter plugins such as Reactor or G’Mic. There is a ‘turbo’ version from a third party, said to give a 2x speed up, but it appears to require intense Python wrangling and lots of tracking down dependencies to get it to work.
A 1:1 match means we can restore the Poser colour, by using the original render as a colour-blending layer in Photoshop. Which means we can have consistent colour from panel to panel and page to page, when storytelling in a comic or storybook.
We get a little drop-out of definition. For instance, the spiral of the snail’s shell is lost. If we had a lineart only Firefly render from Poser, we could bring it back by layering in Photoshop.
Update: It appears that if you go back to it then next day, and experiment with style descriptions, then try to go back to the original prompt, the earlier styled generations somewhow adversely affect the later output (more hard and cartoony than it should be). Possibly old latents are being partly re-used? Anyway… start from a fresh launch of Comfy, then go to the workflow and don’t tinker or change anything before starting your output.
Update: It seems a Poser .PNG render with transparency is the best to drop in as the seed image. Rather than needing to first place it onto a white background. Also, “filter” rather than “convert” seems a better choice of words for the prompt.


Kontext is wayward in terms of wanting to resize things. But it’s a matter of getting the prompt right, for exact 1:1 registration.
Add a layer of simple black and white lineart, while showing the photo beneath and keeping identical subject placement, camera angle, framing and perspective.
Layer the result in Photoshop, and blend via Multiply. Brush a soft eraser over teeth etc. Then filter the base photo to lighten it up. I imagine it would blend nicely with a Poser real-time comic-book lineart render, for added line variation. You’re welcome.
Source image from the official test workflow. Using the official default GGUF workflow, but made compact by moving things around and with upscaling nodes removed.