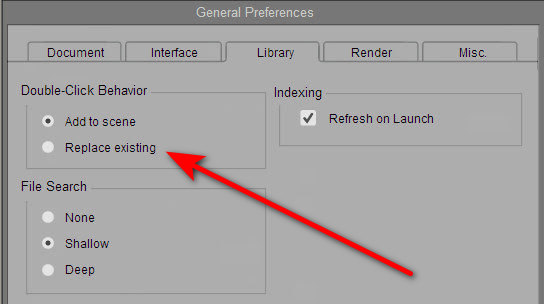
New Poser 12 users may be frustrated by the default behaviour of their light presets. Clicking on a preset light-set adds its lights to the existing lighting in the scene. Until you have a ‘hedgehog bundle’ of lights on the light-ball. Most of which are actually not doing anything in Preview, because there’s a cap on the number of lights that OpenGL can display.
The Poser 12 newbie may think: “Ah, so that’s why the ‘delete all lights’ Python script is needed” and/or “So that’s why some people don’t like using the Poser lights”. Ideally, such thoughts could be avoided if the default shipping state of Poser was that a double-click on a light preset replaces the existing scene lighting.
This can be achieved. But how? It’s quite simple…
Top menu | Edit | Preferences.
Library Tab | Double Click Behaviour | tick ‘Replace Existing’ | OK.
That’s it. You don’t even need to re-start Poser for it to take effect. Light presets now replace the existing lights, rather than adding to them. You can still add the lights in an accumulative way if you want, but you now do that by selecting the Library light preset with a single-click. Then clicking the double-tick icon at the base of the Library panel…
Figures are added in the same way, or can simply be dragged-and-dropped and then they won’t replace an existing figure. Props and MATs can just be double-clicked.
The behaviour is different than in Poser 11, but the above is a partial fix.
New users will also want to set Library search-depth to “Shallow”, to prevent Poser from bringing Poser to a grinding halt and spending ages looking for lost textures on badly installed or made freebies. “Deep” initially, overnight to index all the content. Then “Shallow”.


Pingback: Release: Poser 13 – MyClone Poser and Daz Studio blog