Right, so after more research I find that there are in fact two ways to have Photoshop play “spot the differences” across an image stack, and to extract those differences. This solution relates to my previous post on Poser 11’s Comic Book Preview lineart, and the desire to fix small breaks and missing ‘chips’ of inked line.
I had discovered that a click of the current Display Mode’s ball-icon subtly randomises the coverage and break-patterns of the line-art available from Comic Book Preview in Poser 11. I was thus looking for a Photoshop plugin to combine multiple PREVIEW renders made in this way, but I now find… the feature is already native in Photoshop and can be done via two different methods!
First you’d assemble your slightly variant lineart renders, made as described here. 1.png through 6.png should do it, though you could go to twelve renders if you wanted to be really thorough.
METHOD ONE:
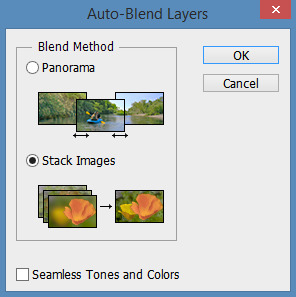
Top Menu | File | Scripts | “Load files to Stack” (Stack is 64-bit only, do not tick “Automatically Align”). Shift-select all layers in the Layers Palette. Top menu: Edit | Auto-blend Layers | Stack Images. That’s it. Photoshop will then whizz through the stack as fast as a whizzly weasel, spot the differences, and produce a single unified image containing all those small differences.
The result is not as adjustable later, since Photoshop does it a weird way and you don’t get discreet cutouts on new layers, each containing ‘just the bit that was different’.
I never knew this feature existed. Never heard it mentioned in umpteen years, or had cause to use it. It’s generally though of as a focus-stacker for macro photographers.
METHOD TWO:
1. Top Menu | File | Scripts | “Load files to Stack” (Stack is 64-bit only, do not tick “Automatically Align”).
2. Select top layer in the Layers Palette. Set its layer blending mode to Difference. Invert. ‘Select Colour Range’ – white. White highlights the bit(s) different from the layer beneath it.
3. ‘Copy merged’ and ‘paste in place’ your selection to a new layer at the top of the stack, invert it to return it to black. Ensure the new layer’s blending mode is set to Normal.
4. Delete the source layer and have the Action move down to the next layer in the initial stack. Repeat.
Eventually you have a base layer and all the differences are isolated, extracted and stacked on top. This stack of differences is more adjustable than the results for method one, for instance allowing you to delete a layer with a manky eye if needed. However, it’s probably not as computationally precise compared to Method One, because the process can only ever compare with the layer beneath it. Fragments may also have slight unwanted fringing around them.
In terms of speed, once you have Method Two as an Action they’re both about the same speed.
Either method is still not going to automatically fix tiny hairlines running across eyeballs, or noses that have double lines or broken ridges when seen at certain angles.


Would an approach like this be useful?
https://digitalsynopsis.com/design/how-to-convert-raster-to-vector-in-photoshop/
Thanks Will, I considered that re: vectorisation in Clip Studio and Inkscape, in the original post (linked in the one you’ve seen). The method was tried in Inkscape – vectorise, then have a script try to fix gaps – but was not a success. It does, however, appear to work well enough for those who need to 3D print and therefore need all their gaps closed.