OOooh…
Monthly Archives: February 2019
Tutorial: a ‘pseudo ToonID’ render in Poser, using a Preview render
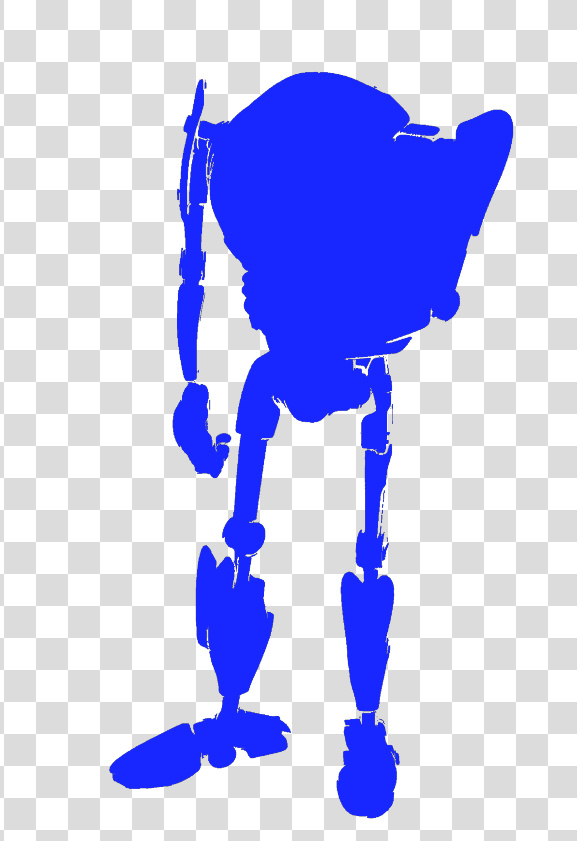
This tutorial shows you how to get a ‘pseudo Toon ID’ render from Poser, using a quick Preview render. As such this method works in both Standard and Pro versions of Poser, and gives you what is effectively a ToonID render layer (usually a Pro feature). Rather usefully, it also uses the real-time Preview render mode, rather than a slow Firefly render.
1. Set up your scene as usual and get to your final artistic framing and lighting. Save to MyScene-final.pz3. Render your final renders as usual. Without making any changes, then make a working duplicate of your final scene, MyScene-toonID.pz3. You need to work on a duplicate from now on, as you’re going to mess with the scene a bit.
2. Go up to the top menu: Display | Cartoon Settings | One Tone.
3. Go down to the Document Display Style icon palette, and set Cartoon Display mode. Everything goes flat. Each flat colour you see is being driven by the Diffuse colour in the relevant scene material.
4. Now, you may be happy with what you see. Lots of clearly defined flat colours, just begging to be precisely and easily selected with the Magic Wand or Colour Select in Photoshop. In which case make a Preview render and save your ‘pseudo Toon ID’ image. Take it into Photoshop and ‘Paste in place’ to align it precisely on top of the other layer(s). You’re done. Bring on the Magic Wand and Paintbucket!
5. Are things not looking right? Lights should not make a difference, given the combination of Display modes your scene is in. But try scrapping your scene’s existing light rig and replacing it with one single ‘flat’ IBL light. ‘Flat’ meaning it is pointed straight at the scene and is causing as little shadowing as possible.
6. It could also be that some or all of the colours in your scene are too similar. You may have dark greys on top of dark greys for instance, as was the case with these sludgy dinosaurs before they were jazzed up a bit.
You could jazz up your too-similar colours by going into the Material Room, select each and every Material and change the Diffuse colours manually. But you may have too many materials in a big scene for that to be viable. What to do?
i) If you have MATWriter Panel 2014 installed in Poser 11, you’re in luck. These make it really easy to change Diffuse colours in bulk across each character and prop, and XS even uses the Windows Colour-picker for the colour selection.
ii) The free EZMat has a Randomise script that does the same per character/prop with auto randomisation of the Diffuse colour.
Be warned that you need to work on backup copies of your scene with these!
Once you’re done, don’t forget to go back up to the top menu: Display | Cartoon Settings | and set Poser back to ‘Three Tones’ or whatever you usually have set there.
For comparison, here is a default ToonID render layer from Poser Pro. Without any colour adjustment done in Poser, in Photoshop the default ToonID layer usually requires a quick Auto Contrast and then a Brightness/Contrast tweak to make it visible and its parts selectable. That’s been done here. Note that the opacity mapping has been handled by Poser much more nicely than the above Preview method, albeit at the cost of render time. On the downside, we don’t have a selection area for the eyes, which we do have on the ‘pseudo ToonID’ render, but those could be manually input in the Material Room (change the toonID number to something very high, i.e. six figures).
There is a free script that will quickly and vividly block-colour the ToonID channel for each character and prop in your scene.
Lost your Toon ID renders in Poser 11? Here’s how to get them back again.
Update: Poser 11.2 has restored these render switches.
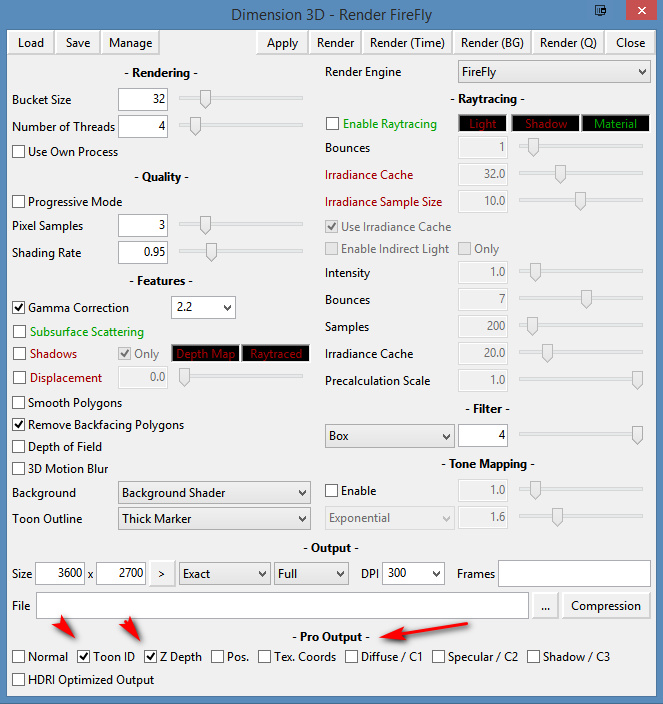
Possibly as a result of the latest Poser Pro update, I seem to have lost the Firefly “auxiliary render” switches. These add additional render types, and their drop-down switches are usually always found on the Firefly Settings panel. These extra renders are then bundled into a saved Photoshop .PSD file as layers.
But there’s a workaround fix for this problem, for me and possibly for others. Because Firefly renders can also be controlled by an official partner script, which ships with Poser. This script still works, and is robust. Go up to the top menu and find: Scripts | Partners | Dimension 3D — and from there launch the ‘Render Firefly’ scripted panel. This can also be invoked instantly with Shift + F on the keyboard. Update: Shift + F seems to have changed now.
Note that this panel may require you to toggle the render type – see the drop-down in the top-right corner. It appears to default to the last-used render type.
At the foot of this alternative Firefly rendering panel, you’ll see the expected Auxiliary render type switches (the ones which seem to have vanished from the standard Firefly settings panel).
Regrettably this can’t use your regular render presets, but you can recreate them and then save them as presets for the new panel.
Doing a Firefly render this way works fine, as the features are still there even if the switches are not. You then save a Photoshop file and it has the expected extra layers. In this instance, Z Depth and Toon ID.
For future reference, here’s what these Auxiliary renders give the Poser Pro user, even if these days you may not care much for the main Firefly render itself:
* Normal. This produces a psychedelic colour-shaded render. I’ve never had cause to use it, but apparently such renders can be used for adding enhanced bumps and scratches, and were most useful back in the days of low-poly gaming? See the page ‘Normal mapping’ on Wikipedia.
* Toon ID. Also called ‘ToonID’ in the Poser Material Room, and simply ‘ID’ when its render is in a Photoshop layer. Each material on your character gets its own material colour, and this is rendered out to a plain flat RGB colour. This enables easy part-selection in Photoshop. For instance, instantly select all of a helmet, and just the helmet. ToonID is automatically assigned and its number (and thus colour) can be changed per-material in the Material Room.
* Z Depth. A greyscale depth mask for your scene. Not useful for scenes with transparency-mapped elements such as leaves and petals, which become ugly square blocks.
* Position. Aka a Position Pass. Looks similar to the Normal render. I’ve no idea what it does, but the Cinema 4D manual says vaguely… “The Position Pass can be used in 3D-compatible compositing applications that can in turn be used to create all sorts of effects with it.” Sounds like it’s of use to high-end compositing and video editing software, such as After Effects.
* Texture Coordinates. Looks similar to the Position render, and a sort of combination of Position and Toon ID. Again, possibly useful in video compositing, at a guess?
* Custom 1. Renders Diffuse only, unless it has a Material plugged into its node in the Materials Room. In which case this channel will only render that material.
* Custom 2. Renders Specular only, unless it has a Material plugged into its node in the Materials Room. In which case this channel will only render that material.
* Custom 3. Renders a Shadows only layer, with dense shadows hard-merged onto a white background (i.e.: not over transparency). As with Custom 1 & 2, Shadows only render if no materials are plugged into its node. Note that this is not the same as: Render Settings | Options | Shadows only, which appears to produce shadows lighter in tone than Custom 3 (even from exactly the same scene).
One can also fairly easily get an Ambient Occlusion (AO) shadows pass from Poser, though not via the Auxiliary render switches.
Tutorial: How to autocolour Poser lineart with Krita 4.x
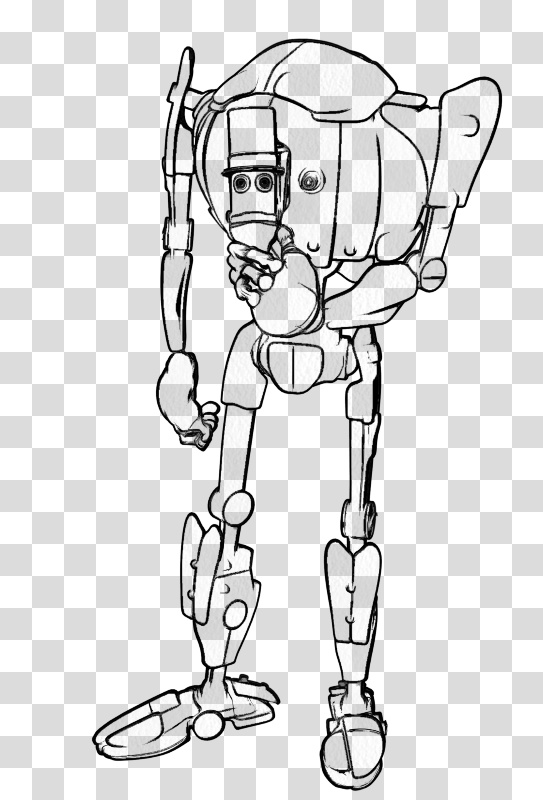
Poser 11 makes excellent line-art from 3D content, using its Comic Book Preview mode. This effect can easily be switched into plain black-and-white, giving you just the ink outlines for a character, scene or prop. (See my video demo of this).
The free open source Krita 4.x can add to your options here, by providing you with another layer of colour for your art. It does this by cleverly auto-colorising the inked line-art it gets from Poser.
Here is the workflow for how to do this in Krita 4.x, with screenshots. Note that this is very different from how it was done in Krita 3.x.
Obviously what follows is a very simple two-colour example done for this tutorial, and I could have got more funky with auto-painting colours into the line-art.
1. First set up your exported Poser render layers in Photoshop. The layers will usually be…
Shadows.
Inks.
Colour Flats.
Background.
You then run the usual Photoshop Action to remove all the white on the Inks layer, to get this result…
Then you save to an unflattened .PSD Photoshop file.
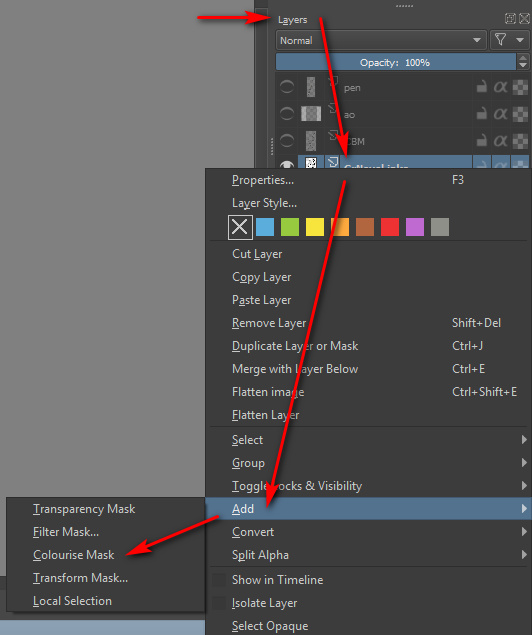
2. Now start Krita 4 and open your new layered .PSD file. In Krita’s Layers palette, right-click on your chosen Inks layer. A menu will pop up, and you then select: Add | Colourize Mask…
Krita will then add and auto-name a new sub-layer, which sits directly below the Inks layer…
3. Now you make an absolutely vital initial selection in the Krita user interface, which isn’t mentioned in the Manual. You go over to the Toolbar and select the “Colourise Mask Editing Tool” icon. The Tool you need to select is the paintbrush icon with a sort of ‘glowing tip’, which should be near the Eyedropper…
This Tool stays selected in the Toolbar even as you then select a suitable brush or pen from the Brush Library. DO NOT EVER select the normal Brush icon on the Toolbar, as this will mess things up over in the Tool Options.
You then roughly paint and dab colours where you want them to be auto-painted by Krita. It’s important to also indicate a background colour, even if you don’t want a background colour, as the auto-colour process can only fill the entire canvas. I’ll show you how to get rid of the painted background in step 6 of this tutorial.
Dabbing and squiggling the colours can be done with the mouse, but will be easier and more pleasant to do with a pen-monitor such as a Wacom or Ugee. Ideally with a good level of zoom-in. Here it’s very crude and just two colours…
4. Ok, you’ve completed your basic indication of where Krita is to lay in its auto-colours. Now go back to the Colour Mask layer and click its end-icon, the one that vaguely resembles a recycling icon…
Clicking this icon triggers Krita’s ‘autopaint’ process, and Krita works out how the colour dabs should spread out to meet each other and the ink lines. Doing the calculations for this may take a while on a large canvas with complex colouring. You should see a tiny ‘progress bar’ while this process happens. The default settings in Krita should be able to intelligently cope with gaps in the line-art.
5. With the auto-painting run completed, you then switch back to normal mode simply by clicking on the pencil icon on the layer…
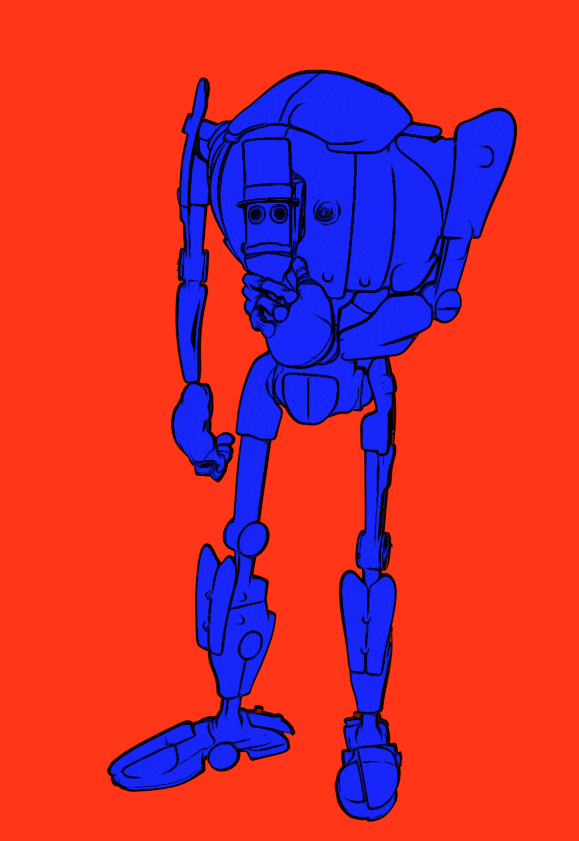
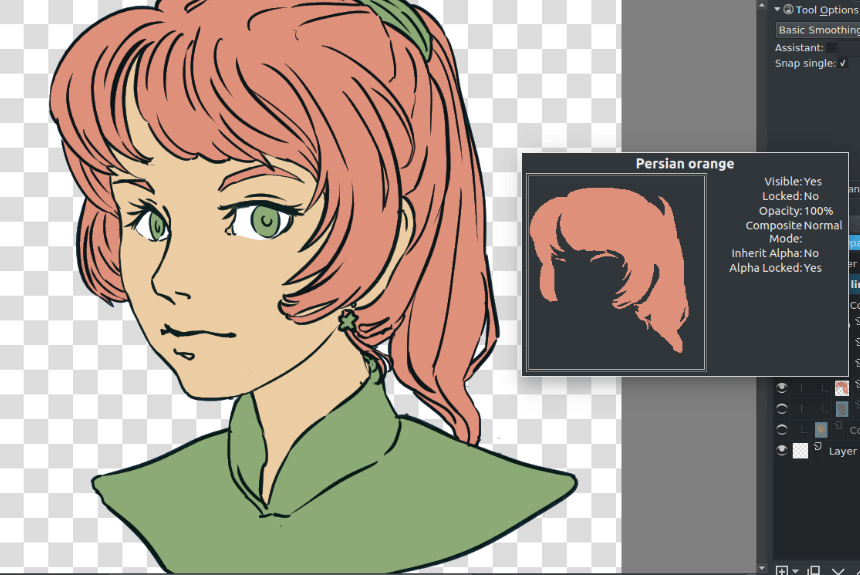
Clicking this pencil icon reveals your fully auto-coloured line art…
If the colouring is not quite correct, you can fix it. To do that you click what has now become a cross icon instead of a pencil…
… and this returns you back to ‘colour dab’ mode, and there you can edit, erase and add to your dabs and strokes. You can also tweak some settings over in the Tool Options. When you’ve made your corrections, click the ‘recycling’ icon again to run the auto-paint again. It should only take a couple of tries to get it right.
6. Now you tell Krita that you want a transparent background colour. For instance, in this example we can make the outer red be transparent when Krita ‘paints’ into the line art.
Regrettably Krita’s manual can be utterly baffling in its instructions on how to do this, if you naturally used a regular paint brush to dab your colours on the line-art. It merely says: “We want to have the [red colour] transparent. In the tool options of the colorize editing tool you will see a small palette.” But if you selected a normal paint brush then: i) you will have no clue that the “Colourise Mask Editing Tool” lives over on the Toolbar; and ii) because you never selected this “Colourise Mask Editing Tool”, there will be no mini-palette. The Tool Options docker will not reflect your active use of the ‘Colourise Mask’ layer, and it will be stuck in ‘normal brush mode’.
However, you followed my instructions above in Step 3 — to find and pick the “Colourise Mask Editing Tool” for painting colours, before selecting a brush from the Library. This means that your Tool Options docker is correctly showing this by default…
In this Tool Options docker we can now scroll down to find a line of colour chips at the bottom. Each of the colours found here represents a paint colour you used on your line-art a moment ago. We then select the red colour chip and click the ‘Transparent’ button. We then update the layer’s paint effect, and the red is gone…
We now just have the colour-filled line art and the original background layer underneath it. The red colour has simply vanished, cleanly and without leaving any ugly fringing.
7. Once you you are happy with Krita’s auto-paint, select the Colourise Mask layer and right-click on it, then choose…
Convert > to Paint Layer.
This is what the raw converted paint layer looks like on its own. If we had made more paint dabs on the line-art, obviously we could have got a far more complex colouring in of the line-art…
Here’s a very slightly more complex example of what can be done, and how it’s possible to save each paint layer as its own ‘island’ of colour…
Ok, then you’re done in Krita. Save the .PSD and load it up again in Photoshop. You can then use this new Krita layer to interact with the Colour Flats layer you had from Poser. It could also interact with a shadows layer to colourise the shadows.
The above workflow sounds complex, to accurately describe it and to warn about the pitfalls. But once you learn it, it is fairly quick.
For some types of Poser scene it can also be mimicked and bypassed inside Poser by a render using:
Single ‘flat’ IBL light, ‘flat’ meaning it is pointed straight at the scene.
Top menu, Display | Cartoon Settings | One Tone.
Set Cartoon Display mode in Document Display Style icon palette.
Then make a Preview render.
This gives you a pseudo ToonID Preview render, onto which you can paintbucket new colour, depending on how many colour segments you have. If you only have eight segments you’re fine, but if you have 200 segments per frame then you’d be at it all day.
Lastly, automation. Sadly Krita isn’t Photoshop, which means we can’t encapsulate this somewhat fiddly workflow in a semi-automated Action. But I don’t know of anything that can do what Krita can do here, inside Photoshop.
The new La Femme, tested
La Femme is the name of the new flagship female character for Poser, arising from the new Smith Micro / Renderosity partnership. She looks great and is free… but not really free, only becoming available free if you first spend more than $3.50 on other content at the Renderosity store.
Why is she more important than other recent Poser figures, such as the flagship Pauline figure which shipped for free (really for free) with Poser 11? To put it very simply, I’m told it’s because she brings Poser up to parity with DAZ Studio’s latest G8F figure. In terms of things like natural joint-bending, muscle flexing and having related figure and skin advances baked in. I haven’t yet seen the Smith Micro webinar on her, but I take it on trust that she’s an advanced state-of-the-art figure. Though I have very little knowledge of such jointy/bendy technical matters, and have also hardly even tried the G8s in DAZ Studio yet, I spent a few hours with a G8 and I like what I see. So it’s good to know that Poser is keeping parity with DAZ Studio there.
Personally though, I’ve always been more inclined to fix such joint and muscle-flexing matters in Photoshop, with a few flicks of the Liquify tool and a bit of light paintwork. But I can see how it would be important for animators and the 8k hyper-real render people, especially in settings where there’s minimal clothing involved.
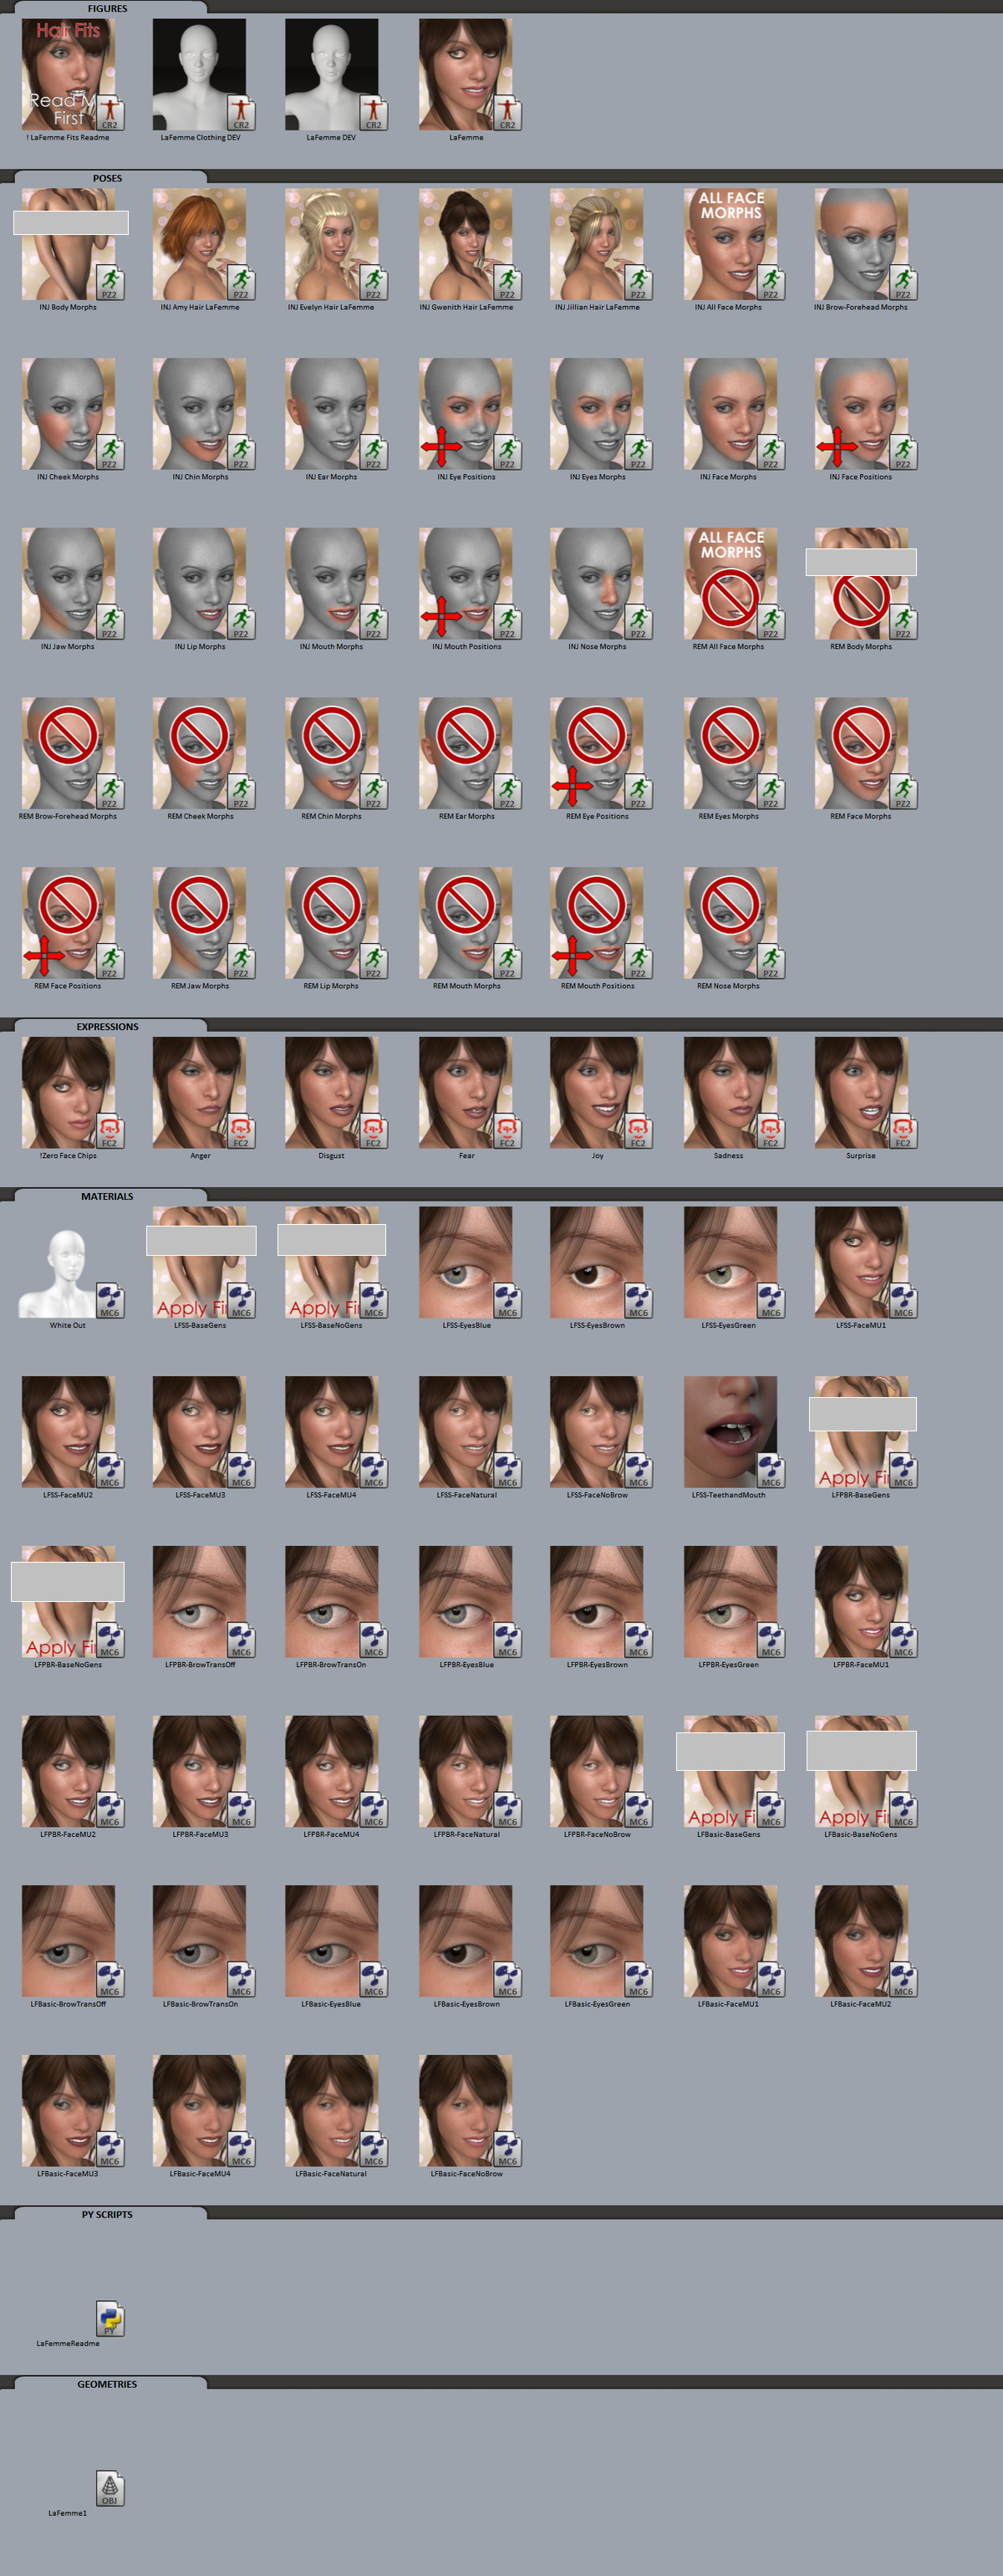
Install: Here’s the complete roster for what my third-party PzDB content library indexed for her after install. The chest cover-ups are my own, as today’s Internet services appear to be hyper-prudish about showing even the simplest and tamest nudity.
Of course you can also load all her elements with a keyword ‘lafemme’ in Poser’s native Content Library, once the yellow re-indexing icon eventually stops pulsing.
As you can see, very curiously there is no restore MAT for the skin textures. You need to make and save your own. Such a thing is needed in cases where you try a third-party MAT and you need to restore to the default MAT.
Morphs: She comes with a quite basic set of ‘starter’ Body Morphs, and a more extensive set of Head Morphs. At Renderosity there are also two $20-each packs which will add lots of further Body Morphs and HD Morphs, if that’s what you need for your renders or new characters. So you’re looking at $43.50 if you want the whole La Femme caboodle, which most days is probably comparable with V4 and Morphs++ and HD skins from the DAZ Store.
Face-control and Expressions: Her face has the new face-control chips, though apparently these are only to fine-tune her underlying expressions. Not having used Poser 11’s Paul and Pauline, I’m not at all familiar with such things. But such features look handy, and more importantly there are dials for moving both eyes at once up-and-down and side-to-side quite easily. There are also six rather basic expression presets in the freebie package, if you just want to pop on a quick expression and tweak it. The Face Chips and the body chips can be turned off in Preview, useful for comics production. In Body, there is the following dial to turn them off…
I could get no legacy A3 or V4 expressions to work on her. No other legacy expressions worked in the slightest, not even Poser 11 Pauline expressions. Injecting all her Face Morphs made no difference. Nothing at all would move her set-in-stone default expression. This was rather disappointing.
Of course, having face-chips and other advanced face-flexing elements is great, but who has the time or patience to spend an hour hand-crafting a new custom expression with them? I just want 50 good presets in themed subfolders, and separate eyes-only look presets to apply on top of the expression presets, like DAZ Studio has (e.g. the ever-useful i13 SciFi Splendor set and similar). I hope such dedicated expression preset sets for La Femme will come soon, though it’s slightly worrying that there are currently no expression sets either in the Renderosity store or as freebies. Given the apparent flexibility of her face, this seems like a big missed opportunity.
Poses: I tried her with an old Aiko 3 pose, as these often work on many newer characters. The A3 ‘Floating’ and other poses worked perfectly! Next up was a test of some V4 and M4 poses. V4 playing a musical instrument, the Cello, was taken perfectly by La Femme including the hand and finger poses. M4 driving a truck was also successful, including finger positions on the steering wheel. Wonderful. After the total failure among the Poser expressions, such success with poses was very pleasing. But V4 riding a Penny Farthing bicycle proved too much, and the lower legs and feet were totally screwed up. Though possibly this pose first required the feet to be parented to the pedals. It does suggest that while many V4 and M4 poses will work, a few won’t or will first need parenting of feet and hands to props.
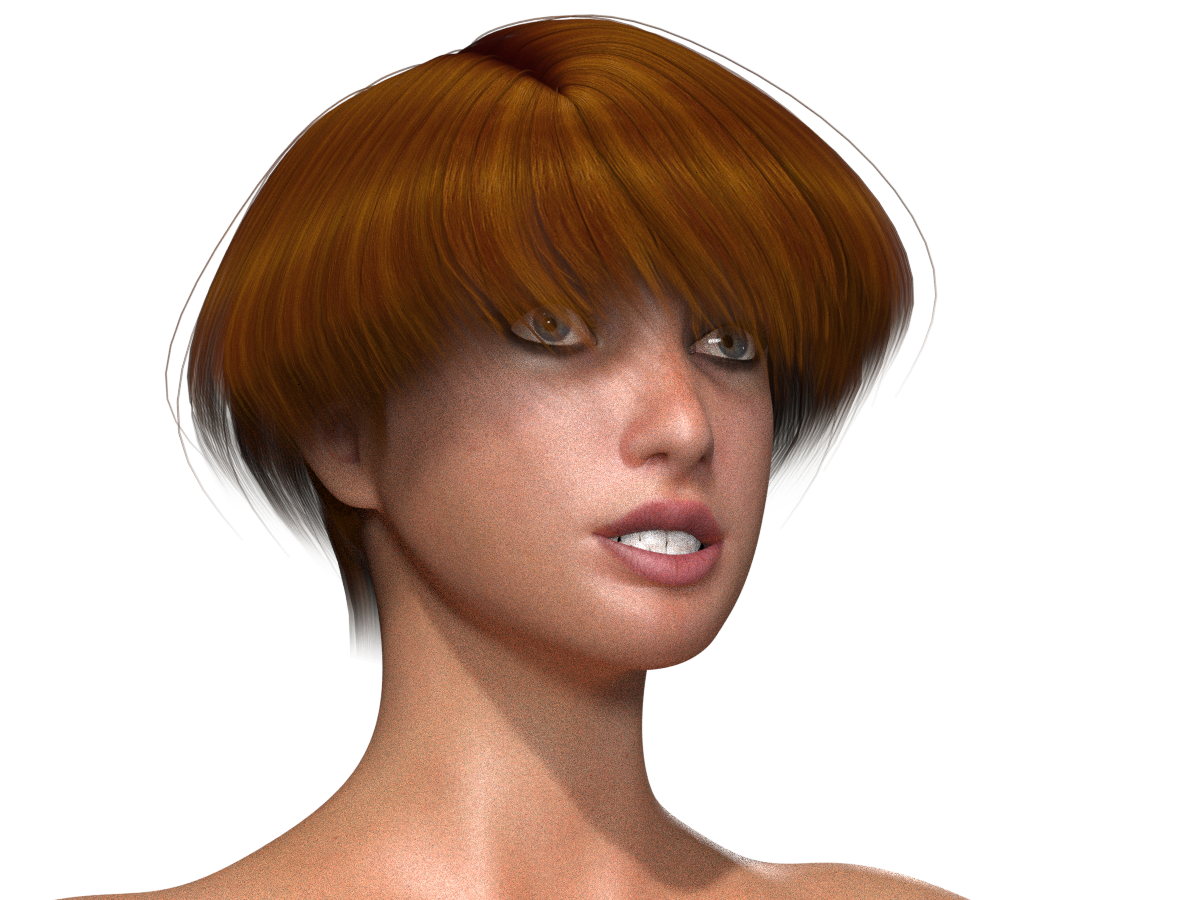
Hair: There’s no hair in the free download, but the four presets do work with the Pauline hair that shipped with Poser as extra downloads. I seem to have skipped that download bundle in the Poser Download Manager, though. Thus I discovered that V4 Supersleek hair (seen below) was fine for making a few test renders, needing only the slightest nudge upward on the Y axis for a La Femme fit. Poser auto-parented this hair and it moved with the head. Super, and this was another win for La Femme.
Clothing: This was the big problem, and lack of clothing was the total deal-breaker (for now). There’s not so much as a basic leotard in the free package, and currently there are no appealing clothes on the Renderosity store. No sci-fi, and only one rather basic maybe-steampunk set of dungarees. Certainly nothing to match V4’s 500+ awesome outfits. I had almost no success with any legacy Poser clothing, except for the V4 Morphing Cloak and the V4 Victorian Outfit, which both looked OK at the front. Otherwise it was all a mis-fit. There is a $7.50 stop-gap route for V4 clothing conversion, though that only gets you as far as the pre-prep of the clothing for the Fitting Room. But I’ve never ever used Poser’s Fitting Room, and don’t even have the first clue how to use it or how well it works for a new figure like La Femme. If clothing doesn’t fit, my immediate reaction is to try another item, rather than faff and fiddle around with it for hours. The Fitting Room is also a Poser Pro only feature, so Poser Standard users don’t have it.
But we already have a free V4 skull-shape morph, for V4 hair-fits on La Femme. So… will we also get a similar V4 full body-clone morph, making her into a V4 shape — but with a load of G8F-like advanced features, joint flexibility, and highly tweak-able expressions? I don’t know enough about the arcana of Poser figure-making to know if that’s possible, but I presume it is? I see it in DAZ Studio, where we even have sliders that can micro-adjust how much legacy character shape your Genesis figure has input in them. If a V4 body shape could be done, would V4 clothing then load onto La Femme perfectly? Or am I just dreaming re: that possibility? Perhaps V4 clothing requires certain named bones to ‘grab onto’, which are not present in La Femme?
The idea of a retro ‘V4 shaped La Femme’ may cause sniffs from some, but it would be fine by me. Just the body and top of the skull, not the face. I’d then consider using her instead of a V4. Because she does look very good in SuperFly renders even ‘out of the box’ and under the default Poser 11 ‘Bright Lights’ preset…
Update: Two years later. The main problems: Difficulty in getting the face away from the default ‘horsey’ face. Limb bending/creasing is not as good as a DAZ G8 in dynamic poses. Lack of morphs and (less so) clothes. Just not as easy to work with and dress as a G8 in DAZ Studio.
3D Map Generator: Atlas
I hadn’t looked at the Photoshop-based 3D map maker ‘panels’ for a while now. Last time I looked they were ‘sort of OK’, and all came from the same maker in a bewildering set of variations and version numbers. But development on these has continued, and the new 3D Map Generator: Atlas looks as though this solo developer has more or less nailed it in terms of easy textured 3D mesh generation from Google Maps. My thanks to Stefan Holzhauer for drawing my attention to this class of ‘Photoshop panel’ software again.
For a mere $21 U.S. the new 3D Map Generator: Atlas works as a panel inside Photoshop 2015.5 or higher. ‘Atlas’ first appeared in summer 2018 (which probably explains why I missed news of it), and is now in a bugfixed version 1.2.
“What can a puny PS panel do”, you might think, but judging by this detailed workflow video… it can load and interface with Google Maps, automatically grab the greyscale heightmap there, and with only minimal manual jiggering of two Photoshop layers, can produce a decent 3D mesh using Photoshop’s own 3D tools. Here’s the video of it in action and tandem with Google Maps. It can even export the resulting mesh as an .OBJ file…
But then the important question is… “can I use Google Maps data commercially?” The answer appears to be “No”. Because even though Google is using public-domain NASA data (Landsat 8) it’s also done lots of private-sector work to clean, rectify and align the tiles. Here’s a quote from Klaas Neinhuis from Jan 2017 on polycount.com, on the matter…
“I’ve spoken to them [Google] and it doesn’t make sense financially to use Google Maps content. I’d need to get a ridiculously expensive license, but the user would also need an expensive license.”
So, while 3D Map Generator: Atlas is going to be of interest for hobbyists, educational users and artist overpainters of 3d scenes, if you create commercial-use map renderings this way — artistic isometric tourist maps for the local tourist board brochures, say — then you’ll still need to go instead to the public-domain for your heightmaps and overlays. Or pay a GIS/mapping nerd $100 to go get the good high-res heightmap and satellite overlay from the public domain for you. Of course, there may be workarounds to get 3D Map Generator: Atlas to use public domain data, but my searches didn’t immediately discover a tutorial on that.
Personally I have a noted workflow and archived public domain datasets for the whole of the UK, with which I know I can produce a viable OBJ mesh for any bit of the UK’s underlying terrain as a result. I used this a few years ago for re-envisioning local Iron Age landscapes using Vue. But it’s still a few hour’s work to get to a good mesh, and involves wrestling with 3DEM and GRASS. So it’s good to know that a $21 Photoshop plugin, such as 3D Map Generator: Atlas, could do the job far more swiftly inside Photoshop. Albeit not for commercial purposes.
Update: I see there’s also what appears to be an easy automated solution over in Adobe After Effects, albeit at a rather high cost. The plugins GEOlayers 2 (mapping) with Trapcode MIR (create 3D meshes in AE) can work together to create maps and terrains, with GEOlayers able to automatically hook into a number of public free mapping tile servers.
Comics addons for Krita 4.x
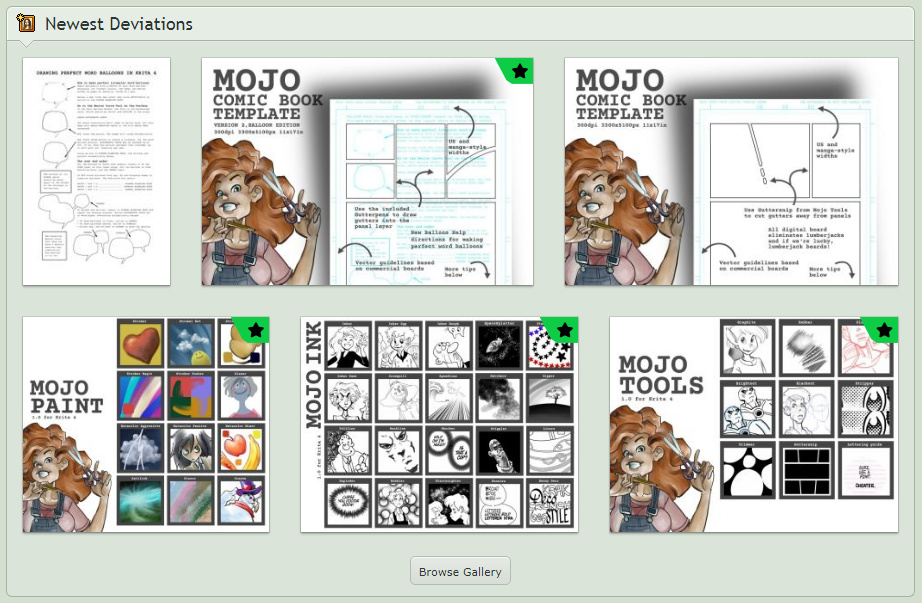
Users of the fine new open source Krita 4.x graphics software may be interested in Ezsaeger’s freebies on DeviantArt. A nice set of ink, ziptone and panels tools for comics makers, even including a panels gutter brush. Also a unique and rather nice stipple brush (I recently went through all the Krita brushes in v4 and v3, one by one, and there’s nothing like it). Despite being branded as “Mojo” they’re all for Krita 4.
These may also be useful for creatives who are looking for a suitable inking and finishing tool for Poser Comic Book renders, but without either… i) the bloat and cost of Photoshop, or ii) the fiddly complexity and cost involved in Clip Studio (Manga Studio). Both of which also have a far higher time-to-learn cost than Krita.
Krita also ships with its own comics tool. This is found under Settings | Dockers | Comics Manager, and can be very tricky to get started the first time. The Manager appears to be asking to load a non-existent .JSON file, but what it actually wants you to do is just to pick a folder to store stuff in. After that huge opening roadblock, using the Manager is fairly straightforward.
FlowScape 1.1
There’s been another update for the new FlowScape real-time landscape software. It’s now at v1.1, having previously added 8k screenshots with v.1.01. Check your purchase page for the giga-tastic update download.
The main changes…
* Castles, Houses, Village Decorations. Scroll-wheel to go through the options to pick a building type. Once placed, “N and M to rotate these at 15 degree increments”.
* Rolling Fog “for that eerie feeling”.
* New vertical rocks “that look great at a larger scale”. (Sounds like cliffs?)
* Terrains can be up to 5 times larger than before.
‘Ctrl Z’ to Undo paint, as well as Backspace.
‘Ctrl C’ then ‘Ctrl V’, to copy/paste.
Tonight – free La Femme webinar for Poser
There’s a free Poser webinar for the new La Femme figure for Poser, the one that gives Poser parity with the features of DAZ Studio’s G8F figure. The webinar starts in three hours time! It’s now 8pm Wednesday in the UK, and 2pm CST in the USA. The webinar starts at 5pm CST in the USA. There are 100 seats so I assume there may be a few tickets left.
I assume it’ll also be edited and posted on YouTube in due course, as the free Poser webinars usually are.
Cartoon Animator 4 – new ‘360’ character-angle features
Reallusion now has a release date for their excellent 2D animation software CrazyTalk Animator. Thankfully there’s no mention of a total UI makeover, and the new features do look rather nice. I’m mostly interested in this software not for animation, but for its potential in rapid 2D comics production.
The re-named Cartoon Animator 4 will be released in April 2019 with…
* Smart IK for character joints.
* a “360 Head Creator”, aka “3D Head Creator”.
* Live performance capture (webcam head/facial mocap for 2D toons).
* Real-time lip-sync, for voice actors -> characters.
Of these, the 3D-ish “360 Head Creator” seems most interesting for static comics production, in terms of differentiating it from what you could do natively in Photoshop…
“Quickly Transform a 2D Face into a 3D Head. 3D Head Creator transforms 2D art into 3D styled characters with up to 360 degree of motion for deeply rich performances. Photoshop round-trip integration for editing multi-angle character in and out of 3D Head Creator.”
So, there’s no 3D object mesh generation from flat 2D ‘line-art and colours’ assets, which would be a theoretical marvel of technology that probably needs AI assistance. If it could be done at all.
Instead it looks more like a pseudo 2.5D, or a bit like what the isometric RPG game-makers do when they use a script to quickly output a series of 2D turn-table renders for subsequent game animation of sprites.
Along with the new feature will come…
“360 animation controls and timeline editing” and “New generation of 360 creative assets”.
It’ll be interesting to see video of it in operation, and discover how laborious the set-up is and how much is automated with a few clicks. And how easily Poser’s Comic Book Preview mode might produce the 2.5D character views needed.
For now, take a look at the new page which explains it all and has screenshots and details.
How to find the tablet version of Anomaly
How to get the digital version of Anomaly (2012), the outstanding graphic novel made with Poser? You won’t find it on the main Amazon, which on the UK and USA versions only lists the galaxy-sized print version — with no link through to the Android app version.
What you need to do instead is to specifically go to Amazon’s Apps and Games store, cringe for a moment at all the cheese on the front page… then you search for “Anomaly”. You hopefully get whisked to this page, although that may depend on what your national version of Amazon wants to do.
Assuming you can get to that page, then a mere 59p ($1 U.S.) gets you this amazing 370-page graphic novel on your 10″ tablet. It works and looks fine on my 2017 Kindle Fire HD 10″. Just be aware it’s rated “mature”, so if you have censor-ware installed then its App Store page may be blocked for you.
Smith Micro, makers of Poser, also has a free one-hour recorded webinar on the making of Anomaly.
Poser to KeyShot without OBJ?
This may interesting some. I was looking at KeyShot again, and spotted a possibly rather easy workflow from Poser Pro to KeyShot, without .OBJ or .FBX files.
FAQ: Which 3D files can I import into KeyShot? [Last Updated – Jan 25, 2019]
* Cinema 4D R18 and prior (.c4d)
So, theoretically… Poser Pro scene > open Poser scene in Cinema 4D via Smith Micro’s PoserFusion plugin > save scene as .C4D > into KeyShot.
Speed of photoreal rendering, and access to the really cool sci-fi and weathering materials from KeyShot Cloud are the main reasons why you might want to do this. Though human skin rendering is probably going to be a bit ‘off’, compared to doing it in Poser. And hair and eyelash transparency-maps may not make it to KeyShot.
Release: KeyShot 8.2
KeyShot 8.2 has just been released. I noticed version 7.0 but only glanced at 8.0. Both had some ‘nice to have’ items in the changelog, but nothing seemed compelling for those outside of certain creative niches (such as new product rendering). But today’s 8.2 release appears to be something more than a simple polish and bugfix…
“There are a lot of improvements in this release, but also some important new features and updates.”
The item which caught my eye was…
“Offline Rendering Pause” … “We’ve added the ability to pause offline rendering at any time, and if you use interior mode you’ll notice improved speed and performance”.
Not that it’s a Blender or iRay-style hog of your system resources, bringing your PC to a grinding halt. In fact, last I looked, it’s both wonderfully fast to render to 4,000px and you can run Photoshop at the same time. But pausing and re-starting partial renders does sound very useful.
Note there’s also a “completely revised and updated KeyShot 8 manual”. It’s fairly simple software that can still be learned in a day, but as it complexifies and less able users get plonked down in front of it, having a manual aligned with the very latest version could be handy.
Winners: Adobe’s ‘From the Moon to Mars’ Challenge
Adobe’s “From the Moon to Mars Challenge Award” has announced its winners. Competitors had to use the Adobe Dimension software, which is Adobe’s catch-up competitor to the excellent KeyShot, to make their entry.
They also had to use 3D stock models from NASA, which were pulled from the free public archive into the Adobe Stock website. I think I like Chris C‘s picture the best, though he only had an Honorable Mention. It has the proper NASA feel to it, despite the unfortunate use of the Space Shuttles.
News of the contest also led me to this dinky little Mars explorer manned vehicle which is free from NASA’s Advanced Concepts Lab’s in .OBJ format with a texture atlas (which means textures can’t be easily replaced with drag-and-drop).
 I’ll make my quickie test-render of the explorer vehicle ‘Creative Commons Attribution – excludes Alamy, Getty and Shutterstock’. Anyone else, please feel free to use it. The three blended backgrounds are public domain from NASA and ESA.
On looking into the comics industry from outside
Some things I learned recently, on reading up about the ‘young adults’ market in comics. As an outsider I might have got ‘the wrong end of the stick’ in places, in what I’ve written below, but that’s the summary set of impressions I had from reading about the industry over a period of a few days.
1. It doesn’t take a genius to work out that ‘young adult’ graphic novels are the current hot ticket in bookshop publishing, along with well-made audiobooks, and have been for some years now. There are many lightweight articles by managers saying this, boosting their job-hopping and consultancy prospects while not giving away any interesting trends or nitty-gritty numbers. But in October 2017 research from Bookscan reported that the 13-29 age group buy 57% of all comics and graphic novels in the USA. If we assume that another 33% is purchases by adults mostly as gifts or gift-subscriptions for under-29s, then that’s about 90% of the market accounted for. There’s a ‘Cambrian explosion’ of innovation and creativity going on in the remaining 10%, which is what gets a small cadre of critics and art-school types very excited, but it appears to be happening in a sliver of the total sales volume. Most of the audience prefers the cute animal stories.
2. There’s likely to be some confusion in publishing statistics, due to ‘middle-childhood’ sales often being conflated with the older ‘young adult’ market. While these two markets offer very culturally specific approaches to storytelling (cheerful exploration and learning about the world vs. nail-biting angst, self-obsession and self-discovery), their sales figures are too often lumped together.
3. This publishing boomlet is riding on the back of the demographic curve of ‘the new baby boom’, as that cohort surfs into and through ‘peak reading’ years. Also ‘peak gifting’, though many gifted books may go unread — I’m sure we all remember that lad from our own childhoods. I mean that ‘non-reading’ boy who had laden bookshelves, having had a stream of the books as gifts over the years, trying to entice him to start reading. But he never read a single one of them and was only interested in sports and girls.
4. Hardback sales dipped sharply in book stores before Christmas 2018, with Publishers Weekly reporting recently… “a 19.7% drop in hardcover sales [in Children/Young Adult] compared to a year ago. Like in the adult segment, e-books had a good month, with sales up 17.3%.” Sounds to me like evidence of a move by the savvy 20% of the market to the new affordable 10″ tablets with excellent screens (the Amazon Kindle Fire HD 10″ etc). Part of this shift, for the adult buyer of YA gift-books, might perhaps be expressed as: “thank god I don’t have to go to that seedy comic shop any more, and neither does little Nigella” or perhaps “our town’s only comics shop has closed down, so it has to be comics on the digital tablet now”. Cost may be a factor too, though currently it seems there’s often not much difference between print and ebook in either prose or comics.
5. Give us a complete story! Most sensible and busy people want a “complete story”, rather than the traditional episodic delivery via floppy pamphlet. They make comics reading and library-building easy. Libraries are also starting to segregate young adult comics by ‘completed’ status. This week the Manhattan Public Library reported it now has three separate areas and spine-labelling, for: imported manga, non-completed episodic comics, and ‘complete in one volume’ comics. Perhaps we need a new industry-wide logo for trade paperback covers: “Approved by the Completed Comics Committee: this really is a complete story, the publisher ain’t trying to fool ya!”
6. Piracy helps collected works. That’s counter-intuitive, I know, but it seems to be true. According to the Comics Journal the only convincing research on the matter suggests that while piracy damages single-issue sales of episodic materials, it actually provides an overall boost to sales of nicely-presented collections of the same material (i.e. collections which offer the reader the complete story and more). At the same time apparently the industry believes that ‘digital only’ is not an economically sustainable model (because… piracy?), yet it’s the direction the U.S. superhero comics seems to be headed toward as their comic shops close. I suspect that Amazon will be very happy to show creators how “digital only” can pay 60% royalties, and Patreon will also have something to say on the matter. Such creators may not be making Batman, but I for one don’t care a fig about Batman or any other superhero in the DC line-up.
7. India has a truly vast and also under-served market of young readers, re: their potential for consuming entertaining story comics. That’s enticing to western publishers, who are facing a future where even a ‘top best-seller’ non-kiddie graphic novel might only sell 20,000 copies. But local industry experts in India suggest their comics readers are predominately conservative and rural. Thus they really don’t ‘get’ the traditional American superhero settings or attitudes. Nor is the nation as a whole very keen on science-fiction, which is still very much seen as an urban and studenty sort of niche thing. For comics, folk-heroes in countryside settings are said to appeal far more. To get that right takes a lot of local and historical knowledge, not to mention enough know-how to avoid triggering local religious sensitivities.
8. The comics publishing industry in France and Belgium is booming, going from producing a mere 700 books a year in the 1990s to over 5,000 books a year in 2018. In France and Belgium the market is now reportedly worth around $780m a year, which is starting to compare favourably with the $1 billion U.S. comics market. But it seems their “BD” comics have a problem in diluted readerships per-title, and also in getting the $ rewards back down to comics-creators (though the latter may just be me hearing the sound of loud gripers, griping) even though they reportedly pay cash advances while writers and artists work on a new book. Yet the American audience may not be much of a way to boost readerships as translated French titles often have a poor ‘fit’ with the American mass market, for a variety of reasons — including ‘awkward’ page-counts, non-translatable humour, and assumption of an audience comfortable with genuinely adult and iconoclastic themes.
9. A general lack of curation and overview for potential readers. While the high-brow newspaper and ‘in-the-know’ industry critics seem happy to hype titles that fit their own niche political sentiments, the bulk of the audience is often left wondering where they even make a start among the hundreds of titles which appear each month. There is a wealth of great material being released, including for adults and in complete-story trade paperbacks, but how to find out about it? Periodically checking the new comics projects on Kickstarter is not a substitute. Taste-matching algorithms are often worse than useless, even on Amazon. The blog-a-zines seem to cover either i) all of the weekly tidal-wave of new superheroes titles, ii) or titles that suit their own far-left political tastes, or iii) or a handful of obscure art-school titles and similar ‘underground’ reprints. With nothing in between. I know this is a problem I’ve personally encountered in terms of finding completed science-fiction graphic novels suitable for adults, as a catch-up on the output of the last couple of years. It took a long time to find them, and I’m an expert Web searcher. And even then, I’m still finding titles I didn’t find on the first very intensive search.
10. The success of the superhero movies don’t appear to be translating into booming sales of the same heroes in their ongoing serial comics. Possibly because (so I’m told) Thor on the screen is no longer the Thor in the comic, with both the hero and storylines having been changed radically to try to appeal to new demographics. And neither are the same as Thor in 1973. Looking at the comics themselves, it’s quite evident to me that quality has gone down (since the 1970s and 80s) as the number of titles has increased, which is another drawback. While the 50-something guy whose only superpower is a bulging wallet will still buy the collected hardback reprints of the 1970s stuff, for now, it seems he no longer walks out of the comics shop each week with $100 of monthly comics in his bag. As a result mainstream superhero comics and their comics shops appear to be lurching from crisis to crisis, hoping that some big new dedicated readership will suddenly emerge and save them. While certain 11-14 year-olds in niche audiences may feel very flattered that they are being so assiduously courted by current comics publishers, it seems doubtful they’ll mature into a huge rolling cohort of paying readers/collectors of monthly serialized 24-page comics. Meanwhile, the stores are slammed with rising rents, labour costs, and energy costs.
In the debate I also noticed the apparent absence of people talking about…
i) the impact of Amazon ebooks and Amazon’s low-cost 10″ Fire digital tablets with excellent screens. It makes a huge difference to me that since Nov 2017 I can get an affordable £120 tablet with a really great 10″ screen, and I’m sure it’s also impacted many others. In fact it’s the key thing that has drawn me back to comics. You wouldn’t know it from the media coverage of comics, even in the trade press, but apparently the digital-only webtoons.com is the world’s largest comics publisher by audience.
ii) behind the scenes, the ways that comics makers are speeding up the production process with digital, 3D-to-2D and software automation. People seem reluctant to let go of the idea that a good comic must appear in print, and like to imagine that all production still takes place on wooden drawing-boards with dip-pens and white-out.
Ok, there you go. Tell me where I got it wrong or misunderstood, please.


