• Directory
  • FAQ: about JURN
  • Group tests
  • Guide to academic search
  • JURN’s donationware
  • Links
  • openEco: titles indexed

News from JURN

~ search tool for open access content

News from JURN

Category Archives: JURN tips and tricks

How to get pretty buttons on your Google CSE results

12 Sunday Jul 2020

Posted by futurilla in JURN tips and tricks

≈ Leave a comment

How to get pretty buttons on the bottom of your Google CSE results.

1. You want this…

Instead of this…

Ok, so not that much prettier, but bigger. You can work on the styling once you know how to do the basics.

2. First set button and letter/edge colours to match your site/page. You do that here in the CSE Dashboard…

Save.

3. Then add this CSS code into your HTML page header, or your blog theme’s ‘custom CSS’ panel.

4. Save, refresh the page, test. Tell your users they don’t have to squint any more.

VLC Playlist Edit Maker 1.0

27 Saturday Jun 2020

Posted by futurilla in JURN tips and tricks

≈ 3 Comments

I’ve made an Excel spreadsheet that automatically does the calculations required for making a VLC player ‘playlist edit’ of an .MP3 file. By inputting timings and then copying out the columns in light blue, one gets a nearly-made playlist that uses the required ‘elapsed seconds’ format and will only play specific sections of the target media file. See my earlier post for a full discussion on this unique feature of VLC.

Download: timecode_to_seconds_for_vlc_playlist_edit

I’ve assumed here that you have an 80 minute podcast you want to listen to repeatedly. You want to cut the first eight minutes of intro, and also cut two later sections and the final outro. Theoretically it should also work for the ‘virtual editing’ of a video file. No hefty video-editing workstation required!

Useful extra tip: On the keyboard, Ctrl + T gets you the current time on the VLC playback, in the format: 00H:38m:27s. This can be easily copied to the clipboard, and (with a little trimming) into my spreadsheet. So far as I can tell it can’t be made into a paste-friendlier: 00:38:27.

How to ‘edit’ an audio file using only timecodes and playlist

27 Saturday Jun 2020

Posted by futurilla in JURN tips and tricks

≈ 1 Comment

I’m amazed that there’s no easy way to skip across precise multiple sections of an audio file, when playing back in a laptop/desktop audio player. And to then have one’s choices of sections ‘stick’.

For example, I have a 56 minute audio track, downloaded as an .MP3. I am going to listen to this repeatedly, on a loop, and on playback I wish to always skip minutes 0:00 to 9:30, and then 15:30 to 26:00. The player should save my choices and then ‘always skip these sections, whenever I play this file’ locally.

As far as I can see the only options for doing this on a Windows desktop are…

a) actual editing of the audio file in a good audio editor such as Audacity or similar. But an MP3 can take an age to load and then to save out, when dealing with a 50-60 minute track. At a half-hour to laboriously load and process each one, that’s a whole day wasted if you have an album or long audiobook to to process. And if you’re not savvy about export settings, you can also compromise audio quality on export. The clumsy may also risk overwriting the original file.

b) it can be done via a hand-coded workaround that makes a VLC Player playlist. Not ideal, but it seems to be the best current solution and VLC is safe and well supported. It’s relatively quick and wholly non-destructive of the original files.

The simplest form of use for this is…

1. First preview your audio file and make a note of the various ‘in’ and ‘out’ points, giving you a list of just the segments you want played. For example…

PLAY 09:31 – 15:29
PLAY 26:01 – 56:30

2. Then open Windows Notepad and copy the starter template…

#EXTVLCOPT:start-time=1550
#EXTVLCOPT:stop-time= 2611
Acquired Ears.mp3

#EXTVLCOPT:start-time=2890
#EXTVLCOPT:stop-time=3803
Acquired Ears.mp3

The numbers here are the time in seconds elapsed since the start of the audio file. start-time and stop-time should be self-explanatory.

3. Now use the Time Code to Seconds Web page to translate your own noted times to seconds, seconds being the only measure that VLC Player can handle. Most crude online converters only deal in pure seconds. The one linked above can cope with proper audio-player values, such as 26:33. There appears to be no way to do this inside VLC.* A local desktop option for this is the simple Windows freeware Time Converter 1.0. It gives you milliseconds and to get seconds from that you just lop off three zeros…

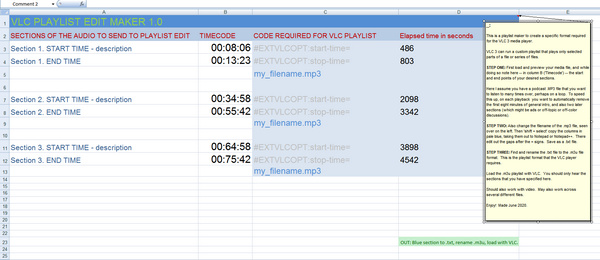
Update: I made a better solution, a VLC Playlist Edit Maker 1.0 Excel spreadsheet.

Obviously you also paste in your own file name(s). Blank spaces in the filename don’t phase VLC player.

As you can see you can have multiple sections of the file listed for playback. It appears that each selection/section/segment must follow after the last such, though it might be possible to skip back and forth across the file. It also appears you can also skip between audio files and generally create quite a complex playback mix. Try such things and see. But for the purposes of this tutorial, all that’s needed is a stepped sequence of playback across one file.

4. Once done, you save it out as a .txt file. Then rename this file so it’s a .m3u playlist. The playlist must then be located in the same folder as the audio file(s).

VLC can loop the playback of such a playlist. Video subtitles are said to play nicely with the ‘playlist edited’ playback.

This saved .m3u playlist only seems to work as intended in VLC Player, not in AIMP or other players that also know about .m3u playlists.

Apparently this also works for video, thus potentially easily enabling the lightweight distribution of ‘edited’ or ‘abridged’ versions of video/audio files, along with the actual files themselves. This relieves a potential editor of the need to wrestle with actual editing and re-encoding of the raw file, in a video editor or audio editor. Which, as anyone who has tried it knows, is a pain is the arts.

Now… if only VLC could also fix its broken “Continue playback” feature, which has never worked for me on a desktop across multiple versions — despite all the right switches being set in Preferences | Interface. The only solution I know of is to specifically call the target playlist from the Windows shortcut, by editing it thus…

“C:\Program Files\VideoLAN\VLC\vlc.exe” C:\Users\Music\playlist.m3u

Then, clicking on the resulting shortcut to launch VLC also automatically launches the target playlist. If it’s a playlist configured as above, it will play as it should and loop as normal. It still won’t automatically start at the point you left off listening when you closed VLC, but it’s better than nothing. AIMP, in contrast, handles such things perfectly and with no problem or setup at all.


Anyway, one can see the uses of such special playlists, for instance for reducing fiddliness when using video in the classroom. Or for offering just the ‘edited highlights’ of a long three-hour podcast without actually going to the trouble of editing it in Audacity. Or for creating a quick ‘cleaned’ version of media for viewing with young children. There may be some paid ‘subscriber value’ in offering such ‘playist edits’ to Patreon patrons etc, or as a ‘mailing-list special feature’.

Indeed, there’s potential for a desktop freeware / Web site combo which makes the above process as easy as possible, and then allows the social sharing of ‘playlist edit’ .m3u files, in much the same way as subtitles are already shared. Perhaps the ability to upload the user’s final edit would be contingent on summarising what was in the excluded bits, and having labelled the file correctly (e.g. ‘this section of the music appears to feature a yodelling camel’, and ‘music edit, to skip unwanted singing’).


* VLC Player also has the addons ‘Jump to Time’ (doesn’t appear to show seconds in any useful way for this purpose), and ‘Time 3.2’ (impenetrable interface, and even when finally wrestled into supposedly working it shows no seconds count anywhere in the UI). There appears to be no other ways of showing elapsed seconds / milliseconds inside VLC 3 via a plugin, though “Crtl + T” will grab it during playback. One final option is the VLC 4.0.0 alpha (most people are on the 3.0.1 stable version). This has SMPTE timestamps, SMPTE being industry-standard timecodes apparently including milliseconds. But the 4.0 .MSI and .EXE refused to install for me, and the .ZIP install just gave a black UI. You may have better luck with it in future.

How to auto-correct curved book pages in 2020

14 Sunday Jun 2020

Posted by futurilla in JURN tips and tricks

≈ 3 Comments

What you found pictured by an eBay seller:

What you want from it:

Ah, if only there were software that can do that… automatically. As a first step, what software can auto-correct curved book pages, of the sort one might be allowed to hastily photograph from a rare book page in a library, or perhaps in the form of a seller’s preview picture on eBay? Of course, I imagine there are now abundant mobile-phone solutions for naughty page-grabbers in book-stores, but what about for scholars on desktop Windows?

It used to be that Snapster 2.0, aka Snapster ICE, could do this via manually placing control-points along the curvature of the pages edges. But that software is now utterly unavailable except as an old 15 day trial which can no longer be unlocked. There’s also an equally finickerty free script for the free Paint.NET, which involves manually laying down two curves — and which I could not get to work at all. Tests show that neither the fine £45 DxO Viewpoint (mostly for architectural photographers) nor its free equivalent ShiftN can do exactly this (though if you have the page fairly straight, they’ll help get everything on it exactly straight). Nor can Photoshop do such auto-correct, rather amazingly, or at least there’s no mention of the capability or any tutorial in how to find and use the relevant tools.

But… there is a solution, and it’s free and relatively easy. You can have it done automatically by a special edition of the Windows freeware called Scan Tailor. No, not the normal/current Scan Tailor, but rather Scan Tailor Experimental 2015, which was a ‘special edition’ produced as a farewell present just before the original maker of Scan Tailor left the project for paid work. His experimental version includes automatic de-curving of book pages, of the sort found in some dedicated software that ships with scanners.

It seems best to first place your target picture(s) in a separate folder and then load up and output one a time, unless they all have the same orientation and distortion. Scan Tailor is obviously meant to run in batch across a lot of nearly-identical book pages. But it works fine and quickly on single images in Windows 8, and even auto-saves the results as a .TIF file.

Automatic isn’t totally perfect, as you can see in the lower-right. It’s a bit ‘off’ there. But even accepting automatic, the results are quite usable…

Automatic does need some edge-contrast to work with. A low-light eBay photo of a book page against a beige carpet will prevent auto from working, and you’ll have to place control-points manually.

As for the colourisation… still not quite automatic as yet, but there are tools that will help you halfway. Then you need to break out the desat and colourising brushes. Good up-rezing can also be done now, but with a fuzzed antique picture like this at 800px the results are not going to be worth having. What can be had from the eBay picture is good enough for a local history website or blog.

If your boss needs current supported software for photographing books on a tight budget, then the $33 Booksorber appears to do much the same thing, with automatic thumb/finger removal. You’ll need a digital SLR camera (ideally one that can also operate from mains electricity as well as easily-expired batteries), release cable, a tripod, and a bright builder-man lamp from the local DIY store.

New editor UI for free WordPress users

06 Saturday Jun 2020

Posted by futurilla in JURN tips and tricks, Spotted in the news

≈ Leave a comment

The new fancy editor UI has landed for free WordPress users. Yes, they’ve given it a radical makeover, again. Thankfully I haven’t even needed to look at it, nor the one it replaces, as the trusty old editor is still chugging away — if you know how to get to it. To use the very old ‘original’ one, you simply install the vital UserScript WordPress.com edit post redirects. Every time you press ‘Write’ to start a new post, you go to the lightweight interface you’re familiar with.

It is a little too lightweight in just one respect. You will not get a button to add a ‘center’ code on the old editor UI, which you do on the fancy one. This can be replaced by a right-click browser addon such as ‘Paste email‘ which you set up to paste…

No need to add the end p tag. Here there are also Italics tags. I’m assuming you want a centred picture-title, in italics to clearly distinguish it from the body text.

Note that you will need to switch to the new UI in order to successfully download a .ZIP backup of your blog. You can go through the motions on the old UI, but you’ll not get the .ZIP file.

How to print a list of what’s in a Windows folder

30 Saturday May 2020

Posted by futurilla in JURN tips and tricks

≈ Leave a comment

How to print a list of what’s in a Windows folder. No need to wrestle with the Command prompt or Outlook. It can be done with most Web browsers…

1. Open a Web browser (not Internet Explorer). Highlight your folder, and drag it to the browser’s Address Bar (not onto the page itself).

2. The folder structure will then display as a Web page. Copy and paste to the clipboard.

3. If, for some reason, you can copy everything except the actual file-names, then simply print the page to a PDF. Copy-paste them from the PDF.

There is also a Windows freeware option called DirPrintOK. This looks fiendishly complex when you open it up. But it’s actually just working much like any normal Windows Explorer replacement, except it has a handy export option up in its top left corner…

This can save the list of a folder/directory’s files out to a .CSV file, as well as to plain text. Thus, this is the option to choose when you have a huge folder, and you want to divide the file-names from the datestamps and file-size information.

WordPress2Doc – a free ebook converter for free WordPress.com blogs

13 Wednesday May 2020

Posted by futurilla in JURN tips and tricks

≈ 1 Comment

Hurrah, there is freeware to get a free WordPress site to Word as a .DOCX file, and thence to an ebook. Only the one, and hardly known to search-engines, but it’s for Windows and it works. WordPress2Doc comes from Germany and was last updated by the author, Raffael Herrmann, in December 2017. The source code for WordPress2Doc is on Github.

It has some nice features…

* Select only certain posts from your exported .XML feed.

* There’s a post preview, over in a side-panel.

* Images are called and embedded (so long as the source WordPress blog is public, presumably).

* Images are correctly sized for the page (if you just copy-paste straight into Word from your blog post, they’re not).

* The blog’s pages are also exported and can be selected, as well as the posts.

* You can also save straight to a PDF, as well as Word.

* Can save each post as named Word .DOCX file.

There’s a PDF Help guide in the download, but there’s also a good Help video at YouTube. But it’s very simple and easy to use. Once you have your Word file, it’s then relatively easy to save to an ebook.

If you’re still using the old WordPress UI, then you may want my guide to how to export your site as an .XML export. Because using the old interface won’t get you a viable export. Incidentally, it seems WordPress are now chunking the .XML export of large blogs. I had two .XMLs in the backup .ZIP, for my medium-sized test blog.

The only bother for an ebook maker will be re-ordering into themed sections or chapters without a whole lot of tedious select-copy-paste, and WordPress2Doc can’t help even partly with that as it lacks tag-support and list re-ordering before saving the .DOCX file. The best way to tackle the problem is probably to export in themed batches, one per intended chapter or section, though that would entail making ten passes of what might be 4,000 posts. Which is not ideal. But it looks to me like WordPress2Doc works best with smaller blogs anyway.

But note that WordPress can export posts to .XML by category, at least. Also, WordPress2Doc can save multiple selected posts as ‘one file per-post’. You could then sort into chapter folders by dragging and dropping, and then use a Word joiner to join them together.


Update: I don’t like the over-compression of images with this method, and some of the text formatting is also lost. I’m coming to the conclusion that one would ideally tag posts with the category “ebook-ch1”, “ebook-ch2” etc in the blog itself, then view that category, then copy-paste the page(s) into (Libre Office) LibreOffice Writer. Unlike Word, this retains formatting, including italics and indented quotes, and also retains picture quality. In almost all cases the pictures are scaled correctly to the page width, which they’re not when using Word to do the same thing. Small pictures such as icons are not scaled. Word cannot do this, even with a macro.

This all assumes, however, that you still have a live blog with its CSS, and not just the .XML export files.

CSS and desist

11 Monday May 2020

Posted by futurilla in JURN tips and tricks

≈ 1 Comment

Ever wonder what a Web page would look like if just the plain HTML were shown, as if it were 1996 again? Ah, but which HTML? There are actually two forms of HTML that reach your browser, and there can be quite a disparity between these two types.

The first is what you see after the raw HTML has been pummelled about by CSS and javascript and the browser’s interpretation. This is often referred to as the ‘DOM’ HTML. This code is what you see and navigate through if you ‘Inspect element’ in your browser, or if you block an element with uBlock’s Element Picker tool.

The second type is the HTML code that gets sent to the browser in the first place, and that original is kept pristine and effectively ‘under’ the Web page. It can be seen via: right-click on page / ‘View source’. This source can then be selected and copied with a Ctrl + A / Ctrl + C keyboard command. Or it can be saved out when you ‘Save page as…’ / ‘Save as HTML only’, and from there you can re-open the saved page in the browser. Some remote CSS, javascript and images may still be called, even then.

A quicker way to ‘see’ this original without its CSS and other ‘remote-code’ flibbertigibbets is to install the add-on disable-HTML in your browser…

The addon is quite simple to use, and though old still works fine. It was somewhat mis-named, as it can robustly block everything except the HTML of the actual ‘page source’. With CSS and javascript blocked, it appears to be blocking the DOM version of the HTML from emerging from the page source. So what you see displayed, on page re-load, is effectively the page source. As such it can be quite handy for the removal of some types of especially tough and obstreperous CSS-and-javascript -driven overlays, in a situation where you don’t much care about the fancy wrapping and just want the words in a readable and/or copy-able form. Such as on the vile overlays of the unherd.com site.

Regex 2020

11 Monday May 2020

Posted by futurilla in JURN tips and tricks

≈ Leave a comment

I’ve expanded my free PDF file, “Some useful regex commands for Notepad++”, which had been released here in May 2019. Here’s the new one…


Update: now updated again My Little Regex Cookbook, for Notepad++ (September 2020).

.JSON to .CSV with Windows freeware

02 Saturday May 2020

Posted by futurilla in JURN tips and tricks

≈ Leave a comment

Situation: You need to cleanly extract just the usernames from a .JSON file, and place each name on a new line. The result should look like…

name1
name2
name3

The value being extracted from the JSON could just as easily be email addresses, or map co-ordinates, or suchlike.

Why you might do this: You can’t just do a simple “.JSON out, .JSON in”. For instance, let’s say you have a Web browser add-on that offers a blocklist function based on usernames. Perhaps it’s the deviantART-Filter. You want to port this 1,600 name blocklist of scum-and-villainy over to a similar browser add-on. Perhaps it’s the dA_ignore UserScript. The old deviantART-Filter usefully exports a .JSON file of your blocked users. But…. the new dA_ignore can only import a pasted-in list of usernames, one per line.

Solution 1:

There is a working Regex for doing this, which only requires a recent copy of Notepad++ and a suitable .JSON file for the process…

It’s been tested and works. The use of the * wildcard will enable the extraction of a list in the form…

path_label”:”any_value_here

After this regex has processed the code you are thus left with a list that looks like…

username”:”name1
username”:”name2
username”:”name3

… and you need only to do a basic search/replace to clear username”:” to obtained your cleaned list of the various unique usernames.

In this use-case you go to your own DeviantArt Settings page, and paste in the new ported-over blocklist.


Solution 2:

1. Open the .JSON with the genuine Windows freeware JSONedit.

2. Filter the JSON on field “username” by typing username into the search box. In ‘List view’ you should now only see a list of the “username” fields and the adjacent data entry.

3. Then go: top menu | ‘Tools’ | ‘Export as .CSV’.

4. Add a file extension .CSV to the saved file if needed, and then open it with Excel. Select and copy out all the “usernames” column to a new Notepad++ file.

5. In Notepad++, a quick search-replace will then remove the “” marks. You now have a clean portable list, with one username per line.


Solution 3:

There are, of course, cloud services in Whereizitagain that may well offer to do this. But the above methods use Windows freeware and are thus more secure.

← Older posts
Newer posts →
RSS Feed: Subscribe


Please become my patron at www.patreon.com/davehaden to help JURN survive and thrive.

JURN

  • JURN : directory of ejournals
  • JURN : main search-engine
  • JURN : openEco directory
  • JURN : repository search
  • Categories

    • Academic search
    • Ecology additions
    • Economics of Open Access
    • How to improve academic search
    • JURN blogged
    • JURN metrics
    • JURN tips and tricks
    • JURN's Google watch
    • My general observations
    • New media journal articles
    • New titles added to JURN
    • Official and think-tank reports
    • Ooops!
    • Open Access publishing
    • Spotted in the news
    • Uncategorized

    Archives

    • February 2026
    • January 2026
    • October 2025
    • May 2025
    • April 2025
    • September 2024
    • June 2024
    • May 2024
    • April 2024
    • March 2024
    • February 2024
    • January 2024
    • December 2023
    • November 2023
    • October 2023
    • September 2023
    • June 2023
    • May 2023
    • January 2023
    • December 2022
    • November 2022
    • October 2021
    • September 2021
    • August 2021
    • July 2021
    • June 2021
    • May 2021
    • April 2021
    • March 2021
    • February 2021
    • January 2021
    • December 2020
    • November 2020
    • October 2020
    • September 2020
    • August 2020
    • July 2020
    • June 2020
    • May 2020
    • April 2020
    • March 2020
    • February 2020
    • January 2020
    • December 2019
    • November 2019
    • October 2019
    • September 2019
    • August 2019
    • July 2019
    • June 2019
    • May 2019
    • April 2019
    • March 2019
    • February 2019
    • January 2019
    • December 2018
    • November 2018
    • October 2018
    • September 2018
    • August 2018
    • July 2018
    • June 2018
    • May 2018
    • April 2018
    • March 2018
    • February 2018
    • January 2018
    • December 2017
    • November 2017
    • October 2017
    • September 2017
    • August 2017
    • July 2017
    • June 2017
    • May 2017
    • April 2017
    • March 2017
    • February 2017
    • January 2017
    • December 2016
    • November 2016
    • October 2016
    • September 2016
    • August 2016
    • July 2016
    • June 2016
    • May 2016
    • April 2016
    • March 2016
    • February 2016
    • January 2016
    • December 2015
    • November 2015
    • October 2015
    • September 2015
    • August 2015
    • July 2015
    • June 2015
    • May 2015
    • April 2015
    • March 2015
    • February 2015
    • January 2015
    • December 2014
    • November 2014
    • October 2014
    • September 2014
    • August 2014
    • July 2014
    • June 2014
    • May 2014
    • April 2014
    • March 2014
    • February 2014
    • January 2014
    • December 2013
    • November 2013
    • October 2013
    • September 2013
    • August 2013
    • July 2013
    • June 2013
    • May 2013
    • April 2013
    • March 2013
    • February 2013
    • January 2013
    • December 2012
    • November 2012
    • October 2012
    • September 2012
    • August 2012
    • June 2012
    • May 2012
    • April 2012
    • March 2012
    • February 2012
    • January 2012
    • December 2011
    • November 2011
    • October 2011
    • September 2011
    • August 2011
    • July 2011
    • June 2011
    • May 2011
    • April 2011
    • March 2011
    • February 2011
    • January 2011
    • December 2010
    • November 2010
    • October 2010
    • September 2010
    • August 2010
    • July 2010
    • June 2010
    • May 2010
    • April 2010
    • March 2010
    • February 2010
    • January 2010
    • December 2009
    • November 2009
    • October 2009
    • September 2009
    • August 2009
    • July 2009
    • June 2009
    • May 2009
    • April 2009
    • March 2009
    • February 2009

    Proudly powered by WordPress Theme: Chateau by Ignacio Ricci.