• Directory
  • FAQ: about JURN
  • Group tests
  • Guide to academic search
  • JURN’s donationware
  • Links
  • openEco: titles indexed

News from JURN

~ search tool for open access content

News from JURN

Category Archives: JURN tips and tricks

How to wrap indented quotes in Word

10 Wednesday Apr 2019

Posted by futurilla in JURN tips and tricks

≈ Leave a comment

Word Cleaner 7.x is the best desktop option for sending an old book from a Word file to genuinely clean Amazon ebook-ready HTML, via its standard template “Convert to HTML and remove formatting”. It retains linked and anchored footnotes, bold, italics etc. Two simple tweaks on this cleaning template can also convert all accents and symbols like © to HTML code entities, and also do the same for the quote marks, —’s and apostrophes. For a minute of work, you’re 90% of the way to an ebook that will validate when uploaded to the Amazon ebook system.

But there’s a big drawback. It can’t retain the indented paragraphs, of the type you used to add your scholarly quotes in Microsoft Word. What you want, then, before you export is to add some nice HTML blockquote tags on your quotes…

These tags will survive passing through the Word Cleaner template, and will display the text as an indented quote in your cleanly-coded HTML ebook.

Are you going to go through and add those tags to 300+ quotes, by hand? No, you’re going to have Word to do it for you. Without fiddling around with macros.


WORKFLOW:

Scenario: you used the Indent paragraph button to add the quotes in your scholarly book, and thus have all quotes indented by 0.5.

1. Alt + H to open the Search/Replace box. Click on “More” button in bottom-left of the box.

2. Place cursor into “Find what” box. Click “More” to open up the lower half of this box. Then click the “Format” button in the bottom-left.

3. Dial the Indentation up to 0.5 (or whatever you have it set to)…

4. Exit the Format | Find Paragraph panels and then place your mouse cursor into the “Replace With” box. Type in your blockquote tag. Run the search and replace.

5. Return both Search/Replace boxes to their default, by clicking “No formatting” on each.

6. Now you do this wildcard search-and-append, adding the required ending tag to any paragraphs that contain the word “blockquote”.

To work, this needs you to have ticked “Use wildcards”…

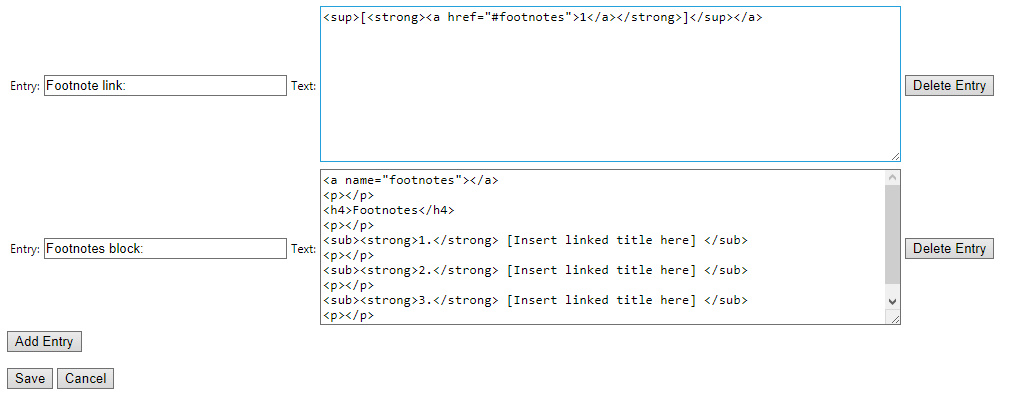
Once there’s a recurring unique word in the quote paragraphs, then Word can hook onto that to add the closing tag to the end of each such paragraph. The tag is added after any footnote-number at the end of the quote, if there is one.

Completing this process will have also tagged… i) indented paragraphs quotes that do not begin with ” and… ii) multiple-paragraph indented quotations and most indented lists, poetry etc. That would not have been the case had we just tagged all paragraphs starting with a “.

You should end up with this…

Note that if you have such indents in the footnotes as well, then you’ll also need to run these two there as well. You may still have some numbered lists or poems that will require search for a ^t tab or a different indentation of other than 0.5.

Finally, remove your drop caps at the start of each chapter, and then save the Word .doc, and load it to Word Cleaner 7.x. This really is the best and easiest desktop option, based on my day of intensive searching and testing in 2019. But if you really need desktop freeware then HTML Cleaner 1.02 is a Windows GUI freeware that is genuinely free, and though difficult to use is quite powerful and has a Help file. You may also want to test a half-dozen free online services, though you may find they choke on a huge 400-page book with indented quotes and footnotes, and that they may be aimed at accurate replication-in-HTML rather than tag stripping and cleaning for Kindle ebooks.

How to get an old Quicktime QTVR onto Facebook 360

07 Sunday Apr 2019

Posted by futurilla in JURN tips and tricks

≈ 1 Comment

Curators and archivists may sometimes come across the once-popular Quicktime format known as QTVR. Possibly as abandonware, or under a permissive licence, or freely released by the maker. The format offered a 360-degree picture in an immersive viewer and Web plugin. The equivalent experience today is ‘Google StreetView’ or ‘Facebook 360 pictures’, but with a genuine 360-degree view, able to look right up into the sky and right down at the ground under your virtual feet.

The defunct QuickTime is no longer a viable install due to major security risks. Yet it was once widely used. Not only for point-and-click CD-ROM games (Myst etc) and as output from 3D landscape software such as MojoWorld, but also for virtual tours of heritage sites. Some historians of the digital may thus have archives of this type of image that they now wish to convert to display as a 360 VR ‘bubble picture’ on Facebook / WordPress, or in HTML5. Videogame environments can also be captured and ported this way, enabling a better understand of an old videogame environment than is possible by simple screenshots. In the image(s) above you see a Half-life 2 videogame level.

I’m always keen to find ways to keep old media alive, especially if it has a permissive licence such as Creative Commons, and so this post is a quickstart on the practicalities of conversion.

QTVR is likely to be encountered in one of two formats. The six 90° × 90° still source images that form the sides of the viewing cube, or these same images compiled into a single .MOV Quicktime movie for display in the Quicktime Player.

.MOV format:

The $32 conversion utility Bixorama can import and convert the .MOV file, and output to a universal HTML5 viewer or other panorama formats.

6 x cube images:

My first thought was simple freeware utilities, but there don’t seem to be any that have a Windows GUI.

Next I thought to use my install of the panorama-assembler PTGui ($115). But I found my trusty and venerable old version of PTGui was a little too venerable, and thus could not handle a set of QTVR tiles. I then learned that PTGui only added support for QTVR tile import from version 8.2. But it was not until the recent 11.0 version that this workflow became easy and streamlined, and only in 11.2 (June 2018) that a major bug with this same workflow was fixed. Thus, if you don’t need the nice authoring tools of Pano2VR (see below), then using the latest PTGui 11.2 might save you $50.

However, today the easiest and slickest tool I found that could easily stitch the six cube images was the $170 Pano2VR 6.0. This is a full-fledged ‘virtual tour maker’ aimed at institutions, tourism businesses and real-estate, and as such it’s quite friendly and easy-to-use despite its obvious power. It can add clickable hot-spots and basically seems to be able to do what the old QuickTime Pro authoring tool could do.

Load the six image tiles via Pano2VR’s ‘Input’ button | ‘Cube Faces’ panel. You just link up each of the six cube tiles until a seamless 360 VR bubble panorama is created over in Pano2VR’s real-time previewer.

Then you export to either: i) the Pano2VR HTML5 viewer (requires a secure server to host); or ii) use the ‘QuickShare’ button (top right of the user interface) to get a Facebook 360-friendly image for upload. That remaps the assembled cube to a standard panorama projection and pops out a single .JPG image.

To Facebook 360: You then simply upload this .JPG to Facebook like any other picture. Facebook will recognise that the image is a panorama and needs to be shown inside a 360 VR bubble, without any need for special metadata. Note that Facebook tends to desaturate colour in pictures by about 10%, so you may want to boost the saturation before you upload.

To WordPress.com: WordPress.com free blogs now support embedding 360° VR pictures via a simple shortcode and a rather clunky viewer. But note you must host the image externally, and it can’t be called from the Media Library of the blog. WordPress.com’s Media Library often has difficulties with huge image uploads, and so presumably WordPress prefers not to encourage people to wrestle with uploading huge 30Mb panoramas. I’m uncertain if moving from free to paid would unlock this shortcode to support images in your Media Library.

To a WordPress based self-hosted blog, on your own webspace: Such blogs seem to have the above-mentioned shortcode functionality disabled. Apparently a security fix for WordPress knocked out a lot of shortcodes, a while back. Instead I chose to install the free plugin DImage 360. This is not over-complicated, yet does have the very nice feature of allowing visitors to ‘zoom-in’ as well as ‘pan around’ your panorama. Its embed code is as a simple as the official WordPress shortcode, and the source image can be hosted in your blog’s Media Library.


Ok, I hope that’s helpful, in terms of saving time for those tasked with converting old QTVR to a format we can view today.

A footnotes-insert system for free WordPress.com blogs

18 Monday Mar 2019

Posted by futurilla in JURN tips and tricks

≈ Leave a comment

How to rig a simple footnotes-insert system for your free WordPress.com blog

Situation: A free WordPress.com blog does not provide the tools to footnote your blog posts. There appears to be no Web browser add-on or UserScript dedicated to this task.

Solution: This can be partly solved with two free add-on assistants for your Web browser, and some simple HTML page code.

This solution assumes you are writing your blog posts with HTML code visible and editable. It has not been tested with other types of blog editing. For free WordPress blogs this means using the unofficial Redirect to Classic Editor script. For self-hosted WordPress blogs on purchased webspace this means using the official Classic Editor plugin (but if you’re on a self-hosted blog then you already have a wealth of footnote plugins you can use).

All this is only a temporary lash-up for free users, and hopefully in future either i) the free blogs at WordPress.com will implement footnotes on the post editor, or ii) someone will code a nifty injecting UserScript that makes footnoting a seamless feature of the editor on free WordPress.com blogs.


1. Install Rich Copy URL or similar, to easily copy to the clipboard the current Web URL with title, inside a formatted HTML link.

2. Install Paste Email. This adds user defined snippets of text to your right-mouse click, when the user is typing into any form on a Web page. These text snippets don’t have to be just an email address, and the add-on can also cope with multi-line formatting.

Then, in the Paste Email addon settings, you set up the following HTML snippets…

For a short blog post with three or four simple footnotes, these two snippets can be easily invoked with a right-click and placed in the post, enabling you to quickly set up the post for footnoting with only very minimal editing of code (you change three numbers, basically).

When your reader clicks on any numbered footnote link, all such body links will jump the reader down to the top of the footnotes block. As this is only a blog post and there are only a few footnotes, this saves the writer time — we don’t need to fiddle with code that sends each footnote link precisely to its footnote number. We also expect the reader to reflexively know how to go “Back” to the point in the text from which they just departed, without needing a HTML-coded “Back” link placed at the top of the footnotes block.

Thus all that the writer needs to adjust in a post is: i) the sequential number on the footnote link placed into the body text; and ii) each link and title needs to be inserted into the footnote block (and the Rich Copy URL addon helps enormously with that, meaning that no manual coding of the the link needs to be done). The writer can of course hard link words in the text as normal.

You may need to tweak the Web URL link title, as many Web page titles add extraneous items to the title. For instance, this blog post form has a captured title of “Edit Post ‹ News from JURN — WordPress” and you might want to make it more understandable to the reader by changing it to “Edit Post form at ‘News from JURN'”.

Of course, you can also tweak the formatting of the above HTML snippets. For instance by making footnote numbers stand out more by forcing a red colour rather than bold styling. If you object to my old-school HTML code then it’s easily tweaked into some shiny modern format. I welcome any necessary cross-browser corrections in the comments on this post. I’d also welcome knowing how to form a plain HTML-coded ‘Back’ link that takes one to the last-clicked anchor within the page (rather than to the last page in the browser history, or to a specific named anchor).

The lines are not really needed with WordPress but they make the code more compatible with the free blogs at Blogger.


Demo insert:

… this text is footnoted [1]


Footnotes

1. [Insert linked title here]

2. [Insert linked title here]

3. [Insert linked title here]

4. [Insert linked title here]

How to bulk-import your YouTube subscriptions into your RSS feedreader

11 Monday Mar 2019

Posted by futurilla in JURN tips and tricks

≈ 2 Comments

Update: October 2020. YouTube broke this. See the foot of the post for my new solution.


How to bulk-import your YouTube channel subscriptions to your desktop RSS feedreader:

1. Open your RSS reader (e.g. FeedDemon) and make a new folder to hold your YouTube subscription feeds.

2. Now go to a place on the Web you probably had no idea existed, the YouTube Subscription Manager page. This page appears to be impossible to find via links from the main Subscriptions – YouTube page.

3. Scroll down to the bottom of this Subscription Manager page, and there find the “Export Subscriptions” button. This will save out a single .XML file containing all your subscriptions.

4. Load your desktop RSS feedreader software, and Import. If you have no XML import option choose OPML…

On seeking the file, the software will likely let you switch to .XML format.

5. Import, and when asked what folder to save the feeds to, choose the new “My YouTube Subs 2019” folder or whatever you called it.

They will now act as if they were normal RSS feeds.

You don’t of course get visual previews of new subscribed YouTube video content, as seen at the regular Subscriptions – YouTube. But in these days of visual click-bait and very naff graphic design, you may consider that to be a good thing.

To send the new video over to your tablet as a live clickable URL + visual preview, without any hand coding or complex privacy-invading apps, just set up a private Trello board for your YouTube picks. Drag-and-drop the video URL from your desktop browser’s URL bar and Trello will automatically form a clickable link on the created card plus a preview. Open your tablet’s Web browser, and there are your picks with previews and live clickable links to YouTube. Just as long as your tablet has Web access, they’ll play. You can of course use the Trello board for any kind of media from any service, mixing and matching in a custom slate of “to watch/listen” stuff.

You might also have success with “Send to Trello” addons for your Web browser, but the ones I found all need full account access (eek!). This Trello solution was the best I found to the surprisingly difficult problem of “send a live clickable Web URL over to my tablet” without the assistance of someone in Wheretheheckizit who wants to suck up your entire bookmarks and browsing history.


UPDATE: October 2020.

The Subscription Manager has been changed to the Channel List page, and its Export RSS feeds function has vanished.

One temporary workaround is then the Web browser UserScript YouTube RSS Feed. On refreshing a video page at YouTube, the script will show the RSS link near the name of the uploader you subscribe to, thus…

This feed URL is in the form of…

../feeds/videos.xml?channel_id=UCralF3lNmSNYFaFtul5apuw

This has been tested and is working.

So you should be able to go to your www.youtube.com/feed/channels page, and use LinkClump or similar to grab the URLs of the list of channel links. These are in the form of…

../channel/UCralF3lNmSNYFaFtul5apuw

And the RSS feed link is in the form of…

../feeds/videos.xml?channel_id=UCralF3lNmSNYFaFtul5apuw

So it’s then a simple search-replace operation to get a list of RSS feeds…

Search: /channel/

Replace: /feeds/videos.xml?channel_id=

That’s fine if you’ve only got 30 or so subscriptions. But for those with 300, 3,000 or 30,000 subscriptions to wrangle to RSS are going to need a little freeware utility to strip the YouTube page of channel links and save out a list in the form that a RSS Reader can handle.

Media Library export from WordPress.com blogs

01 Friday Mar 2019

Posted by futurilla in JURN tips and tricks, Spotted in the news

≈ Leave a comment

New to me. Free blogs hosted on WordPress.com now have a ‘Media Library export’ option…

Only available via the new-style dashboard, under ‘Settings’. It used to be the case that you could export all your posts and pages, but not their pictures and other media.

How to make a wordpress.com blog “private” in 2019

21 Thursday Feb 2019

Posted by futurilla in JURN tips and tricks

≈ 1 Comment

This is for users of the old WordPress Dashboard, who are puzzled about how to make a wordpress.com blog “private” in 2019.

1) Click on the “My Sites” wording in the top left of the old Dashboard. This is actually a clickable link button, rather than just a decorative UI header. This will cause a sidebar overlay to pop out over the left part of your old Dashboard. The sidebar is different from the usual one you use, which is seen in the picture below. At the foot of this new pop-out sidebar is “Settings”, another text label which is also clickable.

2) Here’s a screenshot of the new unfamiliar pop-out sidebar. Clicking “Settings” on this will take you over to the new style Dashboard at your WordPress.com blog…

3) Your view will be focussed onto the new-style “Settings” page. Scroll down this unfamiliar page and find a section called “Privacy”, where you can save and set the required settings.

So far as I can tell, there is no longer any way to access these particular settings from the old Dashboard.

4) Back on the sidebar of the new style Dashboard, the “People” tab then gives you access to invite people to your newly Private blog.

This “People” tab is also present on the old Dashboard, although there it goes by the name of “Users”. You may also see them called “Readers”. This means that once you have set Privacy settings, your blog can continue to be managed as usual through the old familiar Dashboard.

When setting your blog to Private, WordPress will inserting “href.li” at the beginning of Web links. This is a form of link anonymiser, and tries to keep even the existence of your blog unknown. Turn off this feature via: Settings | Reading | “I would like my links to be public” | Save.

While you are at Settings | Reading, you can also see the names (or WordPress usernames) of those you have already invited to read your blog and who have accepted the invitation.

Skyped

20 Wednesday Feb 2019

Posted by futurilla in JURN tips and tricks, Spotted in the news

≈ 1 Comment

Not content with trashing the trusty old Skype desktop interface, and replacing it with shiny app-ized blah, Microsoft’s latest Skype update has now completely locked many people out of using Skype. Including me…

Microsoft seems to have developed a knack for blowing up their updates. In this case the interface, such as it is, is “frozen” and unusable.

Thus, time for a downgrade. The latest Skype Classic no longer works as a fallback, as Microsoft started blocking it from service in early 2019. Instead, I find that one can still downgrade to the Skype Classic 7.36.01 standalone installer. It works fine under Windows 8.1.x as long as you turn off its automatic updates. As a bonus, you get the old user interface back again.

Multi-line search and replace in Notepad++

12 Tuesday Feb 2019

Posted by futurilla in JURN tips and tricks

≈ 3 Comments

One of the slight drawbacks to the popular Notepad++ freeware is its lack of a multi-line search-and-replace which is friendly to non-programmer users. This can be corrected with a simple free plugin.

1. Download ToolBucket, extract its .DLL file and place this in your Notepad++ plugins folder/directory.

2. In Notepad++ go to the top menu bar. Plugins | Plugins Admin | scroll down and select ToolBucket | Install | OK.

3. On restarting Notepad++ you will now have multi-line search-replace, albiet under Plugins rather than under the native Replace menu item.

Note that for macros, multiline search-replace needs to be done as the more tricky: \n command with ‘Extended’ checked. I had no success getting a macro to record the above plugin.


(There have recently been annoying changes to the plugin folder structure in Notepad++, which have broken many older plugins — if you install to Program Files and this plugin doesn’t work, try installing it in its own folder under Plugins. If that doesn’t work then try installing it down in User / Appdata, again with / without its own folder).

YouTube: always force “sort by date” on keyword searches

25 Friday Jan 2019

Posted by futurilla in JURN tips and tricks

≈ Leave a comment

A new UserScript for Tampermonkey (or whatever UserScript addon your browser uses). Youtube: Auto-sort search results by upload date. It works! Superb.

Paperwork – free desktop OCR and search, in open source

22 Tuesday Jan 2019

Posted by futurilla in JURN tips and tricks, Spotted in the news

≈ 1 Comment

Paperwork, a new addition to my A quick guide to desktop search software post…

Paperwork, free open-source software to help a scholar get to grips with their PDF pile, without hooking into some online service that wants to gouge your data — it OCR’s all your PDFs and other documents and then searches across them quickly.

You need a big chunk of spare disk space, it seems, because if you have 25Gb of stuffed-full folders, Paperwork will want to copy all of them over to its own C:\Users\YOURNAME\papers\ folder to OCR them. That makes sense, I guess, so you keep a copy of the original non OCR’d file. But at the cost of using significant disk space for duplicated files.

It comes with optional OCR interpreters for the world’s current languages, but so far as I can see it won’t do German ‘black letter’ (for which you need this).

Under “Settings” there is a “Send anonymous usage statistics” check-box, but this is turned off by default.

It looks good, but suffers from a non-standard Windows user interface which doesn’t appeal. But one could theoretically use it only as the software that watches your “Papers” folder and auto-OCRs any new PDF placed there (for which there seems no other free non-cloud competitor with a GUI). Then you’d point dtSearch at C:\Users\YOURNAME\papers\ for indexing, and use the powerful dtSearch interface for your actual searches.

← Older posts
Newer posts →
RSS Feed: Subscribe


Please become my patron at www.patreon.com/davehaden to help JURN survive and thrive.

JURN

  • JURN : directory of ejournals
  • JURN : main search-engine
  • JURN : openEco directory
  • JURN : repository search
  • Categories

    • Academic search
    • Ecology additions
    • Economics of Open Access
    • How to improve academic search
    • JURN blogged
    • JURN metrics
    • JURN tips and tricks
    • JURN's Google watch
    • My general observations
    • New media journal articles
    • New titles added to JURN
    • Official and think-tank reports
    • Ooops!
    • Open Access publishing
    • Spotted in the news
    • Uncategorized

    Archives

    • February 2026
    • January 2026
    • October 2025
    • May 2025
    • April 2025
    • September 2024
    • June 2024
    • May 2024
    • April 2024
    • March 2024
    • February 2024
    • January 2024
    • December 2023
    • November 2023
    • October 2023
    • September 2023
    • June 2023
    • May 2023
    • January 2023
    • December 2022
    • November 2022
    • October 2021
    • September 2021
    • August 2021
    • July 2021
    • June 2021
    • May 2021
    • April 2021
    • March 2021
    • February 2021
    • January 2021
    • December 2020
    • November 2020
    • October 2020
    • September 2020
    • August 2020
    • July 2020
    • June 2020
    • May 2020
    • April 2020
    • March 2020
    • February 2020
    • January 2020
    • December 2019
    • November 2019
    • October 2019
    • September 2019
    • August 2019
    • July 2019
    • June 2019
    • May 2019
    • April 2019
    • March 2019
    • February 2019
    • January 2019
    • December 2018
    • November 2018
    • October 2018
    • September 2018
    • August 2018
    • July 2018
    • June 2018
    • May 2018
    • April 2018
    • March 2018
    • February 2018
    • January 2018
    • December 2017
    • November 2017
    • October 2017
    • September 2017
    • August 2017
    • July 2017
    • June 2017
    • May 2017
    • April 2017
    • March 2017
    • February 2017
    • January 2017
    • December 2016
    • November 2016
    • October 2016
    • September 2016
    • August 2016
    • July 2016
    • June 2016
    • May 2016
    • April 2016
    • March 2016
    • February 2016
    • January 2016
    • December 2015
    • November 2015
    • October 2015
    • September 2015
    • August 2015
    • July 2015
    • June 2015
    • May 2015
    • April 2015
    • March 2015
    • February 2015
    • January 2015
    • December 2014
    • November 2014
    • October 2014
    • September 2014
    • August 2014
    • July 2014
    • June 2014
    • May 2014
    • April 2014
    • March 2014
    • February 2014
    • January 2014
    • December 2013
    • November 2013
    • October 2013
    • September 2013
    • August 2013
    • July 2013
    • June 2013
    • May 2013
    • April 2013
    • March 2013
    • February 2013
    • January 2013
    • December 2012
    • November 2012
    • October 2012
    • September 2012
    • August 2012
    • June 2012
    • May 2012
    • April 2012
    • March 2012
    • February 2012
    • January 2012
    • December 2011
    • November 2011
    • October 2011
    • September 2011
    • August 2011
    • July 2011
    • June 2011
    • May 2011
    • April 2011
    • March 2011
    • February 2011
    • January 2011
    • December 2010
    • November 2010
    • October 2010
    • September 2010
    • August 2010
    • July 2010
    • June 2010
    • May 2010
    • April 2010
    • March 2010
    • February 2010
    • January 2010
    • December 2009
    • November 2009
    • October 2009
    • September 2009
    • August 2009
    • July 2009
    • June 2009
    • May 2009
    • April 2009
    • March 2009
    • February 2009

    Proudly powered by WordPress Theme: Chateau by Ignacio Ricci.