How to delete the invasive new “Share with Skype” menu item

Here’s how to delete the invasive new “Share with Skype” menu item, newly located on your right-click menu in your Windows PC. This has been added without permission by the latest update for desktop Skype, and is a pointless distraction for anyone who just uses Skype for calls.

There appears to be no way to turn it off from within Skype. I can’t get it to show up in any context menu-editor except the Windows Registry Editor.

How to remove it…

1. Go to the Windows Start menu. In the search box type regedit to launch the Windows Registry Editor.

2. The key you want to delete is easily found under…

HKEY_CLASSES_ROOT\*\shell

3. Right-click on the key’s label (shown here highlighted in blue). Delete it.

4. Exit the Registry Editor.

The menu item is gone, but not gone for good. It will return when desktop Skype is next updated, and the key will thus need to be repeatedly deleted.

OApen update

As of yesterday OAPEN has a new URL path for its record-pages and PDFs, with (it seems) no re-directs. The URL paths have been updated in JURN, but they are not yet known to Google Search — and thus JURN is temporarily without OAPEN results.

They are generally quite verbose in terms of spawning pages that show up in Google Search, but not as horribly verbose as DOAB. Thus, while not perfect, OAPEN is found in JURN and not the DOAB.

DOI hard

“On the Persistence of Persistent Identifiers of the Scholarly Web” is a new paper from Los Alamos, finding that many DOIs in a 10,000 random sample are unreachable…

“consistently across request methods, more than half of our DOIs fail to successfully resolve to a target resource”

Despite the misleading “2004” tag on the page identifier tag, the paper was actually presented in March 2020 at the CNI Spring 2020 Project Briefings.

ACM Digital Library, free until June 2020

The Association for Computing Machinery’s substantial ACM Digital Library is now free until the end of June 2020. Includes magazine and journals. A test shows that the most recent issues of these are included. There doesn’t appear to be a log-on requirement, they’re just all free to visitors. There’s also a handy unified search-box…

Open Access discovery wranglers may find the ACM workflow handbook Data Cleaning (July 2019) of special interest.

Attitudes of North American Academics toward Open Access Scholarly Journals

A new survey “Attitudes of North American Academics toward Open Access Scholarly Journals”. A questionnaire was sent to 15,000 in the U.S. and Canada, both faculty and grad students, with 2,121 responses. The results indicated a high level of antipathy toward open access in the Arts & Humanities. Rather more surprisingly, it was about the same in Social Studies…

How to extract hardcoded subtitles from an old video

VideoSubFinder is Windows freeware to auto-detect and extract hard-coded subtitles from videos, saving the results to a series of screen grabs — containing only the subtitle lettering at large size and thus ready for OCR. VideoSubFinder appears to be the best option for occasional use by media archivists, and also publishers and editors who want to extract to text.

It’s been tested by me and is working nicely ‘out of the box’ on an old 17 minute video. It does not appear to have native dependencies other than requiring the Microsoft Visual C++ Redistributable for Visual Studio 2017, which most Windows users will already have installed. Its output does however require Finereader or similar for OCR processing (see below).

The use-case here is: you have an old interview where where the audio is degraded and/or the speaker has heavily accented English, or where the subtitles are translations, which means you can’t just upload it to YouTube and have closed captions automatically generated in a twinkling by eager Googlebots. But you do have good hardcoded English subtitles on the video frames, which someone spent time creating — perhaps decades ago.

Using the software is tricky, despite the simple interface, as there’s no Help. My noted workflow is as follows…

1. Open your video.

2. Scrub the video’s timeline to the desired starting frame. Then on the top menu: Edit | set Beginning Time.

3. Drag down the little sliders (they look like black fly-specks and are easily overlooked) seen in the corners of the video, so as to precisely frame the area where the subtitle line appears.

4. In the lower panel, switch to the OCR tab and press “Create cleared TXT images”. Subtitles should be extracted from the video frames as ‘lettering only’. This should take a while, but less time that actually playing the video. Now might be a good time for a coffee break.

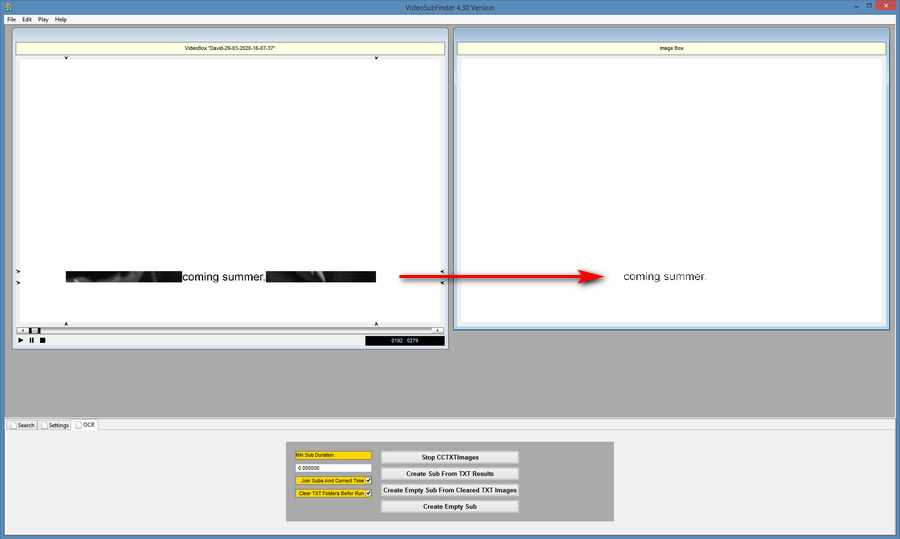
5. Once this process has completed, you then open up the software’s TXTImages folder…

..\VideoSubFinder_4.30_x64\Release_x64\TXTImages

And inside there are a series of large .JPEG images containing the extracted text as large cleaned image-captures, all ready to be OCRd.

So far as I can tell there’s no built in OCR engine with VideoSubFinder, nor any way to plug one in. So now you switch to OCR software such as Finereader.

6. In Finereader, sort the files correctly and then open all the files (Ctrl+A) found in the ..\TXTImages folder. There is no need to resize as Finereader can handle humongous file sizes, unlike the full Adobe Acrobat. Processing should be straightforward and fast, just let it finish. Then save the results out to a single .TXT file and edit.

Apparently, for making new .SRT subtitles, one can then also use this Finereader output file with the “Create Sub From TXT Results” button in VideoSubFinder, and the result should be a timecoded set of subtitles. But for the purposes of an archivist or editor extracting a text interview, this step is not needed.

If you’re going to need to do this sort of thing often and you have a generous boss, then Microsoft Video Indexer is likely to be your friend.

UserScript ‘Google search in several columns’ – temporary fix

This is an update to my January 2020 Google Search in three columns: how to do it in 2020 tutorial post. It’s needed because the key UserScript Google search in several columns has stopped working, due to changes in the Google page code. Even with this script installed, Google Search reverts to a long scrolling page of links, a format highly unsuited to searchers who use a widescreen desktop monitor.

For the time being, the fix is to keep on running this script, but also run these two at the same time

* Stylus UserStyle Google – show search result in two columns and hack the script to show “3” columns.

* Stylus UserStyle Google Search in columns with “3” columns set on install.

On a widescreen monitor, a manual fix the top of the Stylus UserStyle ‘Google Search in columns’ also helps with overlap between results…


/* columns */

.big .mw,
.s {
max-width: unset !important;

to…


/* columns */

.big .mw,
.s {
max-width: 80% !important;

The result gives imperfect but reasonably acceptable three-column display for Google Search and Books results…

‘Google – show search result in two columns’ will need to be temporarily turned off for Google News results.

Note that I have the UserScript Google search in several columns set not to work on Google Books, having added a couple of lines to the script. See my linked post for instructions on how to add that blocking.

See my full Google Search in three columns: how to do it in 2020 tutorial for details of how to bock other page elements, such as huge ‘video suggestions’ blocks and cover thumbnails for Google Books results.